Every few years, we hear about someone building a computer from first principles. This doesn’t mean getting a 6502 or Z80, wiring it up, and running BASIC. I’m talking about builds from the ground up, starting with logic chips or even just transistors.
[James Newman]’s 16-bit CPU built from transistors is something he’s been working on for a little under a year now, and it’s shaping up to be one of the most impressive computer builds since the days of Cray and Control Data Corporation.
The 10,000 foot view of this computer is a machine with a 16-bit data bus, a 16-bit address bus, all built out of individual circuit boards containing single OR, AND, XOR gates, decoders, multiplexers, and registers. These modules are laid out on 2×1.5 meter frames, each of them containing a schematic of the computer printed out with a plotter. The individual circuit modules sit right on top of this schematic, and if you have enough time on your hands, you can trace out every signal in this computer.
The architecture of the computer is more or less the same as any 16-bit processor. Three are four general purpose registers, a 16 bit program counter, a stack pointer, and a status register. [James] already has an assembler and simulator, and the instruction set is more or less what you would expect from a basic microprocessor, although this thing does have division and multiplication instructions.
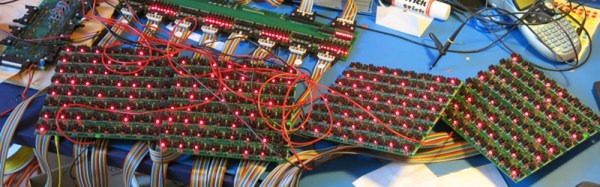
The first three ‘frames’ of this computer, containing the general purpose registers, the state and status registers, and the ALU, are already complete. Those circuits are mounted on towering frames made of aluminum extrusion. [James] already has 32 bytes of memory wired up, with each individual bit having its own LED. This RAM display will be used for the Game of Life simulation once everything is working.
While this build may seem utterly impractical, it’s not too different from a few notable and historical computers. The fastest computer in the world from 1964 to ’69 was built from individual transistors, and had even wider busses and more registers. The CDC6600 was capable of running at around 10MHz, many times faster than the estimated maximum speed of [James]’ computer – 25kHz. Still, building a computer on this scale is an amazing accomplishment, and something we can’t wait to see running the Game of Life.
Thanks [aleksclark], [Michael], and [wulfman] for sending this in.