Building A Miniature X-ray Tube

tube

We’ve seen homemade x-ray devices and we’ve seen people making vacuum tubes at home. We’ve never seen anyone make their own x-ray tube, though, and it’s doubtful we’ll ever see the skill and craftsmanship that went into this build again.

An x-ray tube is a simple device; a cathode emits electrons that strike a tungsten anode that emits x-rays. Most x-ray tubes, though, are relatively large with low-power mammography tubes being a few inches in diameter and about 6 inches long. In his amazing 45-minute-long video, [glasslinger] shows us how to make a miniature vacuum tube, a half-inch in diameter and only about four inches long.

For those of you who love glass lathes, tiny handheld spot welders and induction heaters, but don’t want your workshop bathed in x-rays, [glasslinger] has also built a  few other vacuum tubes, including a winking cat Nixie tube. This alternate cat’s eye tube was actually sealed with JB Weld, an interesting technique if you’d ever like to make a real home made tube amp.

AM Tube Radio Restored And Given MP3 Playback Too

mp3-antique-radio

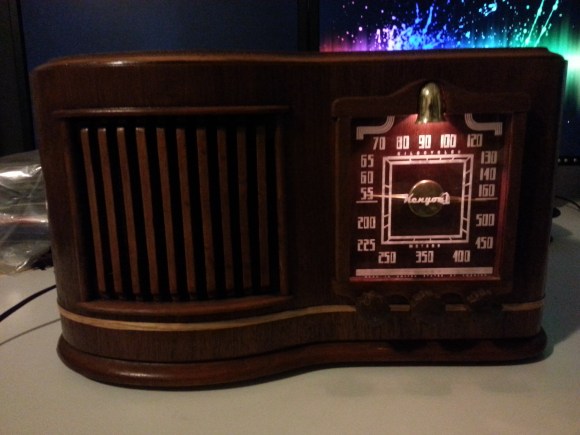
This AM radio looks a bit like it did coming out of the factory. But there are a lot of changes under the hood and that faceplate is a completely new addition. The project really is a restoration with some augmentation and [Michael Ross] did a great job of documenting the project.

The Kenyon radio was built in 1946 and uses vacuum tubes for the amplifier. Considering its age this was in relatively good shape and the first thing that [Michael] set out to do was to get the electronics working again. It involved replacing the messy collection of capacitors inside. He then cleaned up the tubes, checking for any problems, and put the electronics back together to find they work great!

He cleaned up the chassis and gave it a new coat of finish. The original dial plate was missing so he built a wood frame to match a dial scale he ordered. The bell-shaped brass cover hides the light that illuminates the dial.

He could have stopped there but how much do people really listen to AM radio these days? To make sure he would actually use the thing he added an Arduino with an MP3 shield. It patches into the antenna port via a relay, injecting modern tunes into the old amplifier circuit. Catch a glimpse of the final project in the video after the break.

Continue reading “AM Tube Radio Restored And Given MP3 Playback Too”

Console Radio Given New Life With A WiFi Router Retrofit

tube-radio-wifi-router-retrofit

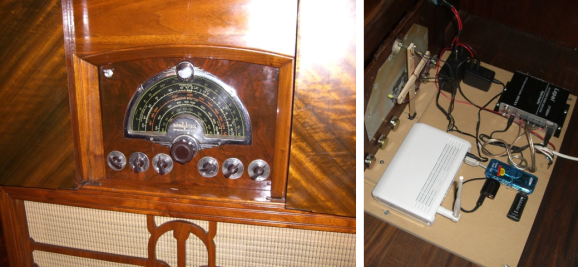
[Craig] did a great job of restoring the case of his antique console radio. But he wanted to bring the guts up to modern standards. The fix ended up being rather easy when it comes to hardware. He based his internet radio retrofit around a wireless router.

We laughed when we heard that he removed about eighty pounds of original electronics from this beast. He then cut a piece of MDF to serve as a mounting platform for the replacement hardware. The WiFi router takes care of audio playback from several sources and offers him the ability to control the stereo from a smart phone or a computer. It has a USB port to which he connected a hub to make room for the USB sound card and a thumb drive which holds his music library. The black box in the upper right is an amp which feeds the NHT stereo speakers housed in the lower half of the cabinet.

It doesn’t make use of the original knobs like the recent tube-amp conversion we looked at. But [Craig] did add some LEDs which illuminate the dial to help keep that stock look.

VFD Tube Clock Built Using Protoboard And Free-formed PSU

[James Glanville] wrote in to show of his latest tube project. It’s a clock using six IV-3 VFD tubes. In addition to the tube displays the project prominently features a blue 3D printed case which hides away all the guts of the build including the Stellaris Launchpad which drives the clock.

Speaking of guts, you’ll want to look through a few of [James’] other posts on the project. His first write-up on this clock shows off the protoboard and point-to-point soldering that makes the tubes work. To help simplify things he went with a MAX6921 VFD driver chip. He mounted it dead-bug style on its own piece of protoboard and then soldered all of the necessary connections to the larger hunk hosting the tubes. There’s also an interesting post that details the switch mode power supply which ramps the USB 5V power all the way up to the 50V used to drive the displays.

If you like this you should check out the first VFD clock he built. We featured it a while back in a links post.

Cute Little Amplifier Has A Tube Pre

tube

While you won’t catch us in an argument with an audiophile regarding the sound quality of tube vs. solid state amps, there is a general consensus that tube amplifiers sound much better than their transistorized brethren. Actually building an all-tube amplifier, though, is a bit harder than one built around common ICs – there are transformers to deal with and of course very high voltages. One solution to get the sound of tubes easily but still retaining the simplicity of integrated circuits is a hybrid amp, or a tube preamplifier combined with a solid state power section. They’re easy enough to build as [Danilo] shows us with his hybrid tube amp design (Italian, translation).

[Danilo]’s design uses two ECC86 for the left and right channels powered by a 12 Volt supply. Each channel is sent through a tube and then amplified by a TDA2005 20 Watt power amplifier. After plugging in a CD player, the result is a clear, warm sound that can put a whole lot of power through a speaker.

ATtiny Controlled Magic Eye Tube

In the early days of broadcast radio, the most expensive radio sets were extremely impressive pieces of furniture. With beautifully crafted wooden cases polished to a high shine, these wireless receivers were the focal point of any family room. Some of the most expensive radio sets even included a visual indicator signaling the strength of the reception, something [Marcus] decided to re-engineer using an ATtiny85.

The display tube in question is an EM800 magic eye tube, used in radio sets, stereos, and electronic test equipment as a rudimentary display indicator. By applying a control voltage (from 0 to -10V), the illuminated display can be controlled like a bar graph display.

[Marcus]’ tube display is built around an ATtiny85 microcontroller, using a homemade PCB. It’s a fairly simple build, once the issue of supplying 250 Volts to the EM800’s anode is taken care of.

In the video after the break, you can see the bar display of [Marcus]’s magic eye tube slowly growing and receding, perfect for either displaying the current CPU load on your computer or anything else a dynamic bar graph display would be used.

Continue reading “ATtiny Controlled Magic Eye Tube”