Using The ESP8266 For Low-Cost Fault Injection

As a general concept, fault injection is a technique that studies how a system reacts to unusual or unexpected external forces. The idea is that, if you can trigger a glitch at the precise moment, you might be able to use that to your advantage in disabling security features or otherwise gaining further access to the device in question. In the hardware world, this could be achieved by fiddling with the power going into the device, or subjecting it to extreme temperatures.

We’ve covered voltage glitching attacks on these pages in the past, but most of the tools used are fairly expensive if you’re not doing this kind of thing professionally. Luckily for us, [Aditya Patil] has developed a fault injection tool that can run on a standard ESP8266 development board. Obviously it’s not as capable as a bespoke device costing hundreds of dollars, but if you just want to experiment with the concept, it’s a fantastic way to wrap your head around it all.

Continue reading “Using The ESP8266 For Low-Cost Fault Injection”

Use PicoGlitcher For Voltage Glitching Attacks

We see a fair few glitcher projects, especially the simpler voltage glitchers. Still, quite often due to their relative simplicity, they’re little more than a microcontroller board and a few components hanging off some wires. PicoGlitcher by Hackaday.IO user [Matthias Kesenheimer] is a simple voltage glitcher which aims to make the hardware setup a little more robust without getting caught up in the complexities of other techniques. Based on the Raspberry Pico (obviously!), the board has sufficient niceties to simplify glitching attacks in various situations, providing controllable host power if required.

A pair of 74LVC8T245 (according to the provided BoM) level shifters allow connecting to targets at voltages from 1.8 V to 5 V if powered by PicoGlitcher or anything in spec for the ‘245 if target power is being used. In addition to the expected RESET and TRIGGER signals, spare GPIOs are brought out to a header for whatever purpose is needed to control a particular attack. If a programmed reset doesn’t get the job done, the target power is provided via a TPS2041 load switch to enable cold starts. The final part of the interface is an analog input provided by an SMA connector.
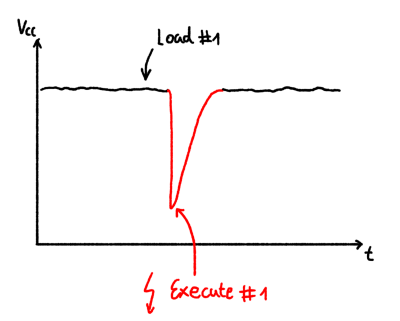
The glitching signal is also brought out to an SMA connector via a pair of transistors; an IRLML2502 NMOS performs ‘low power’ glitching by momentarily connecting the glitch output to ground. This ‘crowbarring’ causes a rapid dip in supply voltage and upsets the target, hopefully in a helpful way. An IRF7807 ‘NMOS device provides a higher power option, which can handle pulse loads of up to 66A. Which transistor you select in the Findus glitching toolchain depends on the type of load connected, particularly the amount of decoupling capacitance that needs to be discharged. For boards with heavier decoupling, use the beefy IRF7807 and accept the glitch won’t be as sharp as you’d like. For other hardware, the faster, smaller device is sufficient.

The software to drive PicoGlitcher and the hardware design files for KiCAD are provided on the project GitHub page. There also appears to be an Eagle project in there. You can’t have too much hardware documentation! For the software, check out the documentation for a quick overview of how it all works and some nice examples against some targets known to be susceptible to this type of attack.

For a cheap way to glitch an STM8, you can just use a pile of wires. But for something a bit more complicated, such as a Starlink user terminal, you need something a bit more robust. Finally, voltage glitching doesn’t always work, so the next tool you can reach for is a picoEMP.

Continue reading “Use PicoGlitcher For Voltage Glitching Attacks”

To the left, a breadboard with the ATMega328P being attacked. To the right, the project's display showing multiple ;) smiley faces, indicating that the attack has completed successfully.

Glitching An ATMega328P Has Never Been Simpler

Did you know just how easily you can glitch microcontrollers? It’s so easy, you really have no excuse for not having tried it out yet. Look, [lord feistel] is doing glitching attacks on an ATMega328P! All you need is an Arduino board with its few SMD capacitors removed or a bare 328P chip, a FET, and some sort of MCU to drive it. All of these are extremely generic components, and you can quickly breadboard them, following [lord feistel]’s guide on GitHub.

In the proof-of-concept, you can connect a HD44780 display to the chip, and have the victim MCU output digits onto the display in an infinite loop. Inside of the loop is a command to output a smiley face – but the command is never reachable, because the counter is reset in an if right before it. By glitching the ATMega’s power input, you can skip the if and witness the ;) on your display; it is that simple.

What are you waiting for? Breadboard it up and see for yourself, this might be the method that you hack your next device and make it do your bidding. If the FET-and-MCU glitching starts to fail you at some point, there’s fancier tools you can use, like the ChipWhisperer. As for practical examples, [scanlime]’s elegant glitching-powered firmware hack is hard to forget.

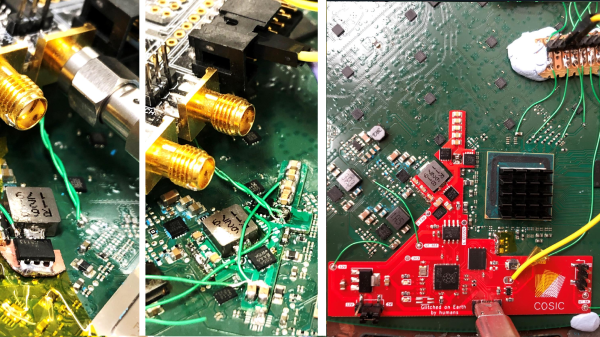
side by side, showing hardware experiments with capacitor gating through FETs, an initial revision of the modchip board with some fixes, and a newer, final, clean revision.

A Modchip To Root Starlink User Terminals Through Voltage Glitching

A modchip is a small PCB that mounts directly on a larger board, tapping into points on that board to make it do something it wasn’t meant to do. We’ve typically seen modchips used with gaming consoles of yore, bypassing DRM protections in a way that a software hacks couldn’t quite do. As software complexity and therefore attack surface increased on newer consoles, software hacks have taken the stage. However, on more integrated pieces of hardware, we’ll still want to return to the old methods – and that’s what this modchip-based hack of a Starlink terminal brings us.

[Lennert Wouters]’ team has been poking and prodding at the Starlink User Terminal, trying to get root access, and needed to bypass the ARM Trusted Firmware boot-time integrity checks. The terminal’s PCB is satellite-dish-sized, so things like laser fault injection are hard to set up – hence, they went the voltage injection route. Much poking and prodding later, they developed a way to reliably glitch the CPU into verifying a faulty firmware, and got to a root shell – the journey described in a BlackHat talk embedded below. Continue reading “A Modchip To Root Starlink User Terminals Through Voltage Glitching”

Starlink Ground Stations Successfully Hacked

Belgian security researcher [Lennert Wouters] has gotten his own code running on the Starlink “Dishy McFlatface” satellite terminals, and you can too! The hack in question is a “modchip” with an RP2040 and a MOSFET that crowbars the power rails, browning out the main CPU exactly when it’s verifying the firmware’s validity and bypassing that protection entirely. [Lennert] had previously figured out how to dump the Starlink firmware straight from the eMMC, and with the ability to upload it back, the circle of pwnership is closed. This was a talk at DEFCON, and you can check out the slides here. (PDF)

The mod chip itself was a sweet piece of work, being tailored to fit into the Starlink’s motherboard just so, and taking good advantage of the RP2040’s PIOs, which are probably the microcontroller’s superpower.

[Lennert] says he submitted his glitch attack to Starlink and they took some precautions to make the glitching harder. In particular, [Lennert] was triggering his timing off of the USART port coming up on the Starlink unit, so Starlink just shut that down. But it’s not like he couldn’t trigger on some other timing-relevant digital signal, so he chose the eMMC’s D0 data line: they’re not going to be able to boot up without it, so this hack is probably final. No shade against Starlink here. It’s almost impossible to shield a device against an attacker who has it on their bench, and [Lennert] concludes that he found no low-hanging fruit and was impressed that he had to work so hard to get root.

What can you do with this? Not much, yet. But in principle, it could be used to explore the security of the rest of the Starlink network. As reported in Wired, Starlink says that they’ve got a defence-in-depth system and that just getting into the network doesn’t really get you very far. We’ll see!

Thanks [jef] for the tip!