A segmented lamp made of circular slices of plywood. They are arranged as shutters around a long, skinny LED bulb in the center that gives off an incadescent-looking glow. A cord trails off to the left against the grey background.

Plywood Lamp Has Customizable Light Output

There’s something about light fixtures that attracts makers like moths to a flame. [danthemakerman] wanted something with a more configurable light output and built this Sculptural and Customizable Plywood Lamp.

In his detailed build log, [danthemakerman] describes how he wanted something “sort of like an analog dimmable light.” By using a stack of split plywood donuts hinged on a brass rod, he can vary the output and shape of the lamp. These shutters allow the lamp to go from bright to nightlight without using any electrical dimming components.

The plywood was rough cut on a bandsaw before being turned on a lathe. The light cover sections were then hollowed out with a Forstner bit and split in half. The tricky bit is the overlap of the cut on the hinge side of the shutters. Cutting the piece exactly in half would’ve required a lot more hardware to make this lamp work than what was achieved by patient woodworking.

If you’d like to see more ways to make light fixtures with plywood, check out this Hexagonal Lamp, these Upcycled Plywood and Glass Lamps, or this Laser-cut Sphere Lampshade that Packs Flat.

Building An Old Guitar From A New One

Anyone who’s ever played guitar to at least the skill level required to form a terrible garage band knows the names of the most legendary guitars. The driving sound of the Gibson Les Paul played by Jimmy Page, the upside-down and smooth Fender Stratocaster from Jimi Hendrix, or the twangy Rickenbacker made famous by George Harrison are all lusted-after models. The guitar that [Frank] really wanted was a Danelectro DC59 and since they’ve been steadily creeping up in price, he decided to build his own.

The body of the clone guitar is hollow and made from effectively scrap wood, in this case plywood. As the original guitars were in fact famous for using the least expensive materials possible, this makes it a great choice for a clone. [Frank] made the guitar using almost exclusively hand tools and glued everything together, but did use a few donor parts from a modern Stratocaster-type guitar. With most of the rough shape of the guitar finished, it was time to add the parts that make the guitar sound the way that a real Danelectro should: the lipstick-style pickups. He purchased these completely separately as they are the most important part to get right to emulate the tone and feel of the original.

With everything finally soldered and assembled, [Frank] got right to work recording a sample audio track which is included at the end of the video. It certainly sounds like the original to our untrained ears, and for around $100 it’s not a bad value either. If you’d like to see a guitar built from the ground up without using another as a clone, take a look at this build which brings a completely original guitar into existence, entirely from scratch.

Continue reading “Building An Old Guitar From A New One”

DIY guide saw

A Beautiful DIY Guided Saw

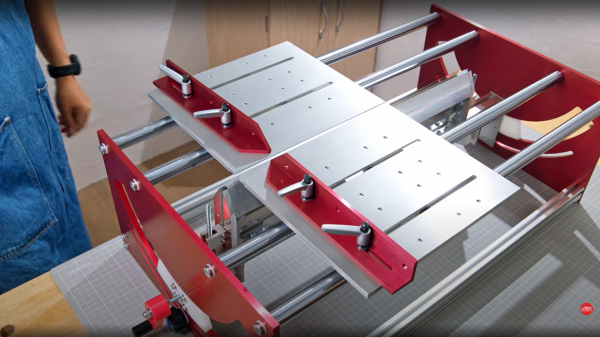
[JSK-koubou] has quite the talent for creative woodwork, particularly building interesting tools or improving existing ones. This recent project (multiple build videos below: part 1, part 2, and part 3) is a very flexible type of guided pull saw, whereby a fine-toothed saw blade is fixed in the bed, and the workpiece is pulled over it it. By fixing it at a shallow angle, and enabling the blade to be raised up through the bed, the workpiece can be progressively cut by simply pulling it over the blade, then winding it up a little until the final cut length is achieved.

From a construction perspective, the tool is all-metal, built from a collection of the off-the-shelf parts, and thick, hand-cut aluminium alloy plate, nary a CNC tool in sight. The only unusual component is the saw blade itself, which might be a bit tricky to track down if you were so inclined to reproduce the build. It appears (well if you believe the auto-translation by Google Lens, anyway) to be a spare blade for a commercial guide saw available in Japan at least.



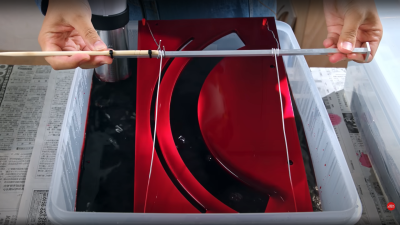
We found it particularly pleasing to see the use of a home-built anodizing setup to give it a bit of a jazzy color scheme for some of the plates, just because. Like with many of the build videos from this YouTuber, it is well worth watching all of them, if only just to gather a few ideas for one’s own workspace, if you can stop yourself getting distracted looking at all the other neat tools he uses on the way.

DIY tool builds are not uncommon in these parts, here’s a neat DIY combo table-based project, and here’s a homebrew auto-lowering metal bandsaw which could be a real timesaver.

Continue reading “A Beautiful DIY Guided Saw”

Here’s The World’s Smallest Wood Plane…Probably

Admittedly, we aren’t really in a position to confirm whether or not the miniature wood plane put together by [Daniel d’Entremont] is actually the smallest in the world, but we’re willing to take his word for it. At the very least, we certainly haven’t seen a smaller one.

In the video below, [Daniel] crafts the diminutive tool from a small block of wood by first slicing off a square using a band saw and then switching over to a small hand saw to cut out the individual pieces. These are glued together to make the body of the plane, and the shank of a small drill bit is used to hold down the wedge and blade. All told it’s about 1/2 of an inch long, and is fully functional…or at least, as functional as a 1/2 inch wood plane can be.

Interested in more miniature tools? Believe it or not, we’ve got you covered.

Continue reading “Here’s The World’s Smallest Wood Plane…Probably”

Pulling A Chainsaw With Gravity

[Flowering Elbow] had a large ash log that needed to be milled. He had his chainsaw and shared an excellent technique for an easier cut. After cutting down a tree, letting it dry for a season, and then hauling it to your saw site, you’re ready to cut. However, cutting a humongous tree with a chainsaw is an enormous task. A few hacks make it better, like tilting your log slightly downhill, so the chainsaw flows downhill or using a jig to keep the cut straight. Some use a winch system to drag the jig along to assist, so it’s not just pure manpower. The problem is that a winch will exert more force if the saw hits a knot or challenging section. So you would want to slow down and let the saw work through the area.

[Flowering Elbow] uses a pulley and offcut from the log and hangs it from a tree. The log drops as the cut progresses and exerts a constant force. This means that the saw can slow down during challenging sections and take the time it needs, extending the blade’s life. There are other excellent tips in the video, and combined with his earlier chainsaw mill jig, you’ll be set to mill up logs with nothing but a chainsaw and some ingenuity.

Video after the break.

Continue reading “Pulling A Chainsaw With Gravity”

A Solar Frame From Scratch

“From scratch” is a bit of a murky expression. How scratchy does it get? Are you just baking your bread yourself or are you growing your own wheat? Rolling your own solar installation probably doesn’t involve manufacturing your own photovoltaic cells. But when it comes to making the frame to hold your panels, why not machine your own brackets and harvest the wood from trees nearby?. That’s what [Kris Harbour] did with his over-engineered 8.4kW solar stand.

He already had a wind turbine and a few solar panels elsewhere on the property, but [Kris] wanted a bit more power. At the start of the video, [Kris] makes an offhand comment that he wants this to last 30-40 years at a minimum. Everything from the focus on the concrete footings to the oversized brackets and beams reflects that. The brackets were cut on his plasma CNC and the wood was cut to rough dimensions using a sawmill on his property. He admits that the sapwood will rot away a bit after 20ish years, but since the core of the posts is heartwood, structurally they’ll last a long time. After planing down to the right size, cutting hole and grooves was a bit of an involved procedure. The structure is quite tall once erected and we loved watching it come together. The most impressive thing here is that this structure was put together by just a single person. All the rafters were cut and hand-chiseled to the right sizes and hoisted into place. The panels ultimately weren’t delivered on time and he had to switch to using new panels rather than the used panels he was expecting.

Previously, [Kris] had shown off his impressive hydroelectric setup. We’re looking forward to seeing the new solar array power all the projects [Kris] is planning in the future. Video after the break.

Continue reading “A Solar Frame From Scratch”

Wooden Keycaps Minus The CNC

What’s the most important part of the keycap? The average user-who-cares might tell you it’s the look and feel, but a keyboard builder would probably say the mounting style. That’s where the rubber meets the road, after all. For anyone trying to make their own keycaps, ‘the mount itself’ is definitely the correct answer. Try printing your own keycaps, and you’ll learn a lot about tolerances when it comes to getting the mount right.

Conversely, you could use a subtractive process like a wood mill to make keycaps. Sounds easy enough, right? But what about all of us who don’t have access to one? [cbosdonnat], who has no CNC, has blazed a cellulose trail, combining hand-tooled wooden keycaps with 3D-printed mounts to create fully-customized keycaps. It’s a great project with concise how-to, especially when it comes to building the jigs needed to keep the keycaps consistently sized and shaped.

It makes a whole lot of sense to start by hollowing out the bottom instead of shaping the business side first or even cutting out the key shape, since the mount is mechanically vital. Why waste time on the look and feel if the foundation isn’t there yet?

Hardwood is a must for DIY keycaps, because the walls need to be thin enough to both fit over the switch and within the matrix, and be sturdy enough not to break with use. We love the look of the varnish-transferred laser-printed logo, and only wish there was a video so we could hear the clacking.

There are all kinds of ways to put legends on DIY keycaps, like waterslide decals for instance.