Gramazon Gives Your Echo Dot A 1920’s Makeover

Unless you’re particularly fond of hockey pucks, you probably aren’t really keen on the aesthetics of the NSA’s Amazon’s diminutive listening device, the Echo Dot. It’s not exactly ugly, but if anyone at Amazon spent more than ten minutes considering the visual design of the thing when it was being developed, we’d be shocked.

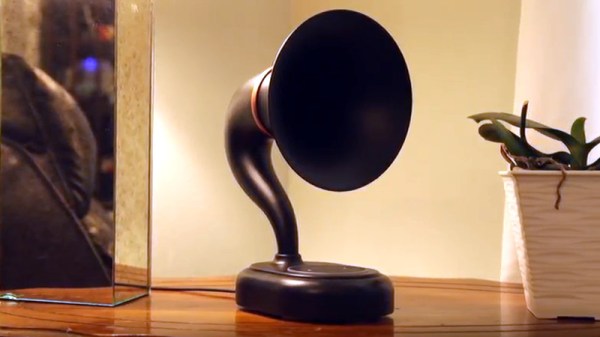
Luckily for us, there are hackers and makers who not only have the artistic chops to come up with visually appealing designs, but are kind enough to share them with those of us who are a few crayons short of a full box in that department. Such is the case with the jaw-dropping Gramazon by [Bård Fleistad], a 3D printed acoustic amplifier for the Echo Dot that converts the ho-hum looking device into a classic 1920’s style “horn” speaker.

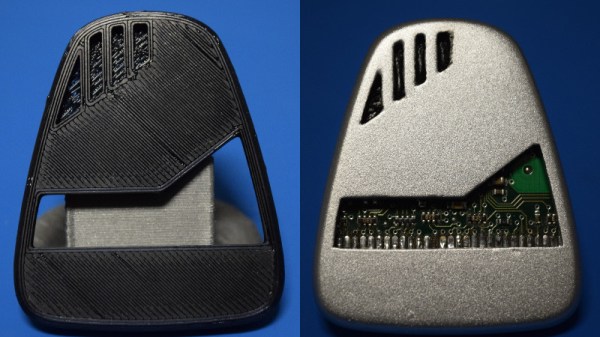
[Bård] has wanted a horn speaker for awhile, but the prices on a real one in decent condition are getting pretty high. If he couldn’t have the real deal he figured the next best thing would be to 3D print his own version, but he’d still need electronics to put into it. Since the Echo is readily available and works as a Bluetooth speaker (not to mention plays audio from various online sources), it made sense to use it as the heart of his faux-horn.

The design he came up with is very slick, but the finish work on the printed parts is really what puts this project over the edge. [Bård] used Bondo and multiple primer coats to smooth the outside of the horn, and XTC-3D for the hard-to-reach internal curves. Plus sanding. Lots, and lots, of sanding.

If you’re looking for more information on putting high quality finishes on your 3D printed parts like this, check out our Visual 3D Print Finishing Guide. Or if you’d rather just find a swanky home for your always-listening hockey puck, we’ve got plenty of inspiration for you there as well.

Continue reading “Gramazon Gives Your Echo Dot A 1920’s Makeover”

3D Printering: Print Smoothing Tests With UV Resin

Smoothing the layer lines out of filament-based 3D prints is a common desire, and there are various methods for doing it. Besides good old sanding, another method is to apply a liquid coating of some kind that fills in irregularities and creates a smooth surface. There’s even a product specifically for this purpose: XTC-3D by Smooth-on. However, I happened to have access to the syrup-thick UV resin from an SLA printer and it occurred to me to see whether I could smooth a 3D print by brushing the resin on, then curing it. I didn’t see any reason it shouldn’t work, and it might even bring its own advantages. Filament printers and resin-based printers don’t normally have anything to do with one another, but since I had access to both I decided to cross the streams a little.

The UV-curable resin I tested is Clear Standard resin from a Formlabs printer. Other UV resins should work similarly from what I understand, but I haven’t tested them.

Continue reading “3D Printering: Print Smoothing Tests With UV Resin”

Visual 3D Print Finishing Guide

With 3D printers now dropping to record low prices, more and more people are getting on the additive manufacturing bandwagon. As a long time believer in consumer-level desktop 3D printing, this is a very exciting time for me; the creativity coming out of places like Thingiverse or the 3D printing communities on Reddit is absolutely incredible. But the realist in me knows that despite what slick promotional material from the manufacturers may lead you to believe, these aren’t Star Trek-level replicators. What comes out of these machines is often riddled with imperfections (from small to soul crushing), and can require considerable cleanup work before they start to look like finished pieces.

If all you hope to get out of your 3D printer are some decent toy boats and some low-poly Pokemon, then have no fear. Even the most finicky of cheap printers can pump those out all day. But if you’re looking to build display pieces, cosplay props, or even prototypes that are worth showing to investors, you’ve got some work cut out for you.

With time, patience, and a few commercial products, you can accomplish the ultimate goal: turning a 3D printed object into something that doesn’t look like it was 3D printed. For the purposes of this demonstration I’ll be creating a replica of the mobile emitter used by the “Emergency Medical Hologram” in Star Trek: Voyager. I can neither confirm nor deny I selected this example due to the fact that I’m currently re-watching Voyager on Netflix. Let’s make it look good.

Continue reading “Visual 3D Print Finishing Guide”

Printing Objects Directly From Fallout 4

Fallout 4 was released about a month ago, and although we don’t have a ‘took an arrow to the knee’ meme like Bethesda’s last game, there are ample opportunities for cosplay and printing out deathclaws and mirelurks on a 3D printer. How do you turn files hidden away in a game’s folders into a real, printed object? It’s actually pretty easy and [Angus] is here to tell you how.

The files for Fallout enemies and items can be readily accessed with the Bethesda Archive Extractor, although this won’t give you files that a 3D printer can understand. You’ll get a .NIF file, and NifSkope can convert the files found in the Fallout archives to an .OBJ file any 3D modeling program can understand. The next step from there is taking the .OBJ file into Meshmixer and fixing everything with Netfabb. After that, it’s off to the printer.

[Angus] printed his model of a Deathclaw in ABS in multiple parts, gluing them together with a little bit of acetone. This didn’t go exactly as planned; there were some contaminants in the ABS that turned into a white film on the black ABS. This was ultimately fixed with XTC-3D, the 3D print coating everyone is experimenting with.

The finished product is a solid yellow but completely smooth 3D model of one of the toughest enemies in Fallout 4. The only thing left to do is paint the model. The best way to proceed at this point is probably doing what model builders have been doing for decades – an airbrush, and hundreds of tiny bottles of paint. [Angus] is opening up his YouTube comments for suggestions, and if you have a better idea he’s looking for some help.
Continue reading “Printing Objects Directly From Fallout 4”