Taking Another Swing At A 3D Printed Eye Of Agamotto

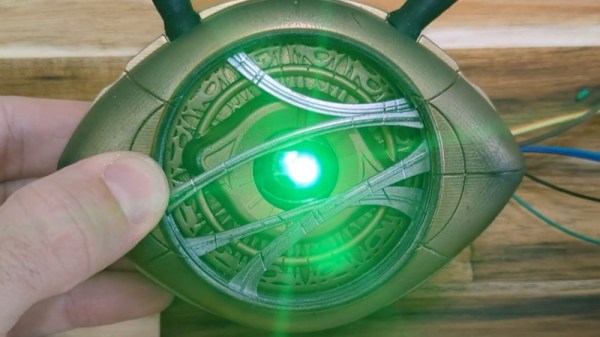
Three years ago, [Enza3D] put together a 3D printed version of the Eye of Agamotto as seen in Marvel’s Doctor Strange. It was a good looking prop, but there was definitely some room for improvement in terms of screen accuracy and scale. With a new Strange film now in theaters, it seemed a good a time as any to revisit the design and tighten up some loose ends.

As you might expect for something that’s supposed to be magic, the internal mechanism required to get all of the moving parts going is quite complex. Not only does the iris need to open and close, but the rings need to spin at different speeds to recreate the effect seen in the film. Impressively, there’s not a single line of code or a microcontroller to be seen here — everything is done with a carefully designed set of a gears and a single N20 motor.

Magical relic, some assembly required.

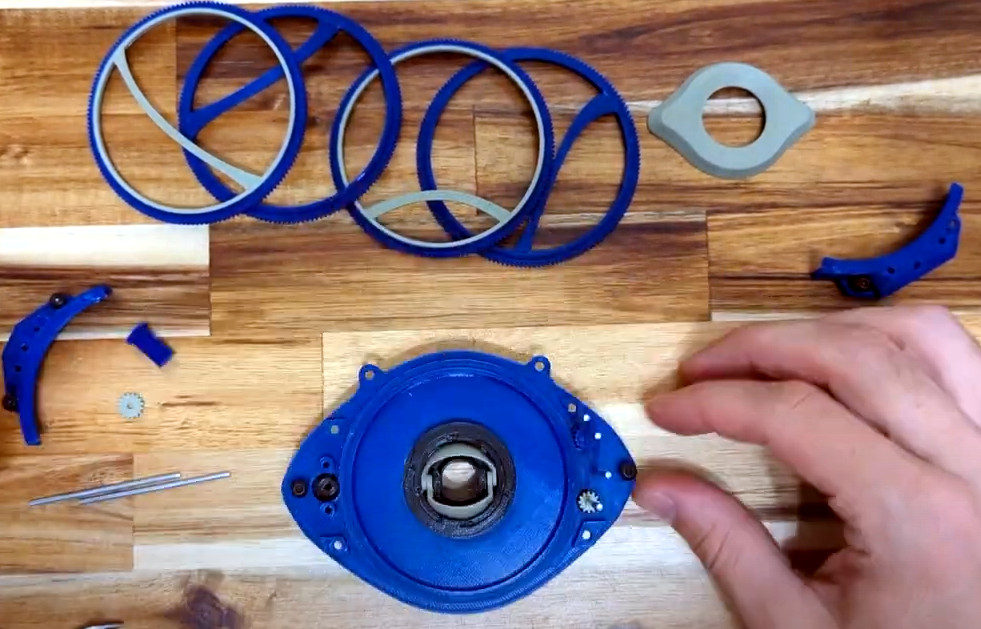
[Enza3D] tried to simplify the construction of the clockwork-like mechanism as much as possible compared to the earlier version, and made some nice improvements like unifying the size of the screws and shafts used in the assembly so there’s no danger of using the wrong part. Despite their size and fine pitch, all of the gears can be printed on a standard FDM desktop printer, in this case a Prusa Mini.

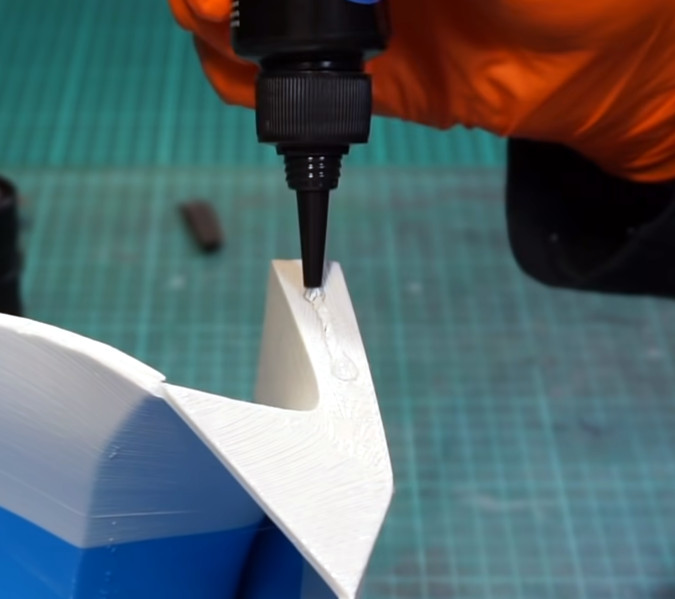
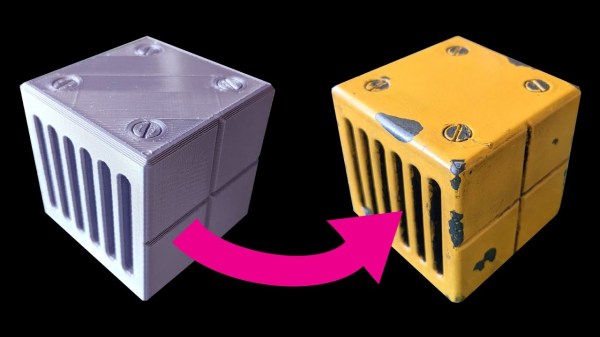
That said, [Enza3D] did switch over to resin prints for the outside of the prop. Incidentally, in another clever design decision, the outer ornamental case is completely separate from the internal powered mechanism. That lets you easily take the unit apart for maintenance or repairs without risking damage to your finish work. Check out the video after the break for a breakdown of how the device is assembled, as well as some tips on how to make shiny pieces of plastic look like aged metal.

Truth be told, if we were working on our own Doctor Strange cosplay, our first pick would still be the ridiculously awesome POV spellcasting gun we covered back in 2018 — but this beauty comes in at a close second for sure.

Continue reading “Taking Another Swing At A 3D Printed Eye Of Agamotto”

UV Resin Perfects 3D Print, But Not How You Think

At this point, everyone knows that the print quality you’ll get from even an entry level UV resin printer far exceeds what’s possible for filament-based fused deposition modeling (FDM) machines. But there’s a trade-off: for the money, you get way more build volume by going with FDM. So until the logistics of large-format resin printers gets worked out, folks looking to make things like replica prop helmets have no choice but to put considerable time into post-processing their prints to remove the obvious layer lines.

But thanks to this somewhat ironic trick demonstrated by [PropsNstuff], you can actually use UV resin to improve the finish quality of your FDM prints. The idea is to put a layer of resin over the layer lines and other imperfections of the 3D print, cure it with a handheld UV flashlight, and then sand it smooth. Essentially it’s like using resin in place of a body filler like Bondo, with the advantage here being that the resin cures in seconds.

The thick resin fills in tough spots quickly.

Now to be clear, this isn’t a new idea. Our very own [Donald Papp] investigated the process back in 2018, and [Thomas Sanladerer] covered the idea in a video of his own the following year. But the difference here is that [PropsNstuff] doesn’t just coat the whole print with resin, he takes a more methodical approach. Working in small sections, he targets areas that really need the high-build properties offered by this technique.

With the tough spots addressed, he then moves on to coating larger areas with resin. But this time, he mixes leftover resin from his SLA printer with talcum powder to make a mix that can be brushed on without running everywhere. It takes a few thin coats, but with this mix, he’s able to build up large swaths of the print without losing any surface detail.

Is it still a hassle? Absolutely. But the final result does look spectacular, so until we figure out how to build the replicators from Star Trek, it looks like we’ll have to make up for our technological shortcomings with the application of a little elbow grease.

Continue reading “UV Resin Perfects 3D Print, But Not How You Think”

Give 3D Printed Plastic A Well-Worn Metal Look

Affordable 3D printers let us turn ideas into physical reality without a big expensive workshop, but with their power came some disadvantages. The nature of FDM printers impart layer lines and nozzle ridges in the parts they produce. They can be minimized with optimized print settings, but never eliminated. [Emily Velasco] loves the power of 3D printing but not how the parts look. So she put in the effort to make 3D-printed plastic look like distressed metal and showed us how she did it. (Video also embedded after the break.)

This video is a follow-up to her Pet Eye project in response to feedback on Twitter. She had mentioned that the  salvaged metal box for Pet Eye wasn’t quite big enough to hold everything, so she had to extend its internal volume with a 3D print box on the back. It fit in so well that the offhand comment surprised many people who wanted to know more about how it was done. So she designed a demonstration cube covered with mechanical characteristics, and gave us this walkthrough of its transformation.

Continue reading “Give 3D Printed Plastic A Well-Worn Metal Look”

Finishing FDM Prints With SLS Resin

[Thomas Sanladerer] has a filament-based 3D printer and a resin one. Can the two types of raw material combine to make something better? [Thomas] did some experiments using some magnets to suspend the parts and a hot air soldering gun to heat things up.

The trick turns out to be cutting the resin with alcohol. Of course, you also need to use a UV light for curing.

The parts looked pretty good, although he did get different results depending on a few factors. To see how it would work on a practical part, he took a very large printed alien egg. The problem is, the egg won’t fit in the curing station. A few minutes with a heat sink, a drill press, and an LED module was all it took to build a handheld UV curing light.

The good news is you don’t need a resin printer to take advantage of the process — just the resin. He also points out that if you had parts which needed to maintain their dimensions because they mate with something else, you could easily mask the part to keep the resin away from those areas.

If this video (and the results it shows) has you interested, then you’ll love the in-depth account that [Donald Papp] wrote up last year about his own attempts to smooth 3D printed parts with UV resin.

Continue reading “Finishing FDM Prints With SLS Resin”

The Only Cassette Player Worth Owning In 2019

Vinyl has the audiophiles to keep it relevant, and CDs still have the people who are scared of streaming music, but who mourns for the cassette tape? Yesterday we would have said nobody, but now that [Igor Afanasyev] has unleashed his latest creation onto an unsuspecting world, we aren’t so sure anymore. A portable tape player that started as a $5 find from the Goodwill is now an outrageously gorgeous piece of electronic art thanks to 3D printing and a liberal application of LEDs.

After freeing the tape mechanism from the original enclosure and extraneous electronics like the AM/FM tuner, [Igor] got to work designing a retro styled enclosure for the hardware which would show off the complex electromechanical bits which would traditionally be hidden. With the addition of a clever 3D printed holder, he was even able to add microswitches under the original player’s buttons so he could detect the player’s current state without having to modify the electronics. This lets the finished player change the color of the RGB LEDs based on what it’s currently doing.

[Igor] came up with a very clever way of integrating light-up icons into the case by placing bright LEDs behind specially crafted thin sections of the print. It looked awesome in his tests, but after the considerable sanding, priming, and painting it took to turn the 3D printed parts into a production-quality enclosure, the LEDs are no longer visible on the final product. Even though they didn’t work in this particular case, we think it’s a brilliant technique worthy of stealing further research.

The detail that [Igor] but into this build is phenomenal. Seeing all the individual components he had to design and print to make the final product come together is really nothing short of inspirational. Projects like these are where 3D printing really shines, as trying to replicate this build with traditional manufacturing techniques would be an absolute nightmare.

If you can’t quite shake the feeling that you’ve seen this name or attention to detail before, it’s for good reason. Last year we covered another build showing the knack [Igor] has for turning the ordinary into the extraordinary.

Continue reading “The Only Cassette Player Worth Owning In 2019”

Texture Trick For 3D Prints From The Stone Age

Arguably one of the most difficult aspects of 3D printing is trying to make the finished product look like it wasn’t 3D printed. It can take a lot of time and work to cover up the telltale layer lines (or striations, if you want to get fancy), especially if your 3D printer isn’t perfectly calibrated. While there aren’t many shortcuts to achieve a glass-like finish on 3D printed parts, if your end goal is to make something that looks like stone, [Wekster] has a tip for you.

He demonstrates the technique by building a gorgeous recreation of the main gate from Jurassic Park. The process gives the relatively smooth plastic the gnarled look of rough-hewn stone with very little in the way of manual work. While it’s true there’s no overabundance of projects this stone-look finish will work for, it’s definitely something we’ll be filing away mentally.

So what’s the secret? [Wekster] first coats the 3D printed parts with common wood filler, the sort of stuff available at any hardware store. He then wraps them in clear plastic wrap, allowing the wrap to bunch up rather than trying to pull it taught. For extra detail, he digs into the plastic wrap here and there to create what will appear to be gaps and cracks on the finished piece. The wood filler is then left to dry; a process which normally only takes a few minutes, but now will take considerably longer as the plastic wrap will be keeping the air from it.

Once its hardened and unwrapped, [Wekster] sprays it with a base coat of color, and follows up with a few washings with watered down black and gray paints. This technique is well known to anyone who’s done miniature or model painting; serving to highlight the surface texture and give the finish more depth. With this method, anything that resembles a layer line in the print is long gone, and the surface looks so complex and detailed that at first glance few would believe it’s plastic.

[Wekster] also used wood filler during the finishing process for his Fallout 4 “Thirst Zapper” replica. In the past we’ve shown how you can smooth out 3D printed parts with epoxy and taken a very scientific look at using UV resin as a conformal coating, but maybe it’s time we give wood filler a shot.

Continue reading “Texture Trick For 3D Prints From The Stone Age”

Gaming System Built With Kite, The DIY Android Kit

As a gamer, [Lexie Dostal] dreamed of a smartphone that was a viable gaming platform: something with enough power to run the games and emulators he was interested in, with the controls to make playing them feel natural. So when he got his hands on an early version of Kite, the modular open hardware platform designed to be hacked and customized, that’s exactly what he decided to build. The Kite kit would provide the touch screen and Android-equipped motherboard, he just needed to design a case and integrate controls to make it a real gaming device.

The case design [Lexie] came up with is inspired by the bottom half of the Nintendo 3DS, and ended up only a few centimeters wider than the stock case from the Kite kit. Unfortunately, his delta 3D printer wasn’t large enough to fit the device’s case, so he ended up having to break it into five separate pieces and glue them together. With the case in one piece he worked his way from 220 to 400 grit sand paper, filling any voids in the print with glue as he went. A few coats of primer, more sanding, and a final matte texture spray give the final case a very professional-looking finish.

Not only was the Nintendo 3DS an inspiration for the device, it was also a donor for some of the parts. The directional pad, analog “nub”, and buttons are replacement 3DS hardware, which is interfaced to the KiteBoard with an Arduino Nano. When he couldn’t find springs small enough to use for the shoulder buttons, he bought some thin music wire and wound them himself. Talk about attention to detail.

There’s quite a bit of gear packed into the case, but [Lexie] thinks there’s probably still room to make some improvements. He could free up some room by dropping the connectors and soldering everything directly, and says he’d like to come up with a custom PCB to better interface with the 3DS’s hardware to cut down on some of the wiring required. With the extra room he thinks the battery, currently a 3200 mAh pack designed for the LG V20 smartphone, could probably be replaced with something even bigger.

Readers may recall that the Kite is currently in the running for the 2018 Hackaday prize. Seeing Kite already delivering on the promise of making it easier to develop powerful Android devices is very exciting, and we can’t wait to see what else hackers will be able to do with it.