Drones fill the sky raining hellfire on unsuspecting civilians below. Self-driving cars only cause half as many accidents as carbon-based drivers. Autonomous vehicles are the future, no matter how bleak that future is. One thing we haven’t seen much of is autonomous marine vehicles, be they submarines, hovercrafts, or sailboats. That’s exactly what [silvioBi] is building for his entry into the Hackaday Prize: a sailboat that will ply the waters of Italy’s largest lake.
Every boat needs a hull, but this project will need much more, from electronics to solar panels to sensors. Luckily for [silvio], choosing a hull is as simple as heading over to eBay. [silvio] picked up a fiberglass boat hull for about €40 that fill fit both is needs and his workbench.
The electronics are a bit trickier, but the basic plan is to cover the deck with solar panels, and use a few sensors including GPS, IMU, and an anemometer to steer this sailboat around a lake. Building an autonomous vehicle is a hard challenge, and for the electronics, [silvio] has a trick up his sleeve: he’s using redundant electronics. All the sensors are connected via an I2C bus, so why not put two microcontrollers on that bus in a master and slave configuration? It won’t add much mass, and given the problems had by a few of the teams behind robotic sailing competitions, a bit of redundancy isn’t a bad thing to have.
We know what you’re thinking. There’s no way an 8 watt USB-powered soldering iron could be worth the $5 it commands on eBay. That’s what [BigClive] thought too, so he bought one, put the iron through a test and teardown, and changed his mind. Can he convince you too?
Right up front, [BigClive] finds that the iron is probably not suitable for some jobs. Aside its obvious unsuitability for connections that take a lot of heat, there’s the problem of leakage current when used with a wall-wart USB power supply. The business end of the iron ends up getting enough AC leak through the capacitors of the power supply to potentially damage MOSFETs and the like. Then again, if you’re handy to an AC outlet, wouldn’t you just use a Hakko? Seems like the iron is best powered by a USB battery pack, and [BigClive] was able to solder some surprisingly beefy connections that way. The teardown and analysis reveal a circuit that looks like it came right out of a [Forrest M. Mims III] book. We won’t spoil the surprise for you – just watch the video below.
While not truly cordless like this USB-rechargeable iron, we’d say that for the price, this is a pretty capable iron for certain use cases. Has anyone else tried one of these? Chime in on the comments and let us know what you think.
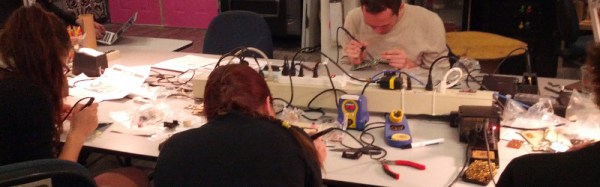
As a hackspace member, it’s easy to fall into the belief that your own everyday skills are universal. Soldering for example. You’ve handled an iron since you were a youngster, the solder bends to your will as a matter of course, and since you see your fellow makers doing the same thing you might imagine that it’s a universal hackspace skill. Everyone can do it, can’t they?
Of course, they can’t. If you weren’t lucky enough to have a parent who tolerated your occasional propensity for acquiring burns on your fingers then you probably won’t have that innate experience with an iron. This extends to people you might expect to have those skills, indeed as an electronic engineering student a couple of decades ago your scribe was surprised to find that the ability to solder was her hotly tradeable skill, amazingly even a lot of EE students couldn’t solder.
So the ability to solder is not as universal as we might expect, and your hackspace will attract plenty of people for whom it is an as-yet-unknown art. What do you do about it? If you are Vancouver Hackspace, you run a workshop whose participants are introduced to soldering through building a simple AM radio. The kit itself is not too special, it looks like one of the Elenco educational kits, but it is what the workshop represents that is important. A hackspace lives or dies by how it shares its skills, and Vancouver’s workshop is a fantastic piece of community engagement. We’d like to see more spaces doing this kind of thing.
So, perhaps it’s time to put our money where our mouth is. How difficult would it be to run a hackspace soldering workshop for the uninitiated? Assuming your space is used to the mechanics of running events, the challenge is to find for each participant a soldering iron, some solder, and a radio or other kit without breaking the bank. An ideal budget from where this is being written in the UK would be £20 (about $29), into which a Chinese kit from AliBaba or similar and a cheap iron kit could be fitted. Some work to decipher the Chinese instructions with the help of an overseas student member and to write an English manual, and we’d be ready to go. If this comes together we’ll report back on whether the non-solderers of our hackspace successfully learned the craft.
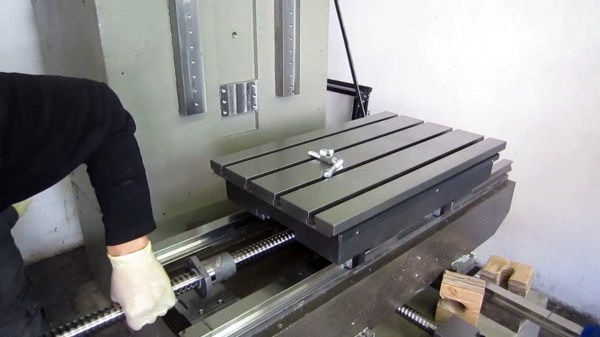
The Jargon File describes a wizard as someone who groks something to a very high degree, or the kind of person that builds a polymer concrete CNC machine with a pneumatic tool changing spindle that they designed by themselves. It makes you think that maybe Tony Stark COULD build it in a cave with scraps.
It’s a five part video series showing snippets of the build process. The last video gives an overview of the design of the machine. It is all very much in German, so if you speak German and we got anything wrong about the machine or missed anything cool, please fill us in down in the comments.
The machine starts with a 1500 kg polymer concrete pour with some steel stock embedded in it. It is then machined within an inch mm of its life as shown by practically zero deviation over its length when measured against a granite block. The wizard then goes on to make his own spindle, get castings made, and more. We liked his flowery kitchen hotplate, which he used to heat the bearings for an interference fit. It added a certain amount of style.
Unfortunately the videos don’t show the machine running, but we assume this sort of person is happily building arc reactors, power suits, and fighting crime. They probably don’t have time to film “CNC Bearbeitungszentrum im Eigenbau Teil 5”. Videos after the break.
Hackaday’s own mythical beast, Sophi Kravitz makes some amazing collaborative tech-art pieces. In this talk, she walks us through four of the art projects that she’s been working on lately, and gives us a glimpse behind the scenes into the technical side of what it takes to see an installation from idea, to prototype, and onto completion.
Watch Sophi’s talk from the Hackaday | Belgrade conference and then join us after the jump for a few more details.
We told you about these “printable” magnets a while back. When you have the ability to squeeze many smaller magnets into a tiny spot and adjust their north/south orientations at will, you can not only control the strength of the overall magnetic field, you can construct new and seemingly physics-defying widgets. This article will not focus on the magnets themselves, but instead we’re going to peel away the closed source shroud that hides the inner workings of that nifty little printer of theirs. There has been a lot of talk about these printable magnets, but very little about how they’re made. This changes today. We’ll show you how this magnetic field printer works so you can get busy making your own.
History
Several years ago, a company called Correlated Magnetic Research introduced to the world the idea of a magnetic field printer with the Mini MagPrinter. It sold for a whopping $45,000, which limited it to businesses and well-funded universities. They eventually changed their company to Polymagnet and now focus on making the magnets themselves. It appears, however, that they’ve refined their printer for a higher resolution. Skip to 2:45 in this video to see the Mini MagPrinter in action. Now skip to 7.25 in this video to see their next generation printer. Now lets figure out how they work.
What We Know
Original Mini MagPrinter
Firstly, you can toss your Kickstarter idea in the recycle bin because they hold severalpatentsfortheirprinter. But that doesn’t mean you can’t make one in your garage or for your hackerspace. Their machine might have cost $45k, but we’d be willing to bet a dozen Raspberry Pi Zeros that you could make one for two orders of magnitude less. But first we need to know how it works. Let’s look at the science first.
The Curie Point
The Curie Point is a temperature where a magnet loses its magnetic field. It is theorized that magnetism arises from the spin and angular momentum of electrons. If you get them lined up correctly, you get a magnet. When you heat the metal past the Curie Point, this alignment gets all messed up and you lose the magnetic properties. And, of course, you can align the atoms back up by introducing the metal to a strong magnetic field.
Halbach Array
A Halbach array is created when smaller magnets are arranged so their magnetic fields are focused in a particular direction and cancel out in another direction. The magnets made by the magnetic field printer can be considered Halbach arrays.
How It Works
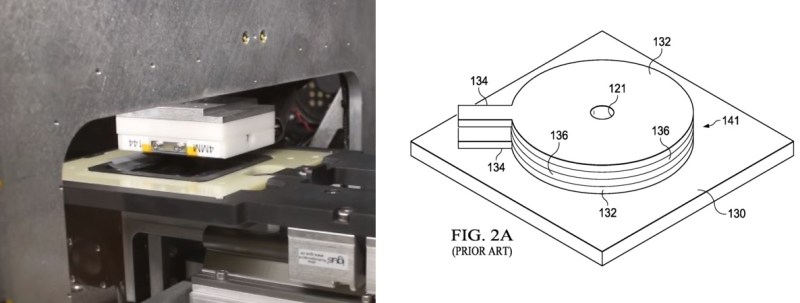
Everything begins with a blank Neodymium magnet. We’re all familiar with CNC technology, so we’ll focus on the magnetic field printing head itself. Reading through the comments of the original article, many believe that it uses a combination of heating to exceed the Curie Point and a high strength electromagnet to “write” the magnetic field into the blank. However, after looking closely at this patent, it appears this is not the case. There is no heating involved. The printer head consists of “an inductor coil having multiple layers and a hole extending through the multiple layers” and works by “emitting from the inductor coil a magnetic field that magnetizes an area on a surface of the magnetizable material…”. In short, it’s just a strong, local magnetic field.
Left – Magnetic field print head. Right – Drawing of internal structure of the print head.
Make Your Own
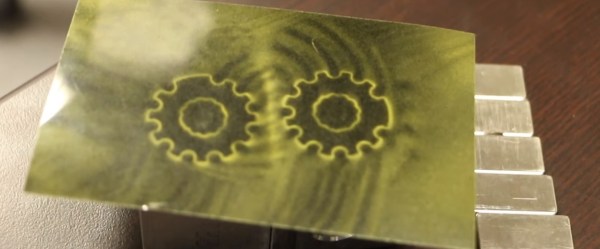
Now that you have a basic idea of how to print magnetic fields, you can start working on one of your own design. You already know how to make 3d printers and laser cutters. Just take one of these designs and replace the head with your custom-built magnetic printer head, whip up some software and bring this technology into the open source community. Blank Neodymium magnets and magnetic field viewing film are fairly cheap. First one to print the skull and wrenches logo gets a free t-shirt!
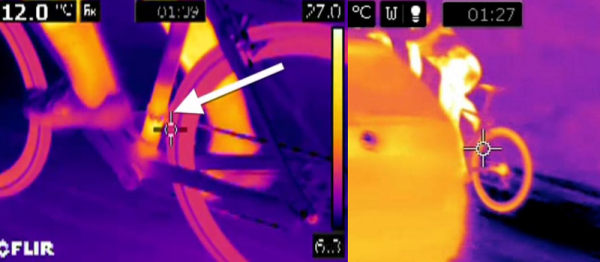
Blood doping is so last decade! The modern cyclist has a motor and power supply hidden inside the bike’s frame.
We were first tipped off to the subject in this article in the New York Times. A Belgian cyclocross rider, Femke Van den Driessche, was caught with a motor hidden in her bike.
While we don’t condone sports cheating, we think that hiding a motor inside a standard bike is pretty cool. But it’s even more fun to think of how to catch the cheats. The Italian and French press have fixated on the idea of using thermal cameras to detect the heat. (Skip to 7:50 in the franceTVsport clip.) We suspect it’s because their reporters recently bought Flir cameras and are trying to justify the expense.
The UCI, cycling’s regulatory body, doesn’t like thermal. They instead use magnetic pulses and listen for the characteristic ringing of a motor coil inside the frame. Other possibilities include X-ray and ultrasonic testing. What do you think? How would you detect a motor inside a bike frame or gearset?