3D Printing A Modular Guitar Means It Can Look Like Whatever You Want

Got some spare filament and looking to build a guitar you can truly call your own? [The 3D Print Zone] has created a modular 3D printable guitar system that lets you easily mix and match different components for the ultimate in customization.

The build is based around a central core, which combines the pickups, bridge, and neck into one solid unit. This is really the heart of the guitar, containing all the pieces that need to be in precise alignment to get those strings vibrating precisely in tune. The core then mounts to a printed outer body via mating slots and rails, which in the main demo is made to look like a Les Paul-style design. This outer body also hosts the volume, tone, and pickup controls. Output from the pickups travels to the controls in the outer body via a set of metallic contacts.

What’s cool about this build is that the sky really is the limit for your creativity. As the video below demonstrates, the main build looks like a Les Paul. But, armed with the right CAD software, you can really make a guitar that looks like whatever you want, while the 3D printer does all the hard work of making it a reality. The files to print the guitar, along with the pickups and other components, are available as kits—but there’s also nothing stopping you from working up your own printed guitar design from scratch, either.

We’ve seen some other great 3D printed guitars before, too.

Continue reading “3D Printing A Modular Guitar Means It Can Look Like Whatever You Want”

Building An Eight Channel Active Mixer

There are plenty of audio mixers on the market, and the vast majority all look the same. If you wanted something different, or just a nice learning experience, you could craft your own instead. That’s precisely what [Something Physical] did. 

The build was inspired by an earlier 3-channel mixer designed by [Moritz Klein]. This project stretches to eight channels, which is nice, because somehow it feels right that a mixer’s total channels always land on a multiple of four. As you might expect, the internals are fairly straightforward—it’s just about lacing together all the separate op-amp gain stages, pots, and jacks, as well as a power LED so you can tell when it’s switched on. It’s all wrapped up in a slant-faced wooden box with an aluminum face plate and Dymo labels. Old-school, functional, and fit for purpose.

It’s a simple build, but a satisfying one; there’s something beautiful about recording on audio gear you’ve hewn yourself. Once you’ve built your mixer, you might like to experiment in the weird world of no-input mixing. Video after the break.

Continue reading “Building An Eight Channel Active Mixer”

ESPer-CDP Plays CDs And Streams In Style

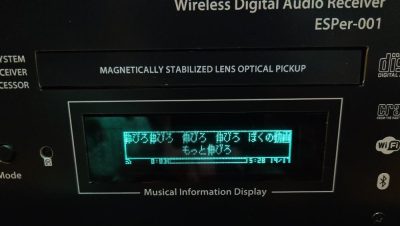
What do you get when you combine an ESP32, a 16-bit DAC, an antique VFD, and an IDE CD-ROM drive? Not much, unless you put in the work, which [Akasaka Ryuunosuke] did to create ESPer-CDP, a modern addition for your hi-fi rack.

It plays CDs (of course), but also can also scrobb the disks to Last.fm, automatically fetch track names and lyrics for CDs, and of course stream internet radio. It even acts as a Bluetooth speaker, because when you have an ESP32 and a DAC, why not? Of course we cannot help but award extra style points for the use of a VFD, a salvaged Futaba GP1232A02.  There’s just something about VFDs and stereo equipment that makes them go together like milk and cookies.

close up of front of machine showing VFD.
Between the panel and the VFD, this could almost pass as vintage Sony.

In terms of CD access, it looks like the IDE interface is being used to issue ATAPI commands to the CD-ROM drive to get audio out via S/PDIF.  (Do you remember when you had to hook your CD drive to your sound card to play music CDs?) This goes through a now-discontinued WM8805 receiver — a sign this project has been in the works for a while — that translates S/PDIF into an I2S stream the ESP32 can easily work with.

Work with it it does, with the aforementioned scrobbing, along with track ID and time-sinked lyrics via CDDB or  MusicBrainz. The ESP32 should have the computing power to pull data through the IDE bus and decode it, but we have to admit that this hack gets the job done — albeit at the expense of losing the ability to read data CDs, like MP3 or MIDI. [Akasaka Ryuunosuk] has plans to include such functionality into v2, along with the ability to use a more modern SATA CD-ROM drive. We look forward to seeing it, especially if it keeps the VFD and classic styling. It just needs to be paired with a classic amplifier, and maybe a DIY turntable to top off the stack.

Thanks to [Akasaka Ryuunosuke] for the tip. If you also crave our eternal gratitude (which is worth its weight in gold, don’t forget), drop us a tip of your own. We’d love to hear from you.

A 100-Year-Old Electronic Musical Instrument Brought Back To Life

In the early years of electrification, when electricity was beginning to shape the modern world, this new technology was being put to use in many more places than turning motors and providing lighting. Some things we can see as obvious missteps like electrified corsets marketed as health tonics or x-ray treatments for eye strain, but others ended up being fascinating bits of technology with interesting uses, many of which have been largely forgotten since. This 100-year-old musical instrument is squarely in the latter category, and this build brings the sound of it back to life.

The instrument was called the Luminaphone and was originally built by [Harry Grindell Matthews]. Of course, this was an age before transistors and many other things we take for grated, so it has some quirks that we might not otherwise expect from a musical instrument. The device generated sound by shining a series of lights through a perforated rotating disc at a selenium cell. The selenium cell was an early photoresistor, generating current corresponding to the amount of light falling on it. A keyboard activated different lights, shining on areas of the disc with different numbers of holes, causing differing sounds to be produced by the instrument.

The recreation was built by [Nick Bild] and uses a laser diode as a stand-in for the rotating disc, but since it can be modulated in a similar way the idea is that the photodiode used as a receiver would generate a similar sound. The recreation sounds a bit like a video game from the 8-bit era, but with no recordings or original Luminaphones surviving to the present day we may never know how accurate it is. There are some other electronic instruments still around today, though, and plenty of ways of DIY-ing their sound like this project which recreates the tonewheels of the classic Hammond organ.

Continue reading “A 100-Year-Old Electronic Musical Instrument Brought Back To Life”

Who Needs 100K Speakers When You’ve Got A 3D Printer?

The B&W Nautilus is, depending who you ask, either infamous or an icon of modern design. Want the look but don’t have a hundred grand to spare? [Every Project All at Once] has got a Nautilus-inspired design on printables you can run off for pennies. He also provides a tutorial video (embedded below) so you can follow along with his design process and get build instructions.

The model was done in Blender, and is designed to contain a 3.5″ full-range driver by Dayton Audio — a considerable simplification from the array of woofers and tweeters in the original Nautilus. On the other hand, they cost considerably less than a car and have no production wait list. [Every Project All At Once] is apparently working on a matching woofer if that interests you, but unless he invests in a bigger printer it seems we can safely say that would require more assembly than this project.

Of course it would also be possible to copy B&W’s design directly, rather than print a loose inspiration of it as makers such as [Every Project All At Once] have done, but what’s the fun in that? It’s a much more interesting hack to take an idea and make it your own, as was done here, and then you can share the design without worrying about a luxury brand’s legal team.

Desktop 3D printing offers a wealth of possibilities for would-be speaker makers, including the possibility of rolling your own drivers.

Continue reading “Who Needs 100K Speakers When You’ve Got A 3D Printer?”

Trashed Sound System Lives To Rock Another Day

Plenty of consumer goods, from passenger vehicles to toys to electronics, get tossed out prematurely for all kinds of reasons. Repairable damage, market trends, planned obsolescence, and bad design can all lead to an early sunset on something that might still have some useful life in it. This was certainly the case for a sound system that [Bill] found — despite a set of good speakers, the poor design of the hardware combined with some damage was enough for the owner to toss it. But [Bill] took up the challenge to get it back in working order again.

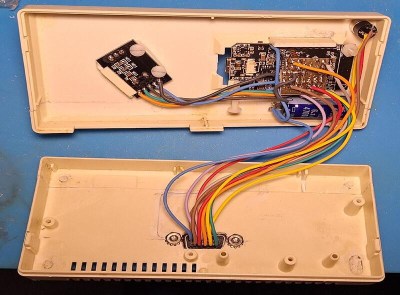
Inside the DIY control unit.

The main problem with this unit is that of design. It relies on a remote control to turn it on and operate everything, and if that breaks or is lost, the entire unit won’t even power on. Tracing the remote back to the control board reveals a 15-pin connector, and some other audio sleuths online have a few ways of using this port to control the system without the remote.

[Bill] found a few mistakes that needed to be corrected, and was eventually able to get an ESP8266 (and eventually an ESP32) to control the unit thanks largely to the fact that it communicates using a slightly modified I2C protocol.

There were a few pieces of physical damage to correct, too. First, the AC power cable had been cut off which was simple enough to replace, but [Bill] also found that a power connector inside the unit was loose as well. With that taken care of he has a perfectly functional and remarkably inexpensive sound system ready for movies or music. There are some other options available for getting a set of speakers blasting tunes again as well, like building the amplifier for them from scratch from the get-go.

Stylus Synth Should Have Used A 555– And Did!

For all that “should have used a 555” is a bit of a meme around here, there’s some truth to it. The humble 555 is a wonderful tool in the right hands. That’s why it’s wonderful to see this all-analog stylus synth project by EE student [DarcyJ] bringing the 555 out for the new generation.

The project is heavily inspired by the vintage stylophone, but has some neat tweaks. A capacitor bank means multiple octaves are available, and using a ladder of trim pots instead of fixed resistors makes every note tunable. [Darcy] of course included the vibrato function of the original, but no, he did not use a 555 for that, too. He used an RC oscillator. He put a trim pot on that, too, to control the depth of vibrato, which we don’t recall seeing on the original stylophone.

The writeup is very high quality and could be recommended to anyone just getting started in analog (or analogue) electronics– not only does [Darcy] explain his design process, he also shows his pratfalls and mistakes, like in the various revisions he went through before discovering the push-pull amplifier that ultimately powers the speaker.

Since each circuit is separately laid out and indicated on the PCB [Darcy] designed in KiCad for this project. Between that and everything being thru-hole, it seems like [Darcy] has the makings of a lovely training kit. If you’re interested in rolling your own, the files are on GitHub under a CERN-OHL-S v2 license,  and don’t forget to check out the demo video embedded below to hear it in action.

Of course, making music on the 555 is hardly a new hack. We’ve seen everything from accordions to paper-tape player pianos to squonkboxes over the years. Got another use for the 555? Let us know about it, in the inevitable shill for our tip line you all knew was coming. Continue reading “Stylus Synth Should Have Used A 555– And Did!”