An 8-bit ISA card being plugged into a motherboard

Reverse-Engineering An ISA Card To Revive An Ancient CD-ROM Drive

Being an early adopter is great if you enjoy showing off new gadgets to your friends. But any new technology also brings the risk of ending up at the wrong side of a format war: just ask anyone who committed to HD-DVD fifteen years ago. If, on the other hand, you were among the few who invested in CD-ROM when it was first released in the mid-1980s, you definitely made the right choice when it came to storage media. However, it was a bit of a different story for the interface that hooks up the CD drive to your computer, as [Tech Tangents] found out when he managed to get his hands on a first-generation CM100 drive. (Video, embedded below.)

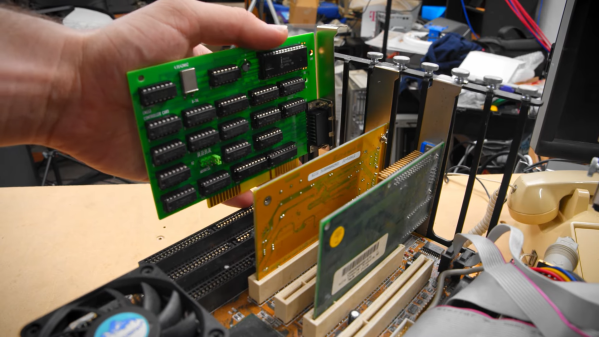
That wonderful piece of 1985 technology is not much smaller than the IBM PC it was designed to connect to, and it originally came with its own CM153 ISA interface card. But while most eBay sellers recognized the historic value of a pioneering CD-ROM drive, the accompanying PC was typically a dime-a-dozen model and was thrown out with the rare interface card still inside. Even after searching high and low for over a year, the only information [Tech Tangents] could find about the card was a nine year old YouTube video that showed what the thing looked like.

A 3D rendered image of an 8-bit ISA card
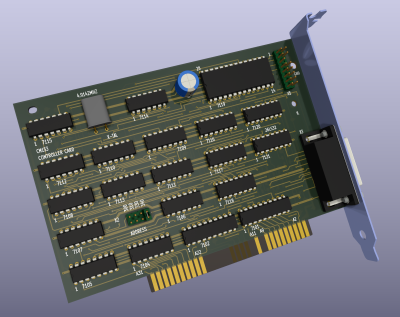
Luckily, the maker of that video was willing to take high-resolution pictures of the card, which allowed [Tech Tangents] to figure out how it worked. As it turned out, the card was entirely made from standard 7400 series logic chips as well as an 8251 USART, which meant that it should be possible to design a replacement simply by following all the traces on the board. [Tech Tangents] set to work, and after a few weeks of reverse-engineering he had a complete schematic and layout ready in KiCAD.

After the PCBs were manufactured and populated with components, it was time to test the new card with the old drive. This wasn’t a simple process either: as anyone who’s tried to get obscure hardware to work in MS-DOS will tell you, it involves countless hours of trying different driver versions and setting poorly documented switches in CONFIG.SYS. Eventually however, the driver loaded correctly and the ancient CD-ROM drive duly transferred the files stored on a Wolfenstein 3D disk.

If you’re lucky enough to own a CM100 or a similar drive from that era, you’ll be happy to know that all design files for the CM153 clone are available on GitHub. This isn’t the first time someone has had to re-create an interface board from pictures alone: we’ve seen a similar project involving a SCSI card for a synthesizer. Thanks for the tip, [hackbyte]!

Continue reading “Reverse-Engineering An ISA Card To Revive An Ancient CD-ROM Drive”

Burn Pictures On A CD-R, No Special Drive Needed

When we routinely carry devices holding tens or hundreds of gigabytes of data, it’s sometimes a shock to remember that there was once a time when 650 MB on a CD was a very big deal indeed. These now archaic storage media came first as silver pre-recorded CD-ROMs, then later as recordable CD-Rs. Most people eventually owned CD writer drives, and some fancy ones came with the feature of etching pictures in the unused portions of the disc.

Haven’t got a fancy drive and desire an etched CD-R? No worries, [arduinocelentano] has a solution, in software which writes a disk image for a standard CD writer whose data makes the visible image on the disc.

CD-Rs have a thin layer of phthalate dye sandwiched between the polycarbonate disc and a silvered layer of lacquer. They’re often gold coloured, but the silvering is in fact just aluminium. The data is encoded as a series of pits and lands crested by the laser vapourising small portions of the dye to make holes.

The code creates a data structure of a standard CD-ROM session which doesn’t contain any usable data, instead whose pits and lands are arranged to form the image. You can find it all in a GitHub repository, and have a go at creating your own offerings. We would have made a Wrencher disc for our pictures, but sadly for some of us who were once in the thick of it we don’t have any CD-Rs any more.

Robotic Hand Uses Old CD-ROM Parts

Robotic arms and actuators are compelling things to watch, and as popular among the maker set as they are crucial to modern industry. [kthod2000] built a design of their own, which relies on parts salvaged from old CD-ROM drives. 

The arm itself is constructed of many components which appear to be 3D printed, with three main motors visible along its length. These look to be the eject motors harvested from several optical drives, which usefully come with a threaded screw on the output shaft that makes them perfect for a linear-drive application. Run by a TMC2208 driver via a microcontroller, the eject motors control the motion of several stages of the robot arm as it moves up and down.

The intention seems to be that one of these three-tiered assemblies could act as a single finger. Ganged up multiple times, this could allow the creation of something akin to a full five-digit robot hand. [kthod2000] has also done plenty of work on the software side of things that handles controlling the arm. The kinematics can all be simulated on screen in concert with the real motion of the arm.

We’ve seen similar builds before, too, like this plotter built out of scrap DVD drives. They’re a great source of quality electromechanical components for small projects, so it’s no surprise to see them put to work here. Video after the break.

Continue reading “Robotic Hand Uses Old CD-ROM Parts”

An Arduino And A CD-ROM Drive Makes A CD Player

In an age of streaming media it’s easy to forget the audio CD, but they still remain as a physical format from the days when the “Play” button was not yet the “Pay” button. A CD player may no longer be the prized possession it once was, but it’s still possible to dabble in the world of 120 mm polycarbonate discs if you have a fancy for it. It’s something [Daniel1111] has done with his Arduino CD player, which uses the little microcontroller board to control a CD-ROM drive via its IDE bus.

The project draws heavily from the work of previous experimenters, notably ATAPIDUINO, but it extends them by taking its audio from the drive’s S/PDIF output. A port expander drives the IDE interface, while a Cirrus Logic WM8805 S/PDIF transceiver handles the digital audio and converts it to an I2S stream. That in turn is fed to a Texas Instruments PCM5102 DAC, which provides a line-level audio output. All the code and schematic can be found in a GitHub repository.

To anyone who worked in the CD-ROM business back in the 1990s this project presses quite a few buttons, though perhaps not enough to dig out all those CDs again. It would be interesting to see whether the I2S stream could be lifted from inside the drive directly, or even if the audio data could be received via the IDE bus. If you’d like to know a bit more about I2S , we have an article for you.

Medium Over Message: A CD-ROM Multimedia Bubble Survivor’s Tale

Sometimes in the never-ending progression of technology, people take wrong turns. They pursue dead-ends they believe represent a bright future, often in spite of obvious indications to the contrary. IBM doggedly insisting Micro Channel Architecture was the future of PC hardware, for example, or Nokia’s seeming inability to recognise that the mobile phone experience had changed for ever when the first iPhones and Android devices appeared.

Every once in a while, that collective delusion grips an entire industry. All the players in a particular market nail their colours to a technology, seemingly without heed to what seems with hindsight to have been a completely obvious threat from the alternative that sidelined them. It is a tale of personal experience that prompts this line of thought, for the industry that tempted me away from hardware to a career in electronic publishing in the early 1990s was CD-ROM multimedia.

Continue reading “Medium Over Message: A CD-ROM Multimedia Bubble Survivor’s Tale”

Data Exfiltration With Broadcast Radio And CD-ROM Drives

The first music played on personal computers didn’t come out of fancy audio cards, or even a DAC. the first audio system in a personal computer was simply holding an AM radio up to the case and blinking address pins furiously. This worked wonderfully for homebrew computers where EMC compliance hadn’t even become an afterthought, but the technique still works today. [Chris] is playing music on the radio by sending bits over the system bus without using any wires at all.

[Chris]’ code is based on the earlier work of [fulldecent], and works pretty much the same. To play a sound over the radio, the code simply writes to a location in memory when the waveform should be high, and doesn’t when the waveform is low.

Of course the ability to exfiltrate information over an airgap has a few more nefarious purposes, but [Chris] also has another way of doing just that which is undefeatable by a TEMPEST shielded computer. He can send one bit at a time by opening and closing a CD-ROM drive, capturing these bits with a webcam. Is it useful? It’s hard to imagine how this setup could ever capture any valuable data, but it is a proof of concept.

Cheap, Easy To Build Robot For Beginners

Robotics kits are a great way to get folks , young and old, interested in hacking and learning the basics. Quite often, the cost puts them off – it’s no fun if you mess things up while learning how to put an expensive kit together. Many kits are too polished and that leads to beginners feeling that they’ll never be able to build something complex like a robot. The Shonkbot is what the team at Bristol Hackspace came up with for a robot that is obvious in its working and encouragingly easy to build, even for kids (with supervision).  To that effect, they completely avoided custom PCBs and laser cut bits. The Shonkbot is built from easily available parts and some commonly available materials. They aimed to build it for £5, but managed £15. With proper planning and time, they guess it can be brought down to £10.

The Shonkbot is built using an Arduino Nano, two stepper motors with their drivers, a 3xAA battery box and some bits and bobs. Assembly takes about an hour for a 10-year-old and then they can reprogram it in another workshop or at home. The “frame” of the Shonkbot is an old CD-ROM or DVD disk. Everything is hot glued to this frame. At the centre of the disk, a Sharpie is inserted and the Arduino code then allows the robot to draw on paper. Upgrades include adding an IR LED, a photo transistor and a buzzer to allow the Shonkbot to detect objects, or communicate with other Shonkbots. Build instructions are detailed in this document, and the code is available from the Github repository. Here is a photo album from their first build workshop which was held recently.

Thanks to [Matthew Venn] from the Bristol Hackspace for sending in this tip. Check the robot in action in the video below.

Continue reading “Cheap, Easy To Build Robot For Beginners”