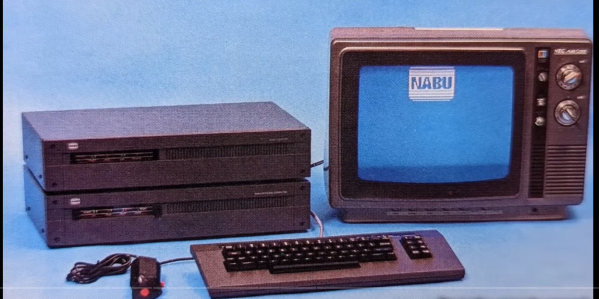
They Milk Cows, Don’t They?

You’ve no doubt heard of the many alternatives to cow’s milk that are available these days. Perhaps you’ve even tried a few of them in your quest to avoid lactose. Some coffeehouses have already moved on from soy milk, offering only oat or almond milk instead of 2% and whole. Their reasoning is that soy milk is a highly processed product that can’t be traced back to a single source, which stands in stark contrast to all those bags of single-origin coffee beans.

These nut-based alternatives kicked off what is known as the milk wars — the dairy industry’s fight against labeling plant-based dairy alternatives as ‘milk’ and so on. Well, now it’s getting even more interesting. A company called Perfect Day is making milk using microorganisms that secrete milk proteins. It may sound kind of gross, but it’s essentially microbial fermentation, which is the normal process by which bread, cheese, yogurt, wine, and beer are made.

To be fair, what Perfect Day and other companies are doing is precision fermentation using genetically engineered microorganisms in a bioreactor, so it’s a bit more involved than what you could probably pull off in the basement. Precision fermentation lies somewhere between two modern extremes — plant-based meat and cultured meat. The latter is actual animal tissue grown from stem cells, and is only available at high-end restaurants for exorbitant prices.

Continue reading “They Milk Cows, Don’t They?”

Making Your Projects Move: Jeremy Fielding To Deliver Remoticon Keynote

We’re really excited to announce that Jeremy Fielding will give a keynote address at Hackaday Remoticon in November! Get your free ticket now!

The projects we in this community choose to tackle often take a lot to see to completion. Parts, tools, expertise, time; all are critical to getting projects from concept to reality. But how deep your parts bin is or how well-equipped your shop may be matters not a whit unless you’ve got the one thing that makes it all go: passion. Passion is what keeps a project rolling ahead paste the inevitable roadblocks and diversions; it’s what keeps us going back to the bench to try something new when we think we’ve tried it all.

Jeremy Fielding showing off his robot arm back in April

The passion to understand, to create, to innovate, is something that Jeremy Fielding clearly has. Anyone who has watched even a few of his YouTube videos knows how much he loves to make things move. His current project is a seven-axis industrial robot arm, and it’s a seriously impressive build that could easily be mistaken for a commercial product. What’s perhaps most impressive about this is that many of the skills needed to pull it off, like welding aluminum and machining, are skills that Jeremy has been teaching himself on the fly. Talk about passion!

For his keynote, Jeremy is going to focus on building hardware that moves. Most of us are reasonably good at putting together projects that flash a few lights or perhaps move a few small steppers or servos. But scaling that up, as Jeremy has done for his robot arm as well as other projects, introduces new challenges: what type of electric motor do I choose? How do I figure out the trade-offs between torque and speed? Do I even want to use electric motors — maybe pneumatics will be better? What are my control options? These questions can be just as daunting to the old hands as they are to beginners, and Jeremy is going to focus on how to handle these and other mechatronic challenges that crop up in our projects.

Aside from the (literal) nuts and bolts of mechanical engineering, there’s another place where Jeremy’s passion shines through: his passion for communicating what he has learned. His presentation style and enthusiasm are infectious, and we’re sure that’s going to come across in his keynote. Jeremy fancies himself a “contraption engineer,” which is both an apt and engaging way to look at what he does. Fellow contraption builders take note — you’re going to want to make sure you don’t miss this one!

Call for Proposals is Still Open!

We’re still on the hunt for great talks about hardware creation, so the Call for Proposals has been extended to October 20. And remember, get your tickets early — knowing how many people to expect really helps us with infrastructure planning so we can give everyone a quality experience.

Arduino Brings USB Mouse To Homebrew Computer

When building your own homebrew computer, everything is a challenge. Ultimately, that’s kind of the point. If you didn’t want to really get your hands dirty with the nuts and bolts of the thing, you wouldn’t have built it in the first place. For example, take the lengths to which [rehsd] was willing to go in order to support standard USB mice on their 6502 machine.

Code for mapping mouse movement to digital output.

The idea early on was to leverage existing Arduino libraries to connect with a standard USB mouse, specifically, the hardware would take the form of an Arduino Mega 2560 with a USB Host Shield. There was plenty of code and examples that showed how you could read the mouse position and clicks from the Arduino, but [rehsd] still had to figure out a way to get that information into the 6502.

In the end, [rehsd] connected one of the digital pins from the Arduino to an interrupt pin on the computer’s W65C22 versatile interface adapter (VIA). Then eleven more digital pins were connected to the computer, each one representing a state for the mouse and buttons, such as MOUSE_CLICK_RIGHT and MOUSE_LEFT_DOWN.

Admittedly, [rehsd] says the mouse action is far from perfect. But as you can see in the video after the break, it’s at least functional. While the code could likely be tightened up, there’s obviously some improvements to be made in terms of the electrical interface. The use of shift registers could reduce the number of wires between the Arduino and VIA, which would be a start. It’s also possible a chip like the CH375 could be used, taking the microcontroller out of the equation entirely.

From classic breadboard builds to some impressively practical portable machines, we’ve seen our fair share of 6502 computers over the years. Despite the incredible variation to be found in these homebrew systems, one thing is always the same: they’re built by some of the most passionate folks out there.

Continue reading “Arduino Brings USB Mouse To Homebrew Computer”

Electric Vehicles, The Gasoline Problem, And Synthetic Fuels

When you’re standing at the gas station filling up your car, watching those digits on the pump flip by can be a sobering experience. Fuel prices, especially the price of gasoline, have always been keenly watched, so it’s hard to imagine a time when gasoline was a low-value waste product. But kerosene, sold mainly for lighting, was once king of the petroleum industry, at least before the automobile came along, to the extent that the gasoline produced while refining kerosene was simply dumped into streams to get rid of it.

The modern mind perhaps shudders at the thought of an environmental crime of that magnitude, and we can’t imagine how anyone would think that was a good solution to the problem. And yet we now face much the same problem, as the increasing electrification of the world’s fleet of motor vehicles pushes down gasoline demand. To understand why this is a problem, we’ll start off by taking a look at how crude oil is formed, and how decreasing demand for gasoline may actually cause problems that we should think about before we get too far down the road.

Continue reading “Electric Vehicles, The Gasoline Problem, And Synthetic Fuels”

The Doom computer game rendered with HTML checkboxes

Play DOOM Using Web Browser Checkboxes (Finally)

If you’ve ever felt the need to render DOOM using nothing but web browser checkboxes, [Andrew Healey] has you covered with his recent port of the first-person shooter. Naturally, this gets our tick of approval.

Yes, you read that right. You can now play DOOM in a 160 x 100 grid of HTML-generated checkboxes, much like this: ☑. The secret sauce for this project is partly derived from the fascinating Checkboxland project by fellow hacker Brian Braun, who uses HTML checkboxes to generate a variety of artistic demos.

[Andrew Healey] also made use of Cornelius Diekmann’s port of DOOM using WebAssembly, which we recently covered here on Hackaday. A smattering of code ties both projects together, and the end result is DOOM at 160×100 resolution, rendered entirely with HTML checkboxes.

The port can be played here using Chrome or Edge (other browsers may have issues if they do not support the zoom property in CSS). The source code is also available over on GitHub.

While the resolution and color palette aren’t what we have come to expect from DOOM, it’s likely that the graphics could be further improved by tinkering with the dithering and threshold settings. Higher resolutions may also be possible with further optimization.

We would be hard pressed to pick our favorite port of DOOM, as the list is becoming quite long. However for something completely different, check out our story on how DOOM was brought to Twitter.

Continue reading “Play DOOM Using Web Browser Checkboxes (Finally)”

caliper jaw tools

Printable Caliper Jaws Increase Precision, Deflect Derision

If you’ve watched as many machining videos as we have, no doubt you’ve seen someone commit the cardinal sin of metalworking: using caliper jaws to scratch a mark into metal. Even if it’s a cheap Harbor Freight caliper rather than an expensive Starrett or Mitutoyo tool being abused, derision and scorn predictably rain down upon the hapless sinner’s head.

The criticism is not without its merit, of course. Recognizing this, [Nelson Stoldt] came up with these clamp-on nosepieces designed to turn calipers into a better marking tool. Using stock calipers as marking gauges always introduces some error, since the jaws are equal lengths and thus have to be held at a slight angle to the workpiece in order to make a mark. The caliper jaws correct for this admittedly negligible error by extending one jaw, allowing it to ride on a reference face while the other jaw remains perpendicular to the workpiece. As a bonus, the short jaw has a slot to mount a steel marking knife, saving the caliper jaws from damage.

[Nelson] chose to 3D-print his caliper jaws, but they could just as easily be milled from solid stock to make them a little more durable. Then again, you could always 3D-print the calipers in the first place, and integrate these jaws right into them.

Inconsistent layer heights in a 3D print

An Easy Fix For Inconsistent Layers In Cheap 3D Printers

If there’s one thing you can say about [Stefan] from CNC Kitchen, it’s that he’s methodical when he’s working on an improvement to his 3D printing processes, or when he’s chasing down a problem with a printer. Case in point: this root-cause analysis of extrusion inconsistencies with an entry-level 3D printer.

The printer in question is a Cetus MK3, a printer that found its way onto many benches due to its ridiculously low price and high-quality linear bearings. Unfortunately, there’s still a lot to be desired about the printer, and its tendency for inconsistent layers was chief among [Stefan]’s gripes. Such “blubbiness” can be pinned on any number of problems, but rather than guess, [Stefan] went through a systematic process of elimination to find the root cause. We won’t spoil the ending, but suffice it to say that the problem was subtle, and could probably be the cause of similar problems with other printers. The fix was also easy, and completely mechanical — just a couple of parts to replace. The video below shows the whole diagnosis process, as well as the before and after comparisons. [Stefan] also teases an upcoming treatment on how he converted the Cetus from the stock proprietary control board, which we’re interested in seeing.

If you haven’t checked out any of [Stefan]’s other 3D printing videos, you really should take a look. Whether it’s vibration damping with a concrete paver, salt annealing prints for strength, or using finite element analysis to optimize infills, he’s always got an interesting take on 3D printing.

Continue reading “An Easy Fix For Inconsistent Layers In Cheap 3D Printers”