Laser Levitation With Scrap Parts

After a year away from YouTube, the ever-energetic [Styropyro] has returned with whiteboard in hand to remind us just how little we actually know about lasers. In the last month he’s really hit the ground running with plenty of new content, but one video of his particularly stands out: a practical demonstration of laser levitation. Even better, unlike most of his projects, it looks like we can replicate this one without killing ourselves or burning our house down!

For those unaware, laser levitation is probably as close as we’ll get to Star Trek-style tractor beams in our lifetimes. In fact, the NASA Innovative Advanced Concepts program has been examining using the technology for capturing small particles in space, since it would allow sample collection without the risk of physical contamination. While the demonstration [Styropyro] performs lacks the “tractor” part of the equation (in other word’s, there’s no way to move the particle along the length of the beam) it does make us hopeful that this type of technology is not completely outside the reach of our home labs.

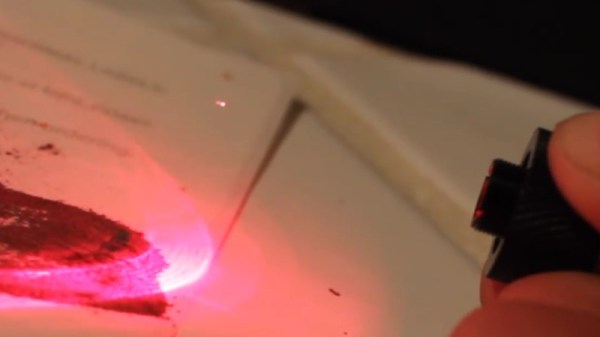
The trick seems to be with the focus of the laser beam itself. Your average laser pointer just doesn’t have the appropriate beam for this kind of work, but with a diode pulled from a DVD burner and a driver circuit made from parts out of the junk bin, the effect can be demonstrated very easily as long as you can keep the air in the room extremely still. Of course, what you’re trying to pick up is also very important, [Styropyro] has found that synthetic diamond powder works exceptionally well for this experiment. At about $1.60 a gram, it won’t break the bank either.

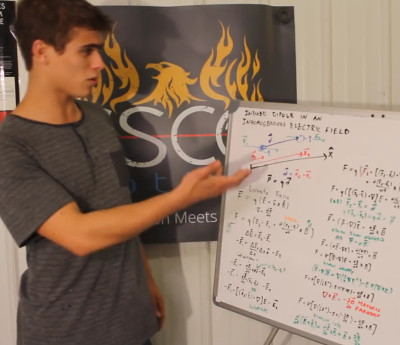
So how does it work? With a few trips to the aforementioned white board, Professor Pyro explains that the effect we’re seeing is actually electromagnetic. If the particle you want to levitate is small enough it will become polarized by the light, which is in itself an electromagnetic wave. Once you’ve got your mind wrapped around that, it logically follows that the levitating particle will experience the Lorentz force. Long story short, the particle is suspended in the air for the same reason that a projectile is ejected from a rail gun: if you’ve got enough power and the mass of the object is low enough, there will be an observable force.

We’ve been covering the work of [Styropyro] for years now, and are glad to see him back on YouTube creating new content and terrifying a new generation of viewers. Between this and the return of [Jeri Ellsworth], it’s like we’re experiencing a YouTube hacker Renaissance.

Continue reading “Laser Levitation With Scrap Parts”

Speakers Make A LASER Scanning Microscope

We’ve seen a lot of interest in LSM (LASER Scanning Microscopes) lately. [Stoppi71] uses an Arduino, a CD drive, and–of all things–two speakers in his build. The speakers are used to move the sample by very small amounts.

The speakers create motion in the X and Y axis depending on the voltage fed to them via a digital analog converter. [Stoppi71] claims this technique can produce motion in the micron range. His results seem to prove that out. You can see a video about the device, below.

Continue reading “Speakers Make A LASER Scanning Microscope”

Laser Scanning Microscope

Remember that feeling when you first looked down on a microscope? Now you can re-live it but in slightly different way. [Venkes] came up with a way to make a Laser Scanning Microscope (LSM) with mostly off the shelf components that you probably have sitting around, collecting dust in your garage. He did it using some modified DVD pick-ups, an Arduino Uno, a laser and a LDR.

fuyati3iy4qiced-large
EPROM die shot

To be honest, there’s some more stuff involved in the making of the LSM but [Venkes] did a detailed Instructable explaining how everything fits together. You will need a fair dose of patience, it’s not very easy to get the focus right and it’s quite slow, an image takes about half an hour to complete, but it can do 1300x amplification at 65k pixels (256×256). From reading the instructions it seems that you will need a steady hand to assemble it together, some steps look kind of tricky. On the software side, the LSM uses Arduino and Processing. The Arduino part is responsible for the steering of the lens and taking the LDR readings. This information is then sent to Processing which takes care of interpreting the data and translate it to an image.

The build difficulty level should be between the DIY Smartphone Microscope and the Laser Sequencer Super Microscope. In the end, if everything goes right, you will end up with some cool images:

Continue reading “Laser Scanning Microscope”

Take The Long Road To A Precise Laser PCB Exposer

According to [diyouware], inside of every HD-DVD player is a gem of laser engineering with the designation of PHR-803T, and it’s just begging to be converted into a PCB exposer. Following along similar hacks which tore the laser diode out of Blu-ray players to expose PCBs, they wanted to use the whole PHR-803T unit without disassembling it, and to try to enable all of its unique features.

They envisioned something simple like a scanner for their machine. Just place the PCB on top of a glass sheet, close the lid, and click print. Unfortunately, moving the laser itself just caused too much vibration. So they switched to an inverted delta robot and named it TwinTeeth. In this design, the laser would stay still and the PCB would move.

What follows next is a seriously impressive journey in reverse engineering and design. The PHR-803T had no data sheet, but a ton of features. For example, it can autofocus, and has three different laser diodes. So many interesting problems were found and solved. For example, the halo from the laser caused the surrounding photoresist to cure. They solved it by adding a glass plate with a UV filtering film on it. Only the most focused point of the laser could punch through.

Another adventure was the autofocus. They wanted to autofocus on all four corners of the board. The PHR-803T was designed to read HD-DVDs so can focus a beam to far below 0.01 mm. They got autofocus working with the UV laser, but couldn’t use it on the PCB without curing the photoresist. So they put a piece of aluminum foil at a known level to start. Then they realized they could use the red or infrared diodes to focus instead. Now they can level the PCB in software, and focus the diode without curing the photoresist.

In the end they have an inverted-delta mini PCB factory. It can produce boards around the size of an Arduino shield with a resolution of 600 DPI. Their machine also has attachments for drilling and solder paste dispensing. Check out the video of it in action.
Continue reading “Take The Long Road To A Precise Laser PCB Exposer”

DIY Laser Lumia Lights Up The Night

Lasers are awesome, and as the technology continues to advance, they keep getting cheaper! If you’ve ever wanted your own laser light show in your man cave, it’s never been easier.

In the 70’s [rgrokett] was a planetarium technician, responsible for building and operating laser shows. Back then, the laser modules were huge and expensive. After being reminded of days gone past, thanks to an article about laser light show operators, he decided to try his own hand at building a Low-cost Laser Lumia Lightshow.

And it couldn’t be easier.

Continue reading “DIY Laser Lumia Lights Up The Night”

Laser Etching Graphene Supercapacitors

The tech is nothing new, but did you know you can make your own graphene using your DVD burner? No seriously — all you need is a light-scribe compatible DVD burner and some graphite oxide.

It’s pretty simple. By placing a thin film on top of a DVD (or any plastic CD shaped disc), and coating it with graphite oxide, you can literally print patterns of graphene using the laser in your DVD burner. By making the shapes shown above, you can introduce an electrolyte and turn the whole thing into a supercapacitor. Albeit, a tiny super capacitor. But — you can print hundreds of them on a DVD in less than an hour.

We’ve covered this before a few times now, but that doesn’t make it any less interesting. We’re still waiting for someone (one of you guys!) to do a project that actually makes use of graphene! Hurry up!

[Thanks for the tip John!]

robot arm laser cutter

Robot Arm Wields Laser, Cares Not For Your Safety

Here at Hackaday we’ve covered a bunch of DIY laser diode projects. And for good reason, they are just cool. We’ve seen people add lasers to their 3D printers, stick one in a milling machine, use a highly modified scanner and even build a simple XY gantry specifically for the task. To say the least there is definitely a wide range of methods for moving around a laser but we’ve never seen anything like what [Sp4rky] sent in to us. He and his friends outfitted an old educational robot arm with a laser.

The robot arm is a 5 axis Armdroid 5100 picked up from eBay for a couple hundred dollars. It didn’t come with a controller but all of the stepper drivers were housed in the base of the arm. After a little tinkering around with the inputs the team was able to get the arm to move by sending serial commands from a PC, through an Arduino Mega which then sends the appropriate signals to the uni-polar stepper drivers. That was the easy part of the build.

The hard part was getting the arm to hold the laser at a consistent angle and height above the table. Inverse Kinematics to the rescue! Since the desired position of the laser, as well as the length of the arm segments is known, mathematical formulas can be derived to determine the necessary arm segment and joint positions while moving the laser around. The process flow starts out with an image in Inkscape, g-code is then generated with this plugin, then sent to the Arduino running a modified version of GRBL that has the inverse kinematic formulas. The Arduino directly controls the stepper drivers and the robotic arm moves. The Arduino also controls 3 constant-current laser drivers made from LM317 regulators. Three laser drivers, why?

Triple Laser Robot
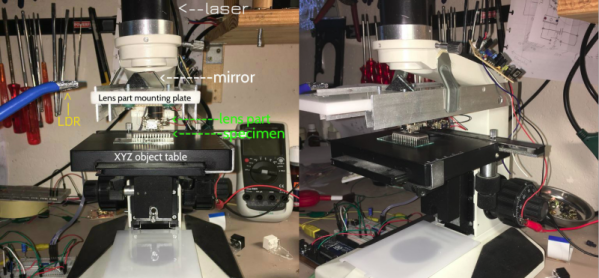
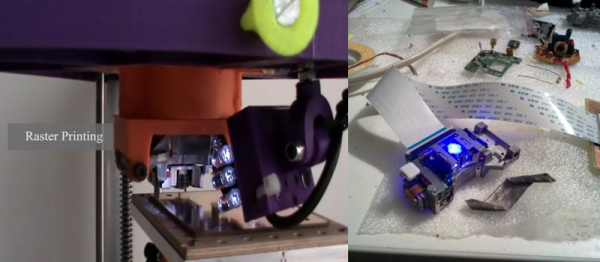
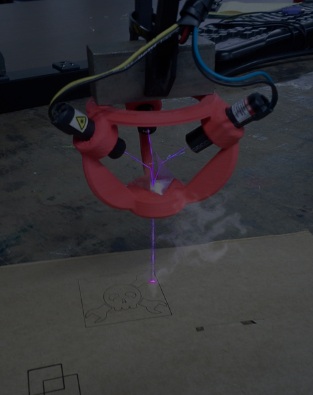
[Sp4rky] got his laser diode modules out of surplus medical equipment and, unfortunately, the rated optical wattage was quite low. Since he had 3 diodes, he decided to try to combine the 3 low power beams into one high power beam. This can be done using a prism. A prism splits sunlight into a rainbow of colors because each wavelength(color) of light that passes through the prism is bent a different amount. Since the laser diodes only put out one wavelength of light, the beam bends but does not split or diffuse. A 3D printed bracket points each laser diode at a 3-sided pyramidal prism which sends the combined beam of light straight out the bottom towards the object to be cut or engraved.

This project is cool enough that we would have covered it even if [Sp4rky] wasn’t burning a Hackaday logo. Although it doesn’t hurt for anyone wanting their project to get covered!