A Linux Business Card You Can Build

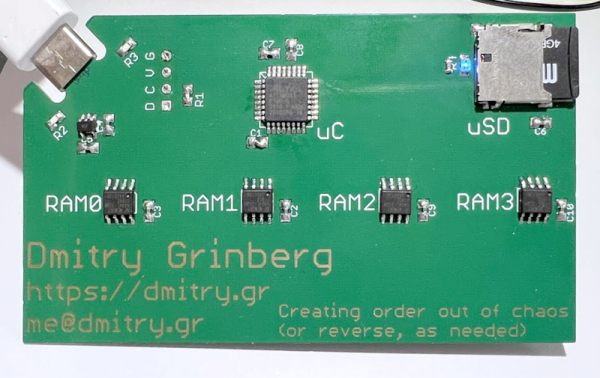
It is a sign of the times that one of [Dmitry’s] design criteria for his new Linux on a business card is to use parts you can actually find during the current component shortage. The resulting board uses a ATSAMD21 chip and emulates a MIPS machine in order to boot Linux.

We like that in addition to the build details, [Dmitry] outlines a lot of the reasons for his decisions. There’s also a a fair amount of detail about how the whole system actually works. For example, by using a 0.8 mm PCB, the board can accept a USB-C cable with no additional connector. There is also a great explanation of the MIPS MMU and don’t forget that MIPS begat RISC-V, so many of the MIPS core details will apply to RISC-V as well (but not the MMU).  You’ll also find some critiques of the ATSAMD21’s DMA system. It seems to save chip real estate, the DMA system stores configuration data in user memory which it has to load and unload every time you switch channels.

By the end of the post you get the feeling this may be [Dimitry]’s last ATSAMD21 project. But we have to admit, it seems to have come out great. This isn’t the first business card Linux build we’ve seen. This one sure reminded us of a MIDI controller card we once saw.

The PawPet board in a 3D-printed case, with a d-pad on the right and four buttons on the left. On its small monochrome screen, there's a cat-like pet looking at you.

Reject Modernity; Return To Tamagotchi

Browsing through the recent projects on Hackaday.io, we’ve found this entry by [NanoCodeBug]: a single-PCB low-power trinket reviving the “pocket pet” concept while having some fun in the process! Some serious thought was put into making this device be as low-power as possible – with a gorgeous Sharp memory LCD and a low-power-friendly SAMD21, it can run for two weeks on a pair of mere AAA batteries, and possibly more given a sufficiently polished firmware. The hardware has some serious potential, with the gadget’s platform lending itself equally well to Arduino or CircuitPython environments, the LCD being overclock-able to 30 FPS, mass storage support to enable pet transfer and other PC integrations, a buzzer for all of your sound needs, and an assortment of buttons to help you create mini-games never seen before. [NanoCodeBug] has been working on the hardware diligently for the past month, having gone through a fair few revisions – this is shaping up to be a very polished gadget!

There’s no wonder that people love to start Tamagotchi-like projects – something special happens when an electronic device invokes the same feelings that we’d get while caring for our own pet, and this project does justice to the idea. With homebrew Tamagotchi projects, there’s a trend – once hardware is finished, the software doesn’t always get to a usable stage, feeling more like an afterthought. There’s a hacker twist that should help us subvert this trend, however – [NanoCodeBug] has shared all sources with us in a GitHub repository! If you would like to help with the “software” part, you can start working on that with just a few breakouts. The board files are also there, if you feel like the boards are marvelous enough for your liking to go through modern-day component sourcing pains.

Hackers have been playing with the “pocket pet” concept here and there, to delightful and unconventional results. If you’re on the lookout for other serious Tamagotchi recreation projects, this one takes the cake – otherwise, check out this furry Tamagotchi-like Tribble pet, disarming in its cuteness! If you’re one of our mischief-minded hackers, we have two posts to keep you entertained – one about dumping ROM on newer Tamagotchi toys, and another about building a WiFi-cracking one. And when it comes to the spirit of “what we have on hand” builds, this giant desktop-sized LED matrix Tamagotchi fits the bill pretty well!

A LoRa IM-Me For The End Of The World

Enshrined in the hacker hall of fame, the IM-Me was an instant messaging toy that turned out to be extremely hackable. You could easily ditch its instant messaging platform to turn it into a little spectrum analyser. Of course what’s old is new again, and in this age where we no longer have the Nokia 3110, the Sidekick, or even Blackberries, how shall we get our fix of those wireless gadgets with physical keyboards?

What would happen if a hacker had a go at creating one of those? [Bobricius]’ Armachat is an instant messaging platform that uses LoRa as its over-the-air protocol, and is powered by a Microchip ATSAMD21x18 ARM Cortex M0 microcontroller alongside an RFM95 LoRa module.

The IM-Me, a free text chat device in the age of per-message charges, was the sweat heart of hardware hacking back in 2010

There are two versions of the device for hand and pocket, both of which come with QWERTY keyboards made with momentary-action switches, 18650 cell power, and LCD screens. The idea is that it could form a robust communication system when many others have failed.

As it stands they have a simple text messaging app in the firmware, but there are other features yet to come. Perhaps the most interesting is a possible store-and-forward meshing system in the future, which would make this a powerful comms tool in so many circumstances. Both of [Bobricius’] devices can be seen in the video below the break — no word from him on the possibility of a pink case option. Meanwhile [Bobricius] has appeared on these pages many times before. With so many to choose from it’s hard to pick one, but his Nixie-like LED display is quite memorable.

Continue reading “A LoRa IM-Me For The End Of The World”

DIY 40FPS 16bpp Platformer On A Cortex M0+

Sure, you can play a bunch of retro games on a Raspberry Pi, but if you’re really hardcore, you build your own retro console and write your own games for it. [Nicola Wrachien]’s entry into this year’s Hackaday prize is his DIY Cortex M0+ game console and the platform game he wrote to test the hardware.

The board that [Nicola] is using is the uChip, a small DIP board based around a ATSAMD21 (the same chip that runs the Arduino Zero). That, along with a 160×128 TFT LCD screen, makes up the bulk of the hardware. A carrier board holds both of these as well as several buttons and an OpAmp.

The ATSAMD21 chip has decent hardware DMA that [Nicola] is using to get the frame rate needed. Since the DMA hardware and the CPU can work at the same time, while the DMA is handling one chunk of graphics, the CPU is working on the next chunk. Using this system, [Nicola] is able to get a better framerate than originally designed. Take a look at [Nicola]’s webpage for more details on the algorithm used.

In order to create a level in the platformer that [Nicola] made to show off the console, [Nicola] created a full blown level editor in Java. Using the editor, you can place the tiles and sprites and set their behaviours. The map can then be exported in an optimized format for loading on to the hardware and into the game.

A video showing off the game is after the break. There’s no shortage of great DIY consoles on the site — check out this impressive vector console, or if RetroPie is more your thing, take a look at this DIY Zelda-playing device.

Continue reading “DIY 40FPS 16bpp Platformer On A Cortex M0+”

Mini Retro PET Computer

There was a time that the Commodore PET was the standard computer at North American schools. It’s all-in-one, rugged construction made it ideal for the education market and for some of us, the PET started a life-long love affair with computers. [Ruiz Brothers] at Adafruit has come up with a miniature PET model run on a microcontroller and loaded up with a green LED matrix for a true vintage look.

While not a working model of a PET, the model runs on an Adafruit Feather M0 Basic Proto which is an Atmel ATSAMD21 Cortex M0 microcontroller and can display graphics on Adafruit’s 16×9 charlieplexed led matrix.The ATSAMD21 is the chip used in the Arduino Zero, so I’m sure we’ll see more of this chip in the future. Like all of the tutorials at Adafruit, this one is very detailed with step-by-step animated pictures to help you along. Obviously, you don’t need the exact hardware that they’re using, but if you’re putting in an order from Adafruit anyway, why not?

The plans for the 3D printed PET are available for free, so even if you don’t want to put their LED matrix and microcontroller in it, you can still print yourself out a great looking prop and 3D printing the PET will only use about a dollar’s worth of filament. Of course, while this is a cool retro model, if you have a Commodore PET lying around, you could probably do something else with it. We don’t, so that sound you hear is the sound of our 3D printer printing up the past.

Continue reading “Mini Retro PET Computer”