A LoRa IM-Me For The End Of The World

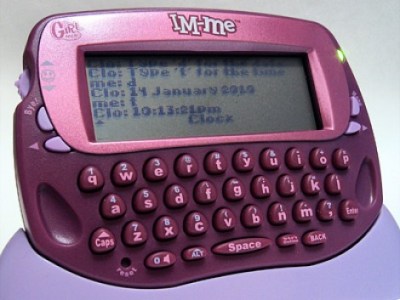
Enshrined in the hacker hall of fame, the IM-Me was an instant messaging toy that turned out to be extremely hackable. You could easily ditch its instant messaging platform to turn it into a little spectrum analyser. Of course what’s old is new again, and in this age where we no longer have the Nokia 3110, the Sidekick, or even Blackberries, how shall we get our fix of those wireless gadgets with physical keyboards?

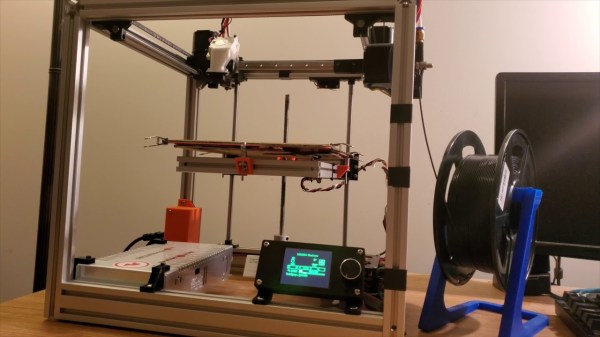
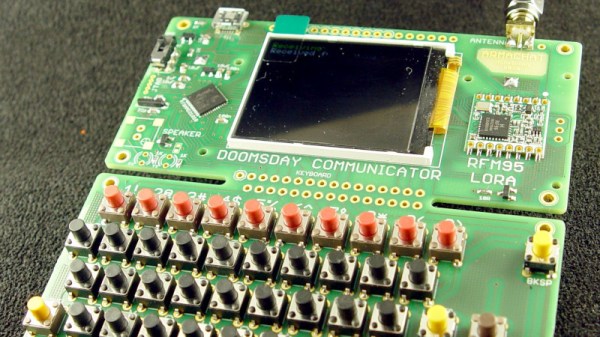
What would happen if a hacker had a go at creating one of those? [Bobricius]’ Armachat is an instant messaging platform that uses LoRa as its over-the-air protocol, and is powered by a Microchip ATSAMD21x18 ARM Cortex M0 microcontroller alongside an RFM95 LoRa module.

The IM-Me, a free text chat device in the age of per-message charges, was the sweat heart of hardware hacking back in 2010

There are two versions of the device for hand and pocket, both of which come with QWERTY keyboards made with momentary-action switches, 18650 cell power, and LCD screens. The idea is that it could form a robust communication system when many others have failed.

As it stands they have a simple text messaging app in the firmware, but there are other features yet to come. Perhaps the most interesting is a possible store-and-forward meshing system in the future, which would make this a powerful comms tool in so many circumstances. Both of [Bobricius’] devices can be seen in the video below the break — no word from him on the possibility of a pink case option. Meanwhile [Bobricius] has appeared on these pages many times before. With so many to choose from it’s hard to pick one, but his Nixie-like LED display is quite memorable.

Continue reading “A LoRa IM-Me For The End Of The World”

Tired Of Fruit Ninja? Try Vegetable Assassin Using An ESP32 Sword

In a world where ninjas no longer rule the social hierarchy, where can a ninja-wannabe practice their sword fighting skills? In the popular Introduction to Embedded Systems class at the Massachusetts Institute of Technology, a team of students made their own version of the popular mobile game Fruit Ninja with a twist – you’re fighting your true nemesis, vegetables.

Vegetable Assassin allows single or multi-player mode, with players slicing vegetables on a screen using fake swords with sensors to detect the players’ motion. The web-based game allows swords to communicate their orientation to the game session with a WebSocket connection to a server, with the game generated and rendered using a 3D client JavaScript library. Rather than using MQTT, which also uses a persistent TCP connection as well as lower overhead, WebSocket provided maximum browser support.

An onboard ESP32 microcontroller and IMU track the sword movements. The game begins by calibrating the sword movements within the play area. Information is generated using the Madgwick algorithm, a 9-degrees-of-freedom algorithm that uses 3-axis data from the sword’s gyroscope, accelerometer, and magnetometer and outputs the absolute orientation of the sword.

The sword and browser both connect to the same channel on the server through a WebSocket connection, identified by a session ID similar to how web chat rooms are implemented. A statistics server manages the allocation of session IDs and other persistent game data to track high scores.

As for the graphics, a Three.js WebGL library creates the scene and camera, loading the game into the browser’s animation frame. Other scripts load the 3D models for the fruits and vegetables in the game, update their positions based on the physics engine provided by Cannon.js, and render UI elements within the game.

Curious? The project site has the microcontroller code to build your own sword that you can use to play the demo. If you don’t have an ESP32 and accelerometer handy you can play Vegetable Assassin in your browser instead.

Checking In On Relatives Using Old Android Tablets

With social distancing it can be harder to stay in touch with our relatives, especially those who are elderly and not particularly tech-savvy. Looking for a solution to that end for his own grandmother, [Steve] came up with the idea of using an inexpensive used tablet and a mobile data plan in order to mail her a “video phone” that works out of the box.

This method requires zero button presses in order to pick up a video call.

Since the tablet is configured to use cellular networks rather than WiFi, it requires no setup process at all to the recipient. And with the Android version of Skype, it’s possible to configure it so that calls are automatically picked up and video chat enabled. That way, whoever gets the tablet after it’s prepared doesn’t have to tap a single button on the screen in order to receive a call.

[Steve] has also developed the simple idea into a full-fledged easy-to-follow tutorial so that just about anyone is able to replicate the process for their own loved ones. And if you’re still having any trouble with it, there’s a team of volunteers right on the website who can help you with tech support. Just remember to disinfect whatever device you’re sending, since viruses can typically stick to surfaces like plastic and glass for longer.

Now, if showing up to your relatives as a disembodied video screen doesn’t cut it for you, then you might want to send them something more substantial like this cute little telepresence robot that can drive around on a desk.

KiCad Panelization Made Easy

There’s a new Python-based script that will panelize your KiCad circuit boards from the command line. The project by [Jan Mrázek] is called KiKit and works on .kicad_pcb files to arrange them in a grid with your choice of mousebites or v-cuts for separating the boards after production.

When working with smaller boards it’s common practice to group them together into panels. This is done to speed up PCB assembly as multiple boards can have solder paste applied, go through a pick and place machine, and be sent into the reflow oven as a single unit. Often this is done manually, but in many cases this script will save you the time while delivering the results you need.

Let’s say you really wanted to make a whole bunch of those Xling open source Tamagotchi-like key fobs we saw a couple of weeks back. Using KiKit you can gang up six of the boards at a time, using “mousebites” to keep them together during production but make it easy to separate them after all the components are soldered:

/usr/local/bin/kikit panelize grid --space 3 --gridsize 2 3 --tabwidth 3 --tabheight 3 --htabs 2 --vtabs 1 --mousebites 0.5 1 0.25 --radius 1 Xling/hardware/xling.kicad_pcb xling_panel.kicad_pcb

You can see that the parameters let you set space between the boards, number of boards in the grid, width of the tabs, tab dimensions, number of tabs between boards, and even the radius of the curve where the tabs meet the board. These settings were pulled from the examples page, which demonstrates outcomes for many different settings options.

If you want to give this a try, we suggest installing directly from the repository, as improvements are ongoing and the pip3 version didn’t have all of the options shown in the examples. For us this was as easy as sudo python3 setup.py install and then calling the script with the full path /usr/local/bin/kikit.

Results from this board are both impressive and cautionary. You can see the top edge of the design is recessed yet the most up-to-date version of KiKit was still able to make the connection. However, how this affects the USB connector on the bottom of the board design may be something to consider before pulling the trigger on your panel order.

OpenScan 3D Scans All Of The (Small) Things

The OpenScan project has been updated quite a bit since its inception. OpenScan is an open source, Arduino or Raspberry Pi-based 3D scanner for small objects that uses 3D printed hardware and some common electronic components to create 3D scans using photogrammetry; a process by which a series of still images from different angles are used to create a 3D point cloud of an object, which can then be used to generate a 3D model.

Feature visualization overlays detected features onto the camera preview to help judge quality. Broadly speaking, green is good.

Photogrammetry is a somewhat involved process that relies on consistent conditions, so going through the whole process only to find out the results aren’t up to snuff can be tiresome. Happily, OpenScan offers some interesting new functions such as feature visualization via the web interface, which helps a user judge scan quality and make changes to optimize results without having to blindly cross their fingers quite so much. OpenScan remains a one-person project by [Thomas], who is clearly motivated to improve his design and we’re delighted to see it getting updates.

Embedded below is a video that walks through the installation and web interface. It’s a fairly long and comprehensive, but if you like you can skip directly to [Thomas] demonstrating the interface around the 8:22 mark, or watch it below. Interested in your own unit? [Thomas] has an e-shop for parts and the GitHub repository is right here; the project also has its own subreddit.

Continue reading “OpenScan 3D Scans All Of The (Small) Things”

You Need More Weird

What do you do when you need to solve a problem creatively? Me, I go for a walk, preferably in the woods. It’s about as far away from the desk and computer as possible, and somehow getting outside of the box that is my office helps me to think outside of the metaphorical box as well. Maybe it’s the fresh air, maybe it’s the exercise. Or maybe, it’s putting my physical head in a different (head)space that helps me to think differently.

Psychologists are finding that being outside, being an outsider, or even just being exposed to the straight-up strange can help you think weirder, that is, more creatively. That artists, authors, and other hyper-creative folks are often a little bit odd is almost a cliche. Think of the artists who did their best work while under the influence of drugs, mental illness, or drastic dislocations.

The good news is that you might not have to go so far. Psychologists are able to measure increases in creative problem solving simply by exposing people to weirdness. And you don’t have to go on a magic-mushroom trip to get there either. In one study, this was playing in an upside-down VR world before answering a questionnaire, for instance. Ray Wilson meant it tongue-in-cheek when he suggested that building a silly synthesizer would help you think, but who’s laughing now that science is backing him up?

So if you find yourself, as I do, stuck inside the same four walls, make sure that you break out of the box from time to time. Expose your brain to weird, for your own creativity’s sake. Make some time for a completely wacky project. And of course, read more Hackaday! (We’ve got weird.)

This article is part of the Hackaday.com newsletter, delivered every seven days for each of the last 200+ weeks. It also includes our favorite articles from the last seven days that you can see on the web version of the newsletter.

Want this type of article to hit your inbox every Friday morning? You should sign up!

Signal The End Of A Print With MIDI Of Your Choice

The end of every 3D print should be a triumphant moment, and deserves a theme song. [FuseBox2R] decided to make it a reality, and wrote tool for converting MIDI tracks to G-code that uses the buzzer on your 3D printer.

The tool is up on GitHub, and uses the M300 speaker command that is available in Marlin and some other 3D printer firmware packages. It takes the form of a static HTML page with in-line JavaScript that converts a midi track to series of speaker commands with the appropriate frequency and duration parameters, using the Tone.js framework. Simply add to your slicer G-code to add a bit of spice to your prints. You can also build a MIDI jukebox using the RAMPS board and LCD you probably have gathering dust somewhere. See the video after the break for a demonstration, including a rendition of the DOOM theme song, and off course Mario Bros.

For more quarantine projects, you can also play MIDI using the stepper motors on your printer, or build a day clock if time is becoming too much of a blur.

Continue reading “Signal The End Of A Print With MIDI Of Your Choice”