Arbitrary Wave Generator For The Raspberry Pi Pico

Once upon a time, if you wanted to generate some waveforms, you needed to buy an expensive off-the-shelf function generator or whip up a big pile of analog electronics. Not so today, when you can grab a fast microcontroller off the shelf and have it squirt out whatever fancy waves you might desire. That’s just what [rgco] did to build this nifty arbitrary wave generator.

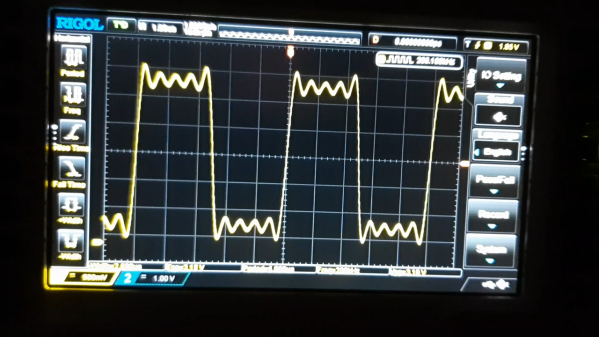
The build improves on prior work by [rgco] with the Arduino Uno, with which they built a device that could output at 381 kilosamples per second, with each sample update taking 42 instruction cycles. Thanks to the Pi Pico’s faster clock speed and certain performance optimizations, they were able to up that to a mighty 125 megasamples per second, using the DMA and PIO subsystems to output a new sample every single clock cycle.

The result is a cheap function generator you can build with a Pi Pico and a handful of resistors, which will probably cost you the grand total of $12. It readily outperforms, at least in regards of speed, devices based on the AD9833 function generator chip, which only runs at 25 megasamples. Plus, that chip can only output sines, triangles, and squares!

Even a passable function generator can be a useful tool to have in the workshop, as we’ve seen before. Video after the break.

Continue reading “Arbitrary Wave Generator For The Raspberry Pi Pico”

Weird 555 Function Generator Uses Feedback

There are plenty of designs out there for sawtooth and triangle function generators, many of them using the humble 555 IC. Few are readily voltage controlled, making them difficult to work with using a DAC, though. Enter this useful design posted to EDN!

The nifty design allows both waveshape and amplitude to be controlled via voltage. You could hook up a couple of  potentiometers and call it done. Or, even better, you can control these parameters via PWM output from a microcontroller. Handy, no? It’s achieved by a fancy routing that sends feedback from the 555’s output pin to the CV input, instead of the usual design that uses the THR and TRG pins instead. The design also allows the production of both symmetrical and asymmetrical triangle waveforms, and as a bonus, the whole oscillator draws less than 4 mW of power.

If you’re looking for a nifty triangle/sawtooth generator that sits neatly in your otherwise-digital design, this could be for you. Or, you might like to explore the sheer mountain of other 555 hacks we’ve featured over the years. We even held a contest! If you’ve got new 555 hacks the world needs to see, don’t hesitate to drop them into the tipsline.


Impatience Is A Virtue When Testing This Old Maritime Teleprinter

[Larry Wall], inventor of Perl, once famously said that programmers have three key virtues: sloth, hubris, and impatience. It’s safe to say that these personality quirks are also present in some measure in most hardware hackers, too, with impatience being perhaps the prime driver of great hacks. Life’s too short to wait for someone else to build it, whatever it may be.

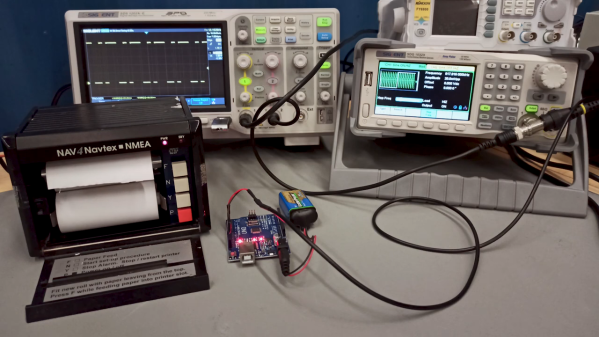
Impatience certainly came into play for [Sebastian (AI5GW)] while hacking a NAVTEX receiver (in German). The NAVTEX system allows ships at sea to receive text broadcast alerts for things like changes in the weather or hazards to navigation. The trouble is, each NAVTEX station only transmits once every four hours, making tests of the teleprinter impractical. So [Sebastian]’s solution was to essentially create his own NAVTEX transmitter.

Job one was to understand the NAVTEX protocol, which is a 100-baud, FSK-modulated signal with characters encoded in CCIR 476. Since this encoding is also used in amateur radio teletype operations, [Sebastian] figured there would surely be an Arduino library for encoding and decoding it. Surprisingly, there wasn’t, but there is now, allowing an Arduino to produce the correct sequence of pulses for a CCIR 476-encoded message. Fed into a function generator, the mini-NAVTEX station’s signal was easily received and recorded by the painfully slow teleprinter. There’s that impatience again.

We thought this was a neat hack, and we especially appreciate that [Sebastian]’s efforts resulted in a library that could be useful to hams and other radio enthusiasts in the future. We’ve talked about some more modern amateur radio digital modes, like WSPR and FT8, but maybe it’s time to look at some other modes, too.

Continue reading “Impatience Is A Virtue When Testing This Old Maritime Teleprinter”

retro breadboard

Retro Breadboard Gives Up Its 1960s Secrets

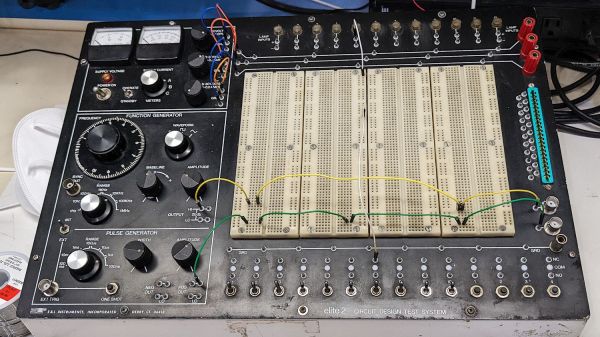
When we see [Ken Shirriff] reverse engineering something, it tends to be on the microscopic level. His usual forte is looking at die photos of strange and obsolete chips and figuring out how they work. And while we love those efforts, it’s nice to see him in the macro world this time with a teardown and repair of a 1960s-era solderless breadboard system.

If you’d swear the “Elite 2 Circuit Design Test System” featured in [Ken]’s post looks familiar, it’s probably because you caught his partner-in-crime [CuriousMarc]’s video on the very same unit, an eBay score that arrived in non-working condition. The breadboard, which retailed for $1,300 in 1969 — an eye-watering $10,000 today — was clearly not aimed at the hobbyist market. Truth be told, we didn’t even know that solderless breadboards were a thing until the mid-70s, but live and learn. This unit has all the bells and whistles, including three variable power supplies, an array of switches, buttons, indicator lamps, and jacks for external connections, and a pulse generator as well as a legit function generator.

Legit, that would be, if it actually worked. [Ken]’s contribution to the repair was a thorough teardown of the device followed by reverse-engineering the design. Seeing how this thing was designed around the constraints of 1969 technology is a real treat; the metal can transistor and ICs and the neat and tidy PCB layout are worth the price of admission alone. And the fact that neon lamps and their drivers were cheaper and easier to use than LEDs says a lot about the state of the art at the time.

As for the necessary repairs, [Marc]’s video leaves off before getting there. That’s fine, we’re sure he’ll put [Ken]’s analysis to good use, and we always enjoy [Marc]’s video series anyway. The Apollo flight comms series was a great one, too. Continue reading “Retro Breadboard Gives Up Its 1960s Secrets”

Low-Cost, Two-Channel Scriptable Waveform Generator

Microcontroller addict [Debraj] decided to make his own programmable sine wave generator, and was able to put it together for under $40 USD. Other than low-cost, his list of requirements was as follows:

  • Dual sine wave output, synchronized
  • Frequency, Amplitude, and Phase control
  • Low harmonics under 1 MHz
  • Scriptable via Python

The heart of the project is the Analog Devices AD9833, a complete Direct Digital Synthesis (DDS) waveform generator system on a chip. If you’ve ever rolled your own DDS using discrete ICs or in an FPGA, you can appreciate the benefit of squeezing the phase accumulator, sine lookup table, DAC, and control logic all into a single ten-pin package. [Debraj] uses AD9833 modules from the usual online vendors for a few dollars each. He synchronizes the generators by disconnecting the reference crystal on the second module and driving it from the first one. The remaining specifications are met by the inherent characteristics of the DDS system, and the scriptable interface is accomplished with an Arduino controlling the AD9833 chips and two programmable gain amplifiers (MCP6S31). We like the confidence that [Debraj] displays by sketching the initial circuit diagram with a ball-point pen — check out the sketch and the final pictorial schematic in the video below the break.

This is a good example of combining off-the-shelf modules to quickly build a project. This approach is great for one-off builds or as a proof-of-concept test bed that can later be spun onto a custom PCB. Another reason to use modules these days is that the modules are often in-stock but the chips are unobtainable. Though it appears [Debraj]’s only needs one of these generators, it would be an easy board to layout and build — if you can buy the parts.

Continue reading “Low-Cost, Two-Channel Scriptable Waveform Generator”

Reverse Engineering USB Protocols On A Function Generator

When working with test equipment such as oscilloscopes and function generators, it can be useful to take a screen capture. Historically this was done with Polaroid cameras that were bolted in place, but these days it can be done over a simple USB connection. [Majenko] didn’t like the Windows-only software that shipped with their Tenma 72-14110 function generator, however, and set about reverse engineering the USB protocol to create their own.

The hack was pulled off by running the original software in a Windows VM, while running Wireshark in the host Linux OS to capture the USB traffic. Once enough data had been captured, [Majenko] set about figuring out how the function generator formatted the screen data when sending it to the PC. Based on the fact that the data changed in length depending on what was on the display, it was surmised that the data was not raw, but compressed somehow. A hunch suggested it was probably some form of Run-Length Encoding, and this proved to be correct. With a little more digging and experimentation, [Majenko] was able to put together some code that netted a clear image from the device.

It’s a useful guide for reverse engineering image data, one that could prove useful if you’re tackling a similar problem on other hardware. We’ve seen some great reverse engineering efforts over the years, on everything from old video hardware to the Sega Saturn. If you’ve been diving deep into the secrets of software or hardware yourself, be sure to drop us a line.

Upgrading A Classic Function Generator

If you need an oscilloscope, function generator, or other piece of kit for your electronics workbench, there are plenty of modern options. Dropping $4,000 for a modern oscilloscope is nice if you have the money, but if you’d rather put it to better use there are great options that don’t cost a fortune. There are some addons that can turn a smartphone into an oscilloscope but one of the best values out there are older pieces of equipment from the 80s that still work great. You can even upgrade them with some more modern features too, like [NFM] did with this vintage function generator.

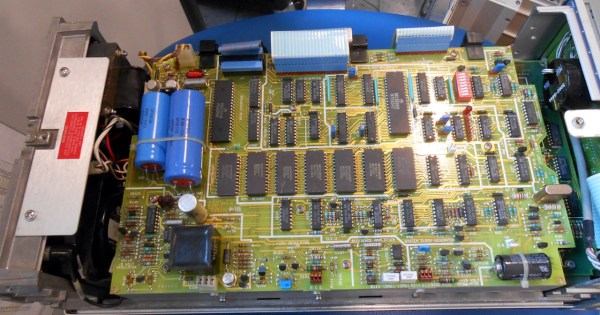
This function generator is an HP3325A and it is several decades old, so some work was needed just to restore it to original working condition. The cooling fan and capacitors all needed to be replaced, as well as a few other odds and ends. From there [NFM] set about adding one of the two optional upgrades available for this device, the high voltage output. This allows the function generator to output 40 volts peak-to-peak at 40 milliamps. While he did have an original version from HP, he actually had a self-made design produced that matches the function of the original.

Even if you don’t have this specific function generator, this guide goes into great details about the functioning of older equipment like this. Most of the parts are replaceable and upgrades aren’t completely out of the question like some modern equipment, and with the right care and maintenance these pieces of equipment could last for decades longer.

Continue reading “Upgrading A Classic Function Generator”