Mouse Brains Plus Line Laser Equals Rangefinder

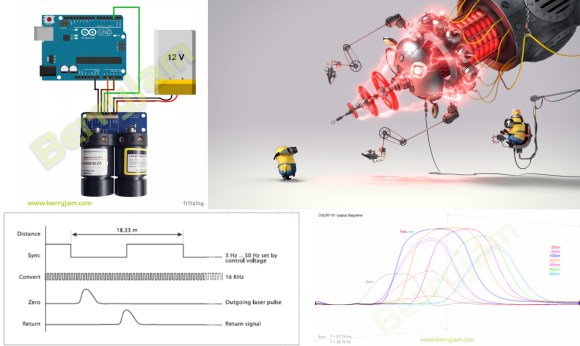
[Neumi] wrote in with a sweet robotics hack. It’s a 2D laser distance sensor (YouTube) made with a cheap line laser and an optical mouse’s flow-sensor chip used as a low-resolution camera. In one sense, it’s a standard laser-distance-sensor project. But it is clever for a whole bunch of reasons.

adns-3080-for-2d-depth-sensing-with-arduino-uzoetsntwv8mp4-shot0010_thumbnail

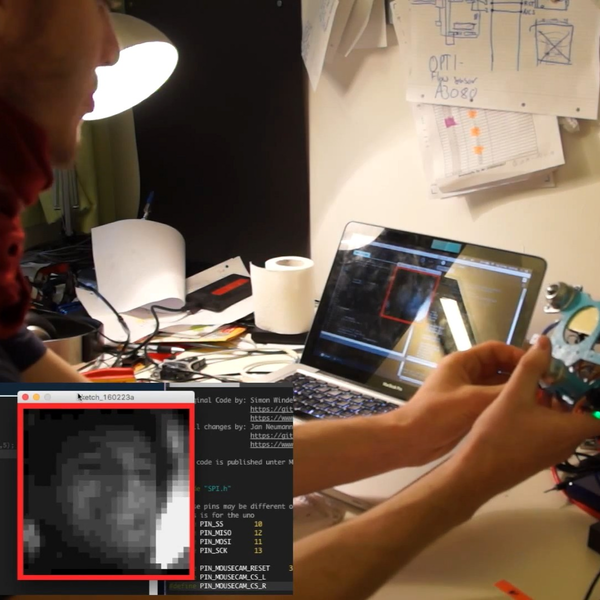
For one, using a mouse sensor as a low-res camera is awesome. It’s designed to read from a standard red LED, so the sensitivity is in just the right ballpark for use with a line laser. It returns a 30×30 pixel greyscale image, which is just about the right amount of data for a low-end microcontroller to handle and keep up with the framerate without resorting to coding tricks.

It’s also no coincidence that these sensors are available with lenses built in, for relatively cheap, on eBay. Apparently the quadcopter gurus use them as if they were mice to visually track their quad’s motion. Hacker spillover!

Detecting the laser line as it reflects off of whatever objects are lying on [Neumi]’s floor could also possibly prove difficult, and might produce false readings in the presence of background illumination. So [Neumi] takes two readings with the camera — one with the laser on and one with it off — and differences them. Done fast enough, this should reduce any non-laser sources down to the sensor’s noise floor. Finally, there’s some thresholding and averaging going on behind the scenes that help make everything work out right. The code is up on GitHub.

Not a bad build for a 2D laser distance system on a budget. If you want to shell out a bit more money, and are into a seriously involved build, this is probably the slickest we’ve seen in a long time. And if you’re thinking that you’ve heard of [Neumi] before, you’re right: we featured this 405mm laser PCB exposer / burner CNC machine just a few months ago.

Continue reading “Mouse Brains Plus Line Laser Equals Rangefinder”

THP Entry: A Repurposed Luminiferous Aether Detector

laserIn the late 1800s, no one knew what light was. Everyone knew it behaved like a wave some of the time, but all waves need to travel through some propagation medium. This propagation medium was called the luminiferous aether and an attempt to detect and quantify this aether led to one of the coolest experimental setups of all time: the Michelson-Morely experiment. It was a huge interferometer mounted on a gigantic slab of marble floating in a pool of mercury. By rotating the interferometer, Michelson and Morely expected to see a small phase shift in the interferometer, both confirming the existence of a luminiferous aether and giving them how fast the Earth moved through this medium.

Of course, there was no phase shift, throwing physics into chaos for a few years. When [Beaglebreath] first learned about the Michelson-Morely interferometer he was amazed by the experimental setup. He’s built a few interferometers over the years, but for The Hackaday Prize, he’s making something useful out of one of these luminiferous aether detectors: a functional laser rangefinder capable of measuring distances of up to 60 inches with an error of 0.000005 inches.

The core of the system is an HP 5528A laser interferometer system. [Beaglebreath] has been collecting the individual components of this system off of eBay for several years now, and amazingly, he has all the parts. That’s dedication, right there. This laser interferometer system will be mounted to a simple camera slider, and with the interferometer measurements, humidity and temperature measurements, and some interesting code (running on one of these for hacker cred), [Beaglebreath] stands a good shot at measuring things very, very accurately.

The devil is in the details, and when you’re measuring things this precisely there are a lot of details. The original Michelson-Morely interferometer was affected by passing horse-drawn carriages and even distant lightning storms. While [Beaglebreath] isn’t using as long of a beam path as the OG interferometer, he’ll still have a lot of bugs to squash to bring this project to its full potential.


SpaceWrencherThe project featured in this post is an entry in The Hackaday Prize. Build something awesome and win a trip to space or hundreds of other prizes.

Pew Pew! An Arduino Based Laser Rangefinder

Arduino Laser Rangefinder
Lasers are some of the coolest devices around. We can use them to cut things, create laser light shows, and also as a rangefinder.[Ignas] wrote in to tell us about [Berryjam’s] AMAZING write-up on creating an Arduino based laser rangefinder. This post is definitely worth reading.

Inspired by a Arduino based LIDAR system, [Berryjam] decided that he wanted to successfully use an affordable Open Source Laser RangeFinder (OSLRF-01) from LightWare. The article starts off by going over the basics of how to measure distance with a laser based system. You measure the time between an outgoing laser pulse and the reflected return pulse; this time directly relates to the distance of the object. Sounds simple? In practice, it is not as simple as it may seem. [Berryjam] has done a great job doing some real world testing of this device, with nice plots to top it all off. After fiddling with the threshold and some other aspects of the code, the resulting accuracy is quite good.

Recently, we have seen more projects utilizing lasers for range-finding, including LIDAR projects. It is very exciting to see such high-end sensors making their way into the maker/hacker realm. If you have a related laser project, be sure to let us know!

Homebrew Phase Laser Rangefinder

Just when you thought ARM micros couldn’t get any cooler, another project comes along to blow you away. [Ilia] created a phase laser rangefinder (.ru, Google translatitron) using nothing but a laser diode, a pair of magnifying glasses, a few components and an STM32F4 Discovery dev board.

The theory behind this build is using a laser’s phase to determine how far away an object is. By modulating the laser diode’s output at a few hundred Mhz, the reflection from the laser can be compared, giving a fairly reasonable estimate of how far away the target is. This method has a few drawbacks; once the reflection is more than 360 degrees out of phase, the distance ‘loops around’ to being right in front of the detector.

The laser diode used does not have any modulation, of course, but by using an STM32F4 ARM chip, [Ilia]was able to modulate the amplitude of the laser with the help of a driver board hacked out of a 74HC04 chip and a few resistors. Not ideal, but it works.

The receiver for the unit uses a photodiode feeding into the same microcontroller. With an impressive amount of DMA and PLL wizardry (the STM32F4 is really cool, you know), the phase of both the transmission and reflection can be compared, giving a distance measurement.

It’s all an impressive amount of work with a hacked together set of optics, a cheap dev board, and a few components just lying around. For any sort of application in a robot or sensor suite this project would fall apart. As a demonstration of the theory of phase laser rangefinding, though, its top notch.

You can check out a video of [Ilia]’s rangefinder below. Be sure to full screen it and check out the distance measurement on the LCD. It’s pretty impressive.

Thanks [Володимир] for the link.

Continue reading “Homebrew Phase Laser Rangefinder”

Sump Pump Alarm Sends Text Message As Water Rises

sump-pump-monitor

We’ve got some friends who have two sump pumps. One is a backup and sounds an alarm when it is switched on. But this only works as long as they’re home to hear it. [Felix Rusu] came up with a solution what will text him if the sump pump fails. This way he can head home, or call someone to check in on the problem if he’s away.

We saw a pretty complicated monitoring system back in January. This one uses a single ultrasonic rangefinder which we think is much simpler. It’s accurate to about 1cm and is simple to use — it’s very popular with the hobby electronics crowd which helps with price and availability of sample code. We hem and haw about the use of a Raspberry Pi board with the project. On the one hand it’s a cheap way to get the sensor on the network and provides the infrastructure you need to send any number of alerts. On the other hand, it’s a lot of power for this particular application. But we figure it can be extended to monitor other utilities in [Felix’s] home, like a sensor to alert him of a leaking water heater. And we think everyone can argue that a monitor like this is well worth the time and effort he spent to develop it.

No-touch Music Player

no-touch-mp3-player

This little box not only plays tunes, but it lets you control several aspects of playback without touching a thing. [Thomas Clauser] calls it the LighTouch and we like it because it uses inaudible sound to control audible sound.

We think the pair of cylinders sticking up through the top of this project enclosure will be recognized by most readers as the business end of an ultrasonic rangefinder. This is the only control interface which [Thomas] chose to use. Although he didn’t write very extensively about the specific control scheme he implemented, the video embedded in his post shows some of the gestures that cause the Arduino inside to change its behavior. For instance, a swipe of the hand at higher level starts playback, swiping at a lower level pauses it. When adjusting the volume the box responds to how close his hand is to that sensor. With this control in place, the music side of these things is simply handled by a music shield he is using.

Garage Parking Monitor Guides You In Every Time

THEPARKINGSPOTTER2

The live Adafruit Show and Tell stream from last weekend featured this project put together by [Silent Jeff]. He’s called “Silent” because when it came time to present his project on the show his microphone wasn’t working. As you can see in the video after the break, [PT] and [Ladyada] worked together to explain the project (of which they had no prior knowledge) using a game of charades. This is one of the follow-up images he sent them which details his parking spotter project.

[Ladyada] compliments [Jeff] on the finished look of the device and we agree. Not only does this do a great job of letting a driver know if they have pulled far enough into the garage, but it’s finished appearance ensures it won’t ever look out-of-place. The two silver discs near the lower end of the box are the sensors of an ultrasonic rangefinder. You mount this box so that the sensor is measuring distance between itself and the bumper of your vehicle. As the distance decreases the LEDs change to let you know when to stop. Inside the case you’ll find a voltage regulator and single-chip running the Arduino bootloader. [Jeff] says this is just his second Arduino project and we hope that at this rate we’ll be looking for big things from him in the not too distant future!

This is basically the same idea as cars that use parking assist sensors in the bumper. It’s just attached to the building instead of to the vehicle itself.

Continue reading “Garage Parking Monitor Guides You In Every Time”