Display Made Out Of Hundreds Of Seven Segment LEDs

While huge LED panels are a relatively common project du jour for people wanting to flex their engineering muscle, we’re taken aback by the sheer beauty of [Skot9000]’s huge LED display made of seven-segment displays. He calls the build DigitGrid, and it’s a wondrous display the likes of which we’ve never seen.

To build a display based on seven-segment LEDs, [Skot] went with a modular approach in designing the DigitGrid. To power and control all these seven-segment displays, [Skot] used a Texas Instruments TLC5920 to run four 4-digit displays as a single module. Four of these modules connect together to form a row of 32×2 digits, and eight rows of digits come together to make a 512-digit display. With seven LEDs for each digit, that works out to 3,584 4,096 individual LEDs for the entire panel.

To power and control this gigantic array of LED displays, each row uses a PIC16F microcontroller which, in turn, is controlled by an FPGA. After several hours of writing Verilog, [Skot] had a reasonably good hunk of software that allowed him to send frames from his computer to the display. The results, quite simply, are amazing. [Skot] managed to put up a short film showing off the animation capabilities of his new display, and it’s a wonder to behold. You can check that video out after the break.

Continue reading “Display Made Out Of Hundreds Of Seven Segment LEDs”

Building A Combination Lock With Logic Chips

The component gods must have smiled on [Darrell], because he recently ran into a cabinet full of 7400-series logic chips for sale at his local college surplus. All the regulars were there – flip-flops, logic gates, and SRAMs – in DIP packages. the 7400-series of logic chips gets very esoteric as the numbers increased, so when [Darrell] found a 74ALS679 address comparator, he didn’t quite realize what he had. After a quick review of the relevant datasheet he had a fairly good idea of the actual function of this chip and decided to make a combination lock.

From the datasheet, [Darrell] figured out how this small logic chip can compare two 12-bit addresses with only 20 pins: each of the 12 address pins are hardwired to match a single four-bit value. If the four-bit ‘key’ is set to 0110, the first six address pins are tied low, and pins 7-12 are tied high. After wiring up his address comparator to a trio of Hex dip switches, [Darrell] had a combination lock that used the word ‘FAB’ as a key.

In the 7400-series of logic chips, there are some oddballs; the 7447 seven-segment display driver is useful, but the 74881 ALU and 74361 bubble memory timing generator aren’t exactly something you would find in a random component stash. If you’ve got a weird logic chip build (there’s a 300-baud modem, you know), send it on in. You can check out an animated gif of [Darrell]’s lock after the break.

Continue reading “Building A Combination Lock With Logic Chips”

Grabbing Data From A Rigol ‘scope With Python

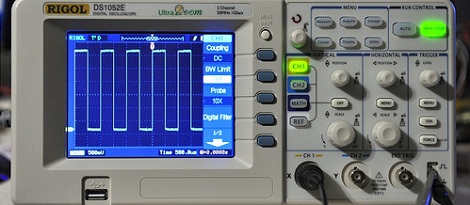
While a fancy Rigol 1052E oscilloscope is a great tool and a wonderful portable oscilloscope we heartily recommend, sometimes you just need to use the more ‘advanced’ functions of an oscilloscope. Luckily, [cibomahto] figured out how to use a Rigol scope with Python, allowing for easy remote viewing and control of a Rigol 1052E ‘scope on any desktop computer.

[cibomahto]’s Python script grabs the screen and can send commands to the oscilloscope, effectively obviating the need for the slightly-terrible Rigol Ultrascope software. Not only that, controlling the 1052E is possible under OS X and Linux because of the portable Python nature of [cibomahto]’s work.

The Rigol DS1052E has become the de facto standard oscilloscope to grace the workbenches of makers and hackers around the globe. With a small price tag, the ability to double the bandwidth, and an active homebrew development scene, we doubt [cibomahto]’s work of grabbing data over USB will be the last hack we’ll see for this fine machine.

Thanks to [Markus] for sending this one in.

Working Software-defined Radio With A TV Tuner Card.

[Balint Seeber] just sent in a small yet timely project he’s been working on: a software radio source block for the Realtek RTL2832U. Now with a cheap USB TV tuner card, you can jump right into the world of software-defined radio.

[Balint]’s code comes just a week after hackaday and other outlets posted stories about using a $20 USB TV capture dongle for software defined radio. At the time, these capture cards could only write data directly to a file. With [Balint]’s work, anyone can use a cheap tv tuner dongle with HDSDR, Winrad, or GNU Radio. If you’ve ever thought about trying out software-defined radio, now might be the time.

Elsewhere on the Internet, a surprisingly active RTL-SDR subreddit popped up dedicated to using the Realtek RTL2832U tuner for software defined radio. There’s an awesome compatibility chart listing compatible USB dongles. The cheapest (so far, and subject to change) is the Unikoo UK001T available for $11 on eBay.

With his source block, [Balint] can listen to anything on the radio between 64-1700 MHz. The sample depth is 8 bits and the sample rate can be anything up to 3.2 MHz. You can watch [Balint] testing out his $20 GNU Radio rig after the break.

Continue reading “Working Software-defined Radio With A TV Tuner Card.”

Quieting An Inexpensive Bench Power Supply

[Mike] just purchased this Atten APS3005S bench power supply for around $80. It does the job, but boy is it noisy! We were pretty surprised to hear it fire up in the video after the break. To make matters worse, the noise is persistent since the fan never shuts off. Having worked with other bench supplies he knew that a common feature included in many models is temperature controlled case fans. He set out to quiet the fan and implement a temperature switch.

For this project [Mike] had the benefit of looking at a nearly identical model that does have temperature switching. He discovered that the board on this one has a through-hole zero ohm resistor populated in place of a thermostat switch. That switch closes the connection at or above 45 degree Celsius, thereby turning on the cooling fan. Bridging the traces with a zero ohm resistor to save on production costs is what caused the fan to run continuously. After replacing the resistor with a KSD-01F and swapping out the stock fan for a high-quality version [Mike] has takes a noise maker and turned it into a device that’s kind to the ears.

Continue reading “Quieting An Inexpensive Bench Power Supply”

808 Camera Hack Produces A Time-lapse Tic Tac Box

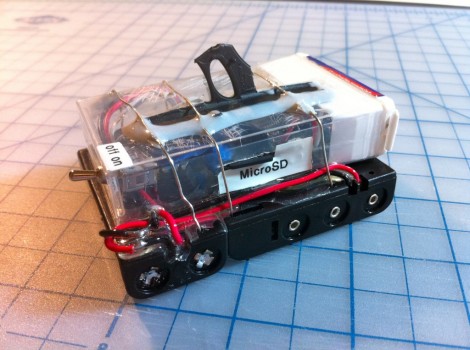
It’s not really conceived as a spy cam, but it could be. [Quinn Dunki] built this tiny time-lapse camera project with racing in mind. She’s involved in a group that endurance races clunkers, and part of the fun is sharing the experience of riding around in the old beaters. The module seen above takes a picture every four seconds and will last 24 hours before needing new batteries or an SD card change. We wonder if that’s longer than some of the ‘racecars’ make it?

She picked up an 808 camera, which looks like the key fob you use to unlock your car doors. They’re so cheap you can include them in projects and not really care if you don’t get them back. Inside it’s got a small lithium battery, the circuit board with a processor, microSD card slot, and of course the SSD used to capture the images. To control the device she used a tiny relay with an ATtiny13 used for the timing. We think the battery selection is a bit overboard, but maybe the next version will be a little more conservative.

There was one folly along the way. She wanted to attach this to the body of the car with a handful of magnets. But they don’t play nicely with the magnetic relays so that was out. The solution was to add that lanyard ring to the case which will allow the camera to be zip tied to the vehicle. So far there are no time-lapse movies available, but keep your eyes on our links posts and we’ll try to include one when it pops up.

Sentry Gun Controller-board Upgrade

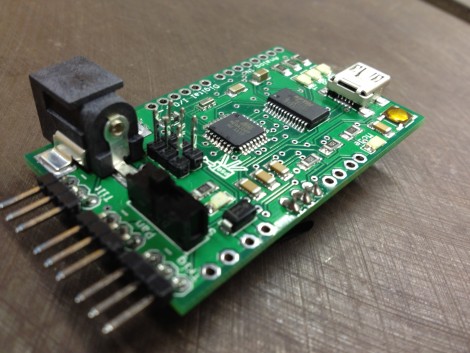
This open source sentry gun controller board builds on a great concept by getting rid of the Arduino board. The previous version was an Arduino shield, but this upgrade keeps all of the cool features by rolling the necessary parts into one smaller footprint.

The image above doesn’t quite convey the scope of the project. Go take a look at the feature from last year which used the shield version of the controller. That build used a servo-mounted paintball gun in conjunction with a webcam. You can still build the same platform, but use the open-source files to include this board. It has outputs for three servo motors, and can also interface with airsoft or paintball guns which have their own electronic triggers and integrated batteries.

We always like to see the schematic for projects like this one. For your convenience we exported an image from the Eagle package. You can find it, along with the demo video, after the break.

Continue reading “Sentry Gun Controller-board Upgrade”