What do you have to do to win best of show at an R/C event in Toledo? Build a 7 foot long fire breathing radio controlled dragon of course! [Rick Hamel] stuffed his electronics, a turbine engine, a kerosene tank, and a stun gun into a home built body shaped like a dragon. You can see a few construction pics that show how he is able to steer. It looks like it flies just like any r/c airplane. This one, however could burn down a village and keep going. Check out the videos after the break to see it flying and testing out its fire breathing mechanism.
Day: May 1, 2012
Build A Rig To Make Orbs In Your Light Paintings
We’ve covered plenty of light painting projects here. People are always finding new ways to create interesting things in this fairly new medium. This project covers a method of creating orbs or spheres in your light paintings. The author points out that many people do this currently by putting the light source at the end of a string, swinging it in front of them like a propeller, and turning slowly in a circle. He wanted to automate the process a bit, so he combined his motorized telescope tripod, a power drill, a strip of RGB LEDs, and a few scraps of wood. He now has an automated system to make perfect orbs. Some of the examples he shows are quite stunning.
Playing Pong With Your Mind
It seems [Charles Moyes] and [Mengxiang Jiang] won’t suffer from the sore wrists and thumbs from an Atari controller any longer. They built a version of Pong played by concentrating and relaxing while wearing an EEG headset.
Right now, there’s only enough hardware for one player; when the player operating the red paddle concentrates the paddle moves up – relax, it goes down.
The hardware portion of the build is fairly tricky business. [Chuck] and [Mengxiang] built a circuit to amplify the tiny voltages between their ears into something a microcontroller can read. The circuit is loosely based on this Arduino EEG build, but highly refined as the elegance of an ATMega644 requires.
The EEG amplifier has a cutoff of under 50 Hz, perfect for reading the Alpha waves correlated with concentration. The oscillations from the skull-cap are sent through the ATMega to MATLAB where after a pass through an FFT the brain waves are converted to mouse scroll wheel output.
There’s a demo video available where you can see spectators screaming at the poor test subject telling him to relax and concentrate on command. You can check that out after the break.
Arduino BASIC Interpreter Using LCD, Keyboard, And SD
This Arduino BASIC interpreter will make a really fun one-day project if you’ve already got the parts on hand. [Usmar A. Padow] put together an Arduino Uno, SD card, four line character LCD, and PS/2 keyboard. but he’s also included alternative options to go without an LCD screen by using a computer terminal, or without the SD card by using only the Uno’s RAM. As you can see in his demo after the break, this simple input/output is all you need to experiment with some ancient computing.
It’s hard for us to watch this and not think back to an orange or green monochrome display. Just like decades past, this implementation of BASIC has you start each line of code with a line number, and doesn’t allow for character editing once the line has been input. The example programs that [Usmar] shows off are simple to understand but cover enough to get you started if you’ve never worked with BASIC before.
Last August we saw another hack which ported Tiny BASIC to the Arduino. You may want to take a gander at that one as well.
Continue reading “Arduino BASIC Interpreter Using LCD, Keyboard, And SD”
GPIB Connectivity Twofer
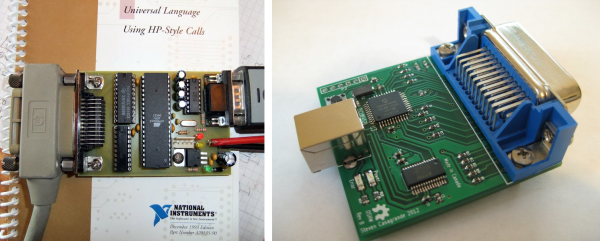
Dust off that old GPIB hardware and hook it up to your modern computing platform using either of these two solutions. If you haven’t a clue what we’re talking about you probably don’t own any fifty-year-old test equipment. But the General Purpose Interface Bus (aka IEEE-488) was fairly common on 1960’s era test equipment like multimeters and logic analyzers.
[Sven Pauli] is responsible for the RS232 GPIB interface board (translated) in the upper left. It uses an ATmega16 and a couple of classic bus driver chips to get the job done.
To the lower right is a USB to GPIB converter board that [Steven Casagrande] developed. This one is PIC based, using the 18F4520 and an FTDI chip to handle the USB side of the equation.
Check out the connector that is used for this protocol. We’d bet that’s not the easiest part to source. But at least now you’ll know what you’re looking at when pawing through the flea market offerings.
LED Case Lights Reflect CPU Usage
A lot of Linux users include system monitor information in their status panel so that they can see when the CPU is grinding away. [Kevin] is taking the concept one step further by changing his case lights based on CPU usage. Above you can see green, orange, and magenta, but [Kevin’s] implementation uses the full spectrum of color.
The project is based on an ATmega48. It’s running the V-USB stack and connects to one of the motherboard’s internal USB ports. This lets him easily push the CPU usage data over to the microcontroller where it is translated into color. One RGB LED has been installed behind each fan panel on the front of the case, with a white LED above and below as an accent. Pulse-width modulation via some MOSFETs lets him mix and match for just the right color. He’s powering the add-on off of the PSU rails rather than USB so that it turns off when the computer goes to standby.
Don’t miss [Kevin’s] explanation of the system, and a demo of it in action after the break.
Chicken Coop Door Using Threaded Rod
There’s no rooster to wake them up, and [Steve] and his wife are fine with that. What they’re not fine with is having to get up early anyway in order to let the chickens out of the coop. Like many small-scale egg farmers they sought out an automatic solution for opening the coup in the morning.
[Steve] had seen a bunch of different automatic coup door hacks kicking around the Internet. But all of the ones he could find used a vertical door and pulleys. His setup has a door that opens horizontally and he realized that he needed to build some kind of linear actuator. What he came up with is a system built with hardware store parts. He’s using a plain old piece of threaded rod along with a coupling nut (they’re usually 3/4″ long or so). The nut is held firmly on the door using a conduit mounting bracket, while the threaded rod is turned by an electric screwdriver mounted to the jamb. Two limiting switches are made up of magnetic sensors often used to ring the door entry bell when you enter a store. An Arduino takes care of scheduling and controlling the motor for opening and closing the door. See for yourself in the high-production-value video after the break.
For what it’s worth, we have seen at least one rope and pulley door that slides horizontally.