DIWire Bender Makes Nearly Any Shape Imaginable

The people over at Pensa posted an awesome CNC wire bender on their blog. Robotic wire benders are common industrial machine that are very fun to watch. These machines can turn out custom wire-bent parts or sculptures in a matter of seconds. The Pensa team’s “DIWire Bender” might not be as fast as the big boys, but it works just the same.

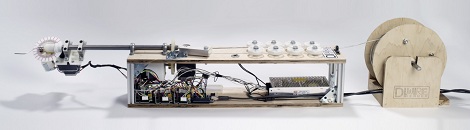
From their Tumblr blog, we see that there are motors to draw the wire off a spool and into a hollow shaft. At the business end of the machine, there’s a small gear-driven bender that can form wire in just about any shape. There’s an awesome video of the DIWire Bender in action after the break if your mind is still trying comprehend how wire top hats and glasses can be made.

The Pensa team says they built this to fill a void in DIY fabrication machines – 3D printers are great and all, but some things can be done more easily by bending some wire.

Continue reading “DIWire Bender Makes Nearly Any Shape Imaginable”

Reaching Out To A Touch Screen With A Microcontroller

We love capacitive touch screens. They’re much more robust than resistive touch screens and if the UI is programmed well they produce a great user experience. But getting your electronics project to interact with one is a bit tough. [RobB] has been experimenting in that area, and managed to build a simple touchscreen actuator for microcontroller use.

In the video after the break you can see his proof of concept. He’s using an Arduino to enter the number 2 on an Android  iOS calculator app once every second. It doesn’t take much to pull off this trick, [RopB] just taped a piece of tin foil to the screen and connected it to the Arduino with a jumper wire. The pin is left floating until a screen tap is needed, at which point it is pulled to ground.

A custom app operating at slow speeds could use this as an input technique. Two pieces of foil (one acting as clock, the other data) would provide a rudimentary serial transfer system.

Continue reading “Reaching Out To A Touch Screen With A Microcontroller”

Creating A Multimedia Elevator Ride

[Ben Peoples] works in theatrical electronics. Sounds like fun, and here’s an example of the kind of stuff he does. We’re not sure what event this installation was used for, but if the elevator ride needed something flashy just think of what the party room must have looked like. These HDTV screens on the ceiling of the elevator play different clips when the elevator is moving up or down. The challenge for [Ben] was to find a way to make it work without tapping into the elevator electronics or requiring any button presses.

The first attempt at sensing the elevator’s travel was done with an accelerometer. The problem with this approach is that an accelerometer only senses change in acceleration and this method proved to be fairly error prone. [Ben] switched over to a reflective sensor which performed quite well. Since most of these sensors will only work within about an eighth of an inch he ended up building his own with a LDR and a couple of amber LEDs.

[via Reddit]

Retrotechtacular: The Blit Has Given Me Access To The Power Of Multiprogramming!

We normally try to be descriptive with our titles. But when that statement pops out of the narration with notable excitement it made us chuckle. This installment of Retrotechtacular is a promotional video for the Blit. It’s a graphics-based hardware terminal for Unix systems. It’s biggest boast is the ability to run (and display on screen) several different programs at once — an activity called multiprogramming. But there is also the “digitizing mouse”. On board is a 68000 microcprocessor 256k of RAM (they call it a quarter meg), and connects via RS232. The screen is 800 by 1024; that’s right, it’s a portrait orientation.

Notable in this episode are some classic eyeglass frames, and rad synthesizer sounds for scene transitions. Whatever happened to videography technique that uses a dimwitted companion to ask that all-knowing narrator stupid questions?

Continue reading “Retrotechtacular: The Blit Has Given Me Access To The Power Of Multiprogramming!”

Printing Point-to-point Circuits On A 3D Printer

[CarryTheWhat] put up an Instructable on his endeavours in printing circuit boards for solder free electronics. He managed to print a flashlight where the only non-printed parts are a pair of batteries and a couple of LEDs.

The circuit is a weird mix of point to point and Manhattan style circuit construction; after modeling a printed plastic plate, [CarryTheWhat] added a few custom component holders to hold LEDs, batteries, and other tiny electronic bits.

To deliver power to each electronic bit, the components are tied off on blue pegs. These pegs are attached to each other by conductive thread much like wirewrap circuit construction.

Right now, the circuits are extremely simple, but they really remind us of a few vintage ham radio rigs. While this method is most likely too complex to print 3D printer electronics (a much desired and elusive goal), it’s very possible to replicate some of the simpler projects we see on Hackaday.

[CarryTheWhat] put the models and files up on GitHub if you’d like to try out a build of your own.

The Gas Cap Senses Your Flatulence And Displays It On Your Forehead

If you’ve ever found yourself wondering if there’s any possible way to let those with deficient olfactory senses know just how flatulent you are, wonder no more. The Gas Cap is here to fulfill that very need. A bar graph of sorts, located on the front of a hat that will light up to reflect the amount of methane sensed near your, uh, exhaust port. This project cost around $100, though a good portion of that went to the Xbee modules so that the detector could be separated from the hat, allowing for remote fart notifications.

This seems to be a project that is not as uncommon as one might assume. We’ve seen fart intensity detectors as well as tweeting chairs that alert the world when you pass gas.

[via Adafruit]

Arduino PIC Programmer Writes To 18F Family

[Kirill] wrote in to share his Arduino-based PIC programmer. It is capable of writing to the 18F family of chips, including 18F2XXX and 18F4XXX. We think that’s pretty exciting because this line of chips has USB functionality and there are bootloaders out there that let you program them via USB. So if you wanted to build your own PIC dev-board (like this one) you can use your Arduino to flash the bootloader.

This post comes hot on the heels of the Arduino being used as a PIC 16F programmer. That hack has a rudimentary programming GUI, something that [Kirill] admits his lacks but has no plans to implement himself. Perhaps someone will do a little porting work to merge the projects, adding to the range of chips supported by this programming technique.