GPIB Connectivity Twofer

Dust off that old GPIB hardware and hook it up to your modern computing platform using either of these two solutions. If you haven’t a clue what we’re talking about you probably don’t own any fifty-year-old test equipment. But the General Purpose Interface Bus (aka IEEE-488) was fairly common on 1960’s era test equipment like multimeters and logic analyzers.

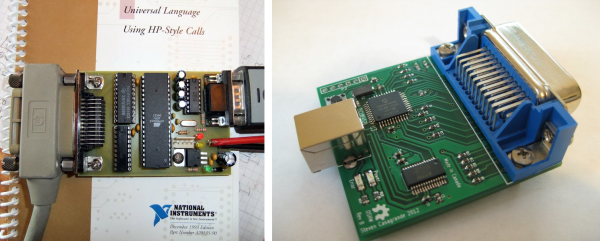
[Sven Pauli] is responsible for the RS232 GPIB interface board (translated) in the upper left. It uses an ATmega16 and a couple of classic bus driver chips to get the job done.

To the lower right is a USB to GPIB converter board that [Steven Casagrande] developed. This one is PIC based, using the 18F4520 and an FTDI chip to handle the USB side of the equation.

Check out the connector that is used for this protocol. We’d bet that’s not the easiest part to source. But at least now you’ll know what you’re looking at when pawing through the flea market offerings.

LED Case Lights Reflect CPU Usage

A lot of Linux users include system monitor information in their status panel so that they can see when the CPU is grinding away. [Kevin] is taking the concept one step further by changing his case lights based on CPU usage. Above you can see green, orange, and magenta, but [Kevin’s] implementation uses the full spectrum of color.

The project is based on an ATmega48. It’s running the V-USB stack and connects to one of the motherboard’s internal USB ports. This lets him easily push the CPU usage data over to the microcontroller where it is translated into color. One RGB LED has been installed behind each fan panel on the front of the case, with a white LED above and below as an accent. Pulse-width modulation via some MOSFETs lets him mix and match for just the right color. He’s powering the add-on off of the PSU rails rather than USB so that it turns off when the computer goes to standby.

Don’t miss [Kevin’s] explanation of the system, and a demo of it in action after the break.

Continue reading “LED Case Lights Reflect CPU Usage”

Chicken Coop Door Using Threaded Rod

There’s no rooster to wake them up, and [Steve] and his wife are fine with that. What they’re not fine with is having to get up early anyway in order to let the chickens out of the coop. Like many small-scale egg farmers they sought out an automatic solution for opening the coup in the morning.

[Steve] had seen a bunch of different automatic coup door hacks kicking around the Internet. But all of the ones he could find used a vertical door and pulleys. His setup has a door that opens horizontally and he realized that he needed to build some kind of linear actuator. What he came up with is a system built with hardware store parts. He’s using a plain old piece of threaded rod along with a coupling nut (they’re usually 3/4″ long or so). The nut is held firmly on the door using a conduit mounting bracket, while the threaded rod is turned by an electric screwdriver mounted to the jamb. Two limiting switches are made up of magnetic sensors often used to ring the door entry bell when you enter a store. An Arduino takes care of scheduling and controlling the motor for opening and closing the door. See for yourself in the high-production-value video after the break.

For what it’s worth, we have seen at least one rope and pulley door that slides horizontally.

Continue reading “Chicken Coop Door Using Threaded Rod”

Drop Everything And Build This Go-kart Right Now!

There are awesome projects, and then there are things that make us drool on the keyboard. We just got done wiping up our mess after seeing this go-kart which uses four hub-motors as direct drive wheels. We’ll admit, this is more artwork than a hack as these guys are mechanical engineers and know what they’re doing. But how could we pass up sharing something like this?

The design is smaller than any of the other go-karts we remember seeing. The low-backed pilot seat is the biggest part, with a cubby-hole beneath it for the batteries and control hardware. Each of the hub-motors was hand wound and reading through the related blog posts it seems this was a huge and painful part of the build.

So it’s pretty fun to watch these guys tear up the hallways of one of the engineering buildings at MIT. But the footage of a two-kart race up a spiraling parking garage in the middle of the night is absolutely delightful. You’ll find both videos embedded after the break.

Continue reading “Drop Everything And Build This Go-kart Right Now!”

Rail Bike Conversion Is A Success, And A Failure

There is a long tradition of hacking transportation to work on the rails. People have done it to all kinds of things for many reasons. Some are for rail maintenance, others are simply to enjoy the tracks. With as much unused railways as we have, it seems a shame to waste them. This hack turns a bicycle into into a rail bike with the use of some conduit, a cut up razor scooter, and a fork from another bike.  After some tinkering with spacing to make the whole thing a little smoother on the rails, the whole thing seemed like a success. That is, until the front rail guide caught a railway tie and the rider was tossed. Not only that, the impact destroyed his bike frame.

So, does this wreck mark this as a failure? Or is this simply another step in the iterative process we all tend to use. The only difference is if he carries on to build another.

Automated Cat Feeder With A View

[Robovergne] wrote in to share his fantastic automated cat feeder with us. After researching the common commercial products he could find, he decided to build one that utilized a home made linear actuator to pull a certain amount out of a reservoir. Initially, he attempted to use microwave motors but ultimately found them to be too weak to force the bits of cat food should they get stuck. He was afraid this extra strain would cause motor failure before too long. Ultimately, he replaced the microwave motor with a fairly strong servo that seems to do the job just fine. He’s currently using an Arduino to time it all, but he does mention that he feels it is a waste of the arduino for such a simple task.

As you can see in the videos after the break, his mechanism seems quite solid. There isn’t a lot of play in the movement and the amount of food coming out seems to be fairly controllable.

Continue reading “Automated Cat Feeder With A View”

Keyboard Composes Its Own Music

Summer is right around the corner and all the final projects from electronic design classes are rolling into the tip line. This time, we’ve got [Chaorong] and [Siyu]’s auto-composing keyboard from their time in ECE4760 at Cornell.

The keyboard has two modes: a ‘happy’ mode and a ‘tender’ mode, the difference being the tender mode is slower and sounds a little like a lullaby. After two keys are pressed, the ATMega644 figures out what key it should play in and starts generating a random-ish sounding song using a Markov probability matrix.

There’s a third option for the keyboard as well: play a short melody and the software will loop through a few permutations of the melody. After the break, you can see [Siyu] play Ode to Joy and have the autocomposer improvise around the tune. Very, very nice work and we can’t wait to see more senior design projects hit the tip line.

Continue reading “Keyboard Composes Its Own Music”