You Are A Sack Of Meat, Easily Punctured By Stompy


It may not be as cool as a bear riding a jet ski on a shark in outer space, but Stompy, the giant, rideable walking hexapod comes very close.

A few months ago, we caught wind of a gigantic rideable hexapod project brewing at the Artisan’s Asylum hackerspace in Somerville, MA. The goal was to build an 18-foot wide, two ton rideable hexapod robot, with the side benefit of teaching students how to weld, code, and other subjects related to giant machines and mechatronics.

The Stompy team has now launched a Kickstarter asking for donations to pay for the materials, plasma cutting, and other bits of hardware required to make Stompy a reality. Since there isn’t much information on amateur level hydraulics, the project is open source; the trials of building Stompy will be made public freely available for any other giant robot project.

Team Stompy has successfully built, debugged, and tested a half-size prototype of one hydraulically powered leg that is able to ‘row’ across the floor under its own power. This is a huge achievement for the team and now they’ll move on to the full-size single leg prototype.

You can see the team’s single leg prototype in action after the break.

Continue reading “You Are A Sack Of Meat, Easily Punctured By Stompy”

Ask Hackaday: What’s Your Backup Solution?

Here’s some very, very sad news from [Charles] over at The Maker’s Workbench: on July 16th, his house was hit by lightning causing his workshop to catch fire. His family is safe, but unfortunately thousands of dollars in gear has gone up in smoke. [Charles] lost a Reprap, a ton of dev boards, a huge amount of tools including an awesome soldering setup, and his laptop and file server.

Short of taking up residence inside Yucca Mountain, there’s little that can be done to prevent random, disastrous acts of Thor. The only bright side to [Charles]’ ordeal (if there is one) is that most of his file server – including all the code he’s written over the years – was backed up on the cloud.

Hackaday readers aren’t much for marketing buzzwords like ‘the cloud,’ so we’re wondering what your backup solutions are. If the cloud isn’t for you, is a NAS at home a good idea? rsync will do wonders, but even hard drives at an off-site location fail; maybe tape is the best choice. Of course if you have a laser cutter, there’s always the option of cutting patterns of holes in stainless steel plates and preserving your data for thousands of years.

If [Charles]’ story doesn’t inspire you to backup often and preserve your data, consider this: the greek poet [Sophocles] wrote 123 plays, seven of which still survive. Put in perspective, that’s like the only songs in The Beatles’ catalog surviving 2,500 years coming from the Yellow Submarine soundtrack.

Node.js For Linux Joysticks

[Tim Caswell] has been using gamepads and joysticks to demonstrate his node.js hacks for a long time. The thing is, he has been relying on C++ bindings to handle the hardware while trying to herald the praises of node.js. Why not cut out the middle man and write a joystick driver in node.js? It turns out to be so simple anyone can do it.

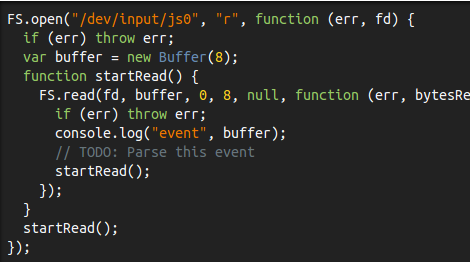
Granted, this is not a kernel driver. He’s relying on the Linux kernel to recognize the hardware and provide him with the customary /dev/js0 file which he can then work with. As you can see in the snippet above, he’s looping through code in order to constantly read from the hardware. To get this far he dug through the documentation for joystick packets (yay for open source!) to find that each is made of a 32-bit timestamp, a 16-bit value, and two 8-bit numbers identifying the event type and button or axis.

Once he has the packets, it’s off to the races. Each data type is parsed into an appropriate variable which you can use in the logic of your own program. Don’t be nervous, this will make a great weekend project!

Dual PIR Photo Trigger By Crossing The Streams

Motion sensing can be quite effective when taking photographs of wildlife. But how can one be sure that the motion was at the center of the frame? A PIR sensor picks up motion in its entire viewing range. It’s not really something that can be aimed. But if you use two PIR sensors you can monitor a focused area for motion.

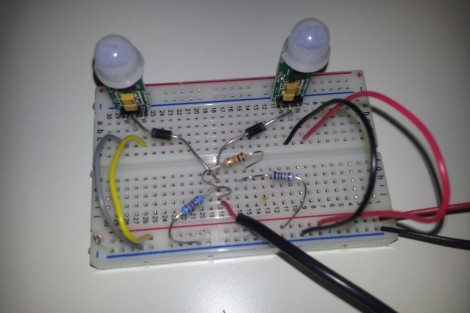
The trick is to use a logic circuit. By building an AND gate you can trigger based on motion in the area which is overlapped by both of the sensors. In this case the AND gate is built from a voltage divider. The outputs of the PIR sensors are connected above and below the divider’s connection to the photo trigger. Both have a protection diode, and the divider is tuned so that both PIR outputs must come one in order to raise the trigger input above the voltage threshold. So much for never crossing the streams.

[via TriggerTrap]

Building A SkyCam-like Camera Mount

With the Olympics on there are a lot of really great camera shots shown during the events. One of the best is the overhead view, which is provided by a camera suspended between cables. It’s not new for the Olympics, SkyCam has been around for over twenty years. What is new is [Dan Royer’s] attempts to build his own aerial camera setup.

He’s not starting from zero with this project. [Dan] has done some really great work with the Drawbot. It’s a two-motor, two-axis plotter which uses CNC to draw on a white board. For this project he combined two Drawbots in order to add a third axis. The image above shows the camera mount suspended between the four strings. He’s been working hard on getting the software ready for this kind of addressing. Along the way he broke the strings a few times because he was too far from the kill switch to stop it in time. But what he’s got is a nice start and we hope to see a more illustrative follow-up soon.

One of the things that SkyCam has going for it is a stabilization system. We wonder if a spinning gyroscope would work as well as it did for that balancing bike.

[Woz] Prints And Spends His Own $2 Bills

[Steve Wozniak’s] damn the man, devil may care attitude continues to show with this recent interview. Here he shows off the pad of $2 bills he had made up. He’ll sell one sheet of them to you for $5. Do you think that’s a scam? He say’s “you’d be an idiot not to buy it for five bucks” and after we dug a little deeper, he’s right.

Now, you really need to watch the video after the break before you read the rest of this feature. Trust us, it’s extremely entertaining. [Woz] mentions that he hired a local printer to make the pads for him, but he got the paper from a high-quality print shop. They meet the specs of the federal government and by law they’re legal tender. Each pad has a page of four bills which can be torn off of the gummed top, and there are perforations between each bill for easy separation.

Nothing illegal is going on here. We followed one of the YouTube commentor’s links to this article [Woz] wrote about his $2 bill exploits. The high-quality printer he buys the paper from is the Bureau of Printing and Engraving. He buys the bills in sheets and pays a premium for that option. Each $2 bill costs him $3. But the fun he’s had over the years is probably worth it.

Continue reading “[Woz] Prints And Spends His Own $2 Bills”

Using An Oscilloscope As A Composite Video Adapter

Confronted with a monitor that would display neither HDMI signal, nor composite video, [Joonas Pihlajamaa] took on a rather unorthodox task of getting his oscilloscope to work as a composite video adapter. He’s using a PicoScope 2204 but any hardware that connects to a computer and has a C API should work. The trick is in how his code uses the API to interpret the signal.

The first thing to do is make sure the voltage levels used in the composite signal are within the tolerances of your scope. [Joonas] used his multimeter to measure the center pole of the RCA connector and found that the Raspberry Pi board puts out from 200 mV to 2V, well within the PicoScope’s specs. Next he started to analyze the signal. The horizontal sync is easy to find, and he ignored the color information — opting for a monochrome output to ease the coding process. The next big piece of the puzzle is to ascertain the vertical sync so that he knows where each frame starts. He got it working and made one last improvement to handle interlacing.

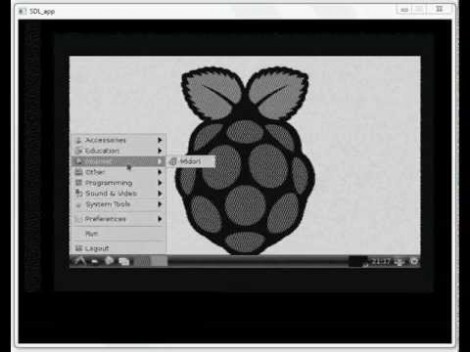
The proof of concept video after the break shows off the he did. It’s a bit fuzzy but that’s how composite video looks normally.

Continue reading “Using An Oscilloscope As A Composite Video Adapter”