MakiBox Turns Plastic Pellets Into 3D Objects

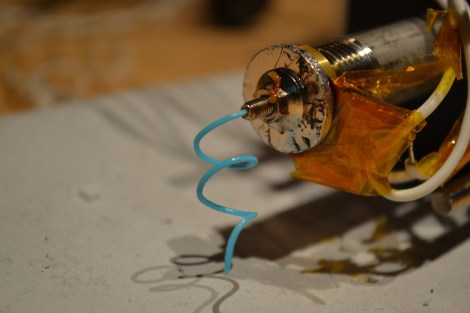
The holy grail of desktop 3D printers – aside from manufacturing full color objects in any shape imaginable – is turning tiny plastic pellets into a plastic filament. Many projects have attempted this with moderate levels of success but turning pellets into filament still an open problem. MakiBot hopes to solve this problem by manufacturing plastic filament just in time to be squirted out a nozzle onto the print bed.

MakiBox is seeing a lot of potential with their pellet drive. Instead of sending huge amounts of pellets into an auger extruder, the team realized the best option would be to send pellets into the hot end one at a time. This makes for better thermal characteristics and produces a very consistent filament.

Turning plastic pellets into 3D objects is an enticing idea but producing a filament on the fly is an interesting concept. While the MakiBox team is making custom color filament right now, in the future it might be possible to mix colors for full-color prints.

Videos demonstrating the extruder after the break.

Continue reading “MakiBox Turns Plastic Pellets Into 3D Objects”

RC Airplane Made From Political Signs

V1-Full

Whatever candidate (if any) you’re in favor of, we could bet that you’re probably tired of seeing advertisements and political signs everywhere. [Mark] wrote in with a hack that allows you to actually use these signs for something fun, making a RC airplane!

[Mark] gives a full bill of materials in his article, but the featured component is campaign sign. This isn’t LawyerADay, so we’re not sure of the legality of taking them. After election day at least, it’s doubtful anyone will care. Of course you’ll also need a motor, prop, and RC controls, as well as some dowels to attach the tail section to the main body, so don’t buy the “campaign promise” that this is a free airplane.

CAD diagrams are available of the cutouts, as well as how to cut the signs to form hinges without any other parts. This is quite clever, and a video of the plane in action on a table is available on the site. According to [Mark], no video was rolling on its test flight, but it did fly before some interference grounded the plane. Hopefully he’ll be able to get some footage of it in action soon!

Making A Phono Preamp For A First Electronics Project

Nearly everyone’s first electronic project is something that blinks a LED. There are a million ways to go about this ‘Hello World’ project of electronic design; 555 timers, microcontrollers, or maybe even discrete components if you’re really cool. When [miceuz] was asked by a friend to help with his first electronic project he eschewed the usual blinking LED project and taught him how to build something he actually needed: a phono preamp for an old turntable.

Back in the day when vinyl was king, albums needed to be mastered to play on a record player. The mastering process cuts some of the bass and increases the treble. When the record is played, this process needs to be reversed. It’s a preamp that does this job by attenuating the high frequency sounds and boosting the thumping bass.

[miceuz] found a nice DIY RIAA preamp  project and found a nice little op amp  somewhere in his parts bin. After laying out the circuit, [miceuz] etched a few boards and taught his friend how to solder SMD components.

Of course the project didn’t work the first time around, but after poking around with a meter and checking out the old turntable, the preamp came to life with the clang of chords from an old record. If you’d like to build your own, you can get the files from [miceuz]’s git.

OpenPLC, For Industrial Automation To Halloween Displays

Stepping out onto just about any factory floor you’ll find complex automatons building anything and everything imaginable. These machines need to be controlled somehow and before the age of computers these manufacturing robots were controlled with relays wired together to produce a multitude of actions. Relays, no matter how reliable and bulletproof the are, can’t be programmed without rewiring the entire machine. Now, factories have programmable logic controllers to take care of their automation tasks.

[Thiago] built his own programmable logic controller and released it as open hardware.Included in the OpenPLC are four 24V inputs, four 24V outputs (two with PWM), 0-10V analog inputs, and USB, SPI, and I2C for programming and expansion.

If you’re building anything from an industrial machine in your garage, or simply want really awesome Halloween (or Christmas) decorations, the OpenPLC can take care of driving all the solenoids, motors, and actuators needed. With the extendable I2C and SPI busses, it’s possible to add a plethora of sensors to bring a project to life.

The OpenPLC is based on an ATMega328 and is compatible with Arduino code. There are a few extension boards for digital and analog IO, as well as Ethernet.

Homebrew Guitar Tuner Also Includes MIDI Out

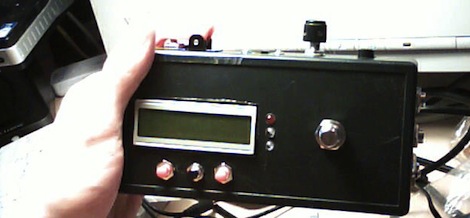
A few years ago, [Frédéric]’s brother in law wanted a guitar tuner for Christmas. Instead of going out and buying one, [Frédéric] broke out the soldering iron and built one from scratch.

[Frédéric]’s tuner is built around an ATMega168 uC on a Real Bare-Bones Board with an LM386 amplifier. The display is a standard 20×2 LCD character display, and the interface is torn from the pages of stomp box schematics with a very hefty foot switch.

Detecting the frequency of a note played into [Frédéric]’s tuner involves a fair bit of math. To measure the frequency, the Arduino samples the waveform coming from the input jack. This signal is delayed for a fraction of a second and the area underneath the real and delayed waveforms is measured. This delay slides across the original waveform until the area between the real and delayed samples are minimized. At that point, delayed wave form will be exactly one cycle behind the real signal, and the cycles per second can be calculated. It’s called the YIN algorithm, and you can read more about it here.

Since [Frédéric] already knew the exact frequency being played into the tuner, he figured it would be trivial to add a small analog audio to MIDI converter. This feature (as shown in the video after the break) turns the sounds from a guitar into MIDI notes. It’s monophonic and probably a little superfluous, but still very cool.

Continue reading “Homebrew Guitar Tuner Also Includes MIDI Out”

Draw Your Own Vinyl Beats


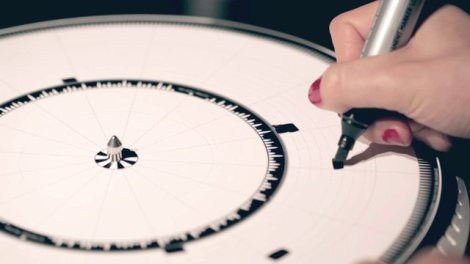
The Dyskograf lets you make music with a magic marker. The musical installation looks much like a turntable for playing vinyl records. But instead of a spiraling groove containing the sounds, this uses marks on a paper disk to play sound samples.

You can see the light outline of several tracks on the paper disc shown above. By adding black marks the optical input of the Dyskograf knows when to start and end each sound. This is best illustrated in the video demonstration after the break.

The marker-based setup makes a lot of sense, and we think it would be perfect if the disc was a dry-erase board. It certainly makes it a lot easier to lay down new beats than this other optical turntable which required holes to be drilled in a vinyl record to play the sounds. While we’re on the topic you may also find this coin-based turntable sequencer of interest.

Continue reading “Draw Your Own Vinyl Beats”

Halloween Props: A Spooky Mirror

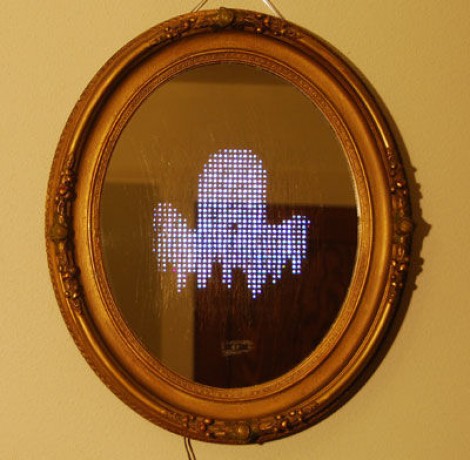
This mirror will spook your guests with a variety of static and animated images. It includes a proximity sensor so the images will not appear until someone comes close enough to see themselves in the looking glass.

The electronic parts are quite easy to put together. There is a 32×32 RGB LED matrix mounted on the back of the mirror. It is driven by an IOIO board with some custom firmware written by [Ytai], the creator of that board who happens to live next door to [Alinke]. Where this starts to get interesting is when [Alinke] was working on the mirror to make the LEDs visible from the front. He used a razor knife to put hundreds of scratches in the varnish on the back. This lets just enough light through to see the LEDs, but keeps the mirrored surface reflective. See for yourself in the clip after the break.

The images are fed to the IOIO board by an Android device. We think this could have a lot of use after Halloween as a weather display or news ticker. Perhaps you could even feed it from your diy Android thermostat.

Continue reading “Halloween Props: A Spooky Mirror”