Picture Frame That Scrapes Train Times From The Web

rpi-train-times-fixture

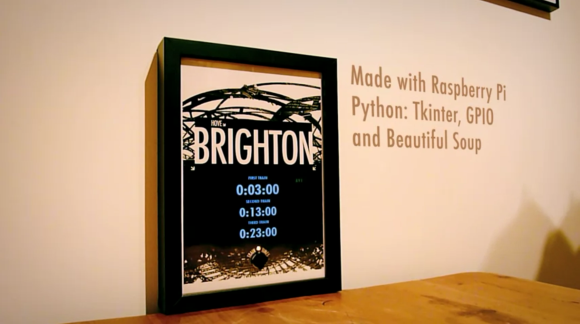
Whenever [Gareth James] needs to catch a train he has only to push a button on this frame and the next three departure times will be displayed. As you can see from the post-processing in the photo, this is accomplished by a Raspberry Pi board using a few familiar tools.

Let’s take a look at the hardware first. He acquired a 7″ LCD display which he removed from its plastic case. The bare screen will easily fit inside of the rather deep wood frame and its composite video input makes it quite simple to interface with the RPi board. There was a little work to be done for power. The LCD needs 12V so he’s using a 12V wall wart to feed the frame, and including a USB car charger to power the RPi. The last thing he added is a button connected to the GPIO header to tell the system to fetch a new set of times.

A Python script monitors the button and uses Beautiful Soup to scrape the train info off of a website. To get the look he wanted [Gareth] wrote a GUI using tkinter. Don’t miss the demo after the jump.

If you need a bit of a primer on scraping web data take a look at this guide.

Continue reading “Picture Frame That Scrapes Train Times From The Web”

Star Wars Themed MAME Cabinet Is Perfect In This Basement Bar

star-wars-themed-mame-cabinet

Fans of the Star Wars series will immediately recognize these illuminated vertical bars as a piece of the style from the original movie. They decorate the MAME cabinet recently installed in this home bar. You’ve got to admit, it looks amazing. But we’re always on the prowl for the build log and this annotated 46 image set has no shortage of goodies.

The project started off as a very ordinary looking plywood frame. But it takes shape quickly as the rounded-over grills were added to the box. Holes were cut behind them to accept the acrylic that serves as a diffuser and to allow the LEDs to shine through from the inside. There are several shelves which will be used to store additional gaming systems in the future. For now all that’s inside is a pretty beefy computer that runs the emulators, allowing games to be played via the arcade buttons or using wireless Xbox controllers.

Make sure you get all the way to the end of the build images. We were delighted by the custom icons in the arcade buttons. Instead of the common player one and player two images there are silhouettes of Star Wars characters and objects. This attention to detail really makes the build something special!

[Thanks Jason]

Satellite Dish Solar Cooker Bakes Potatoes And More

baked-potatoes-in-a-dish-solar-cooker

Hone your survival skills by harnessing the sun’s rays to cook your meals. [Robert] and his daughter turned an old satellite dish into a solar cooker. The image above shows them baking some potatoes, but the temperatures inside the cast iron vessel are high enough to let you cook most foods.

The dish was originally used for satellite television but has been collecting dust in the shed for quite some time. When [Robert] came across a roll of foil tape in his workshop he decided to give the project a whirl. His daughter helped out by peeling away the tape backing (this can be much harder than it sounds) while he applied the reflective material trying to keep it free of wrinkles. After a close call [Robert] donned a pair of welding goggles when positioning the dish. If the light intensity can get the pot up as high as 428 degree Fahrenheit we’re sure it can cause flash blindness.

Unlike other dish cookers we’ve seen, [Robert] didn’t use the original mount for holding the dish in place. He just set it on three bricks and directed it by hand. To keep the intensity focused on the kettle he had to reposition it every 15 minutes.

We wonder if the heat is too much for building a sun tracking solar power harvester?

A Blinky Fedora To Ring In The New Year

[Garrett Mace] decided to dress festive for New Year’s Eve. What he came up with is a fedora ringed in LEDs that react to music. The hardware uses 5050 LEDs on strips. Three of them encircle the head-gear providing a total of 114 RGB pixels. Each is a WS2811 module — a part which we’re seeing more and more of lately.

The video clip after the break starts off with a few minutes of demonstration. [Garrett] managed to code all kinds of animations for the hardware including several different styles of color sweeps and fades. You may start to think that the three bands always display the same patterns but keep watching and you’ll see a sparkle pattern that proves each dot can be addressed individually.

About 2:20 seconds into the video [Garrett] explains how he pulled it off and shows off the driver hardware. The strips are glued to a band of webbing that slides over the hat. The wires that drive the lights were fed through the center of some paracord and connect to an Arduino housed in a 3D printed case. Power is provided by a portable USB battery with a ShiftBrite shield and an MSGEQ7 chip complete the parts list.

Continue reading “A Blinky Fedora To Ring In The New Year”

wifi_car4

A WiFi Controlled RC Car With An IP Camera

Controlling your car over WiFi is good, but mounting a webcam on it so you can actually see where you’re going is even better. [Michael] goes over how he made his wifi car with some great videos in the post about it.

The car used is a seemingly standard RC unit, which came with a speed controller that was recycled for network use. [Michael] removed the standard radio, but having this controller available kept him from having to engineer an H-bridge circuit. The radio was then replaced with a WiFi module from Sparkfun.

There were a few problems with the IP camera to begin with, as the lag was originally unbearable. After some tricks that would qualify as a good hack in itself, the camera was eventually able to perform on an acceptable level and output data to the FLTK app he used to control everything.  Check out one of his videos below of this car in action. Continue reading “A WiFi Controlled RC Car With An IP Camera”

Turning A Tiny Router Into A Webradio

tplink

While the hacking zeitgeist is focused nearly entirely on all those new ARM dev boards that include the Raspberry Pi, some people out there are still doing it old school by modifying existing electronics to suit their needs. [Peter] picked up one of those very inexpensive TP-Link 703n wireless routers we’ve seen before and modified it into a standalone web radio, complete with volume and tuner knobs.

The TP-Link 703n is a wireless router smaller than a credit card available from the usual Chinese resellers for about $20. Able to run OpenWRT, this very inexpensive piece of hardware can be transformed into a device comparable to the Raspberry Pi; a complete Linux system with a few GPIO pins.

[Peter] took his 703n router and added an ATtiny85 connected to two pots and the internal UART. This, along with a script to read the values from the pots, tells the router what station to tune into and what volume to play it. The audio is handled by a USB soundcard with an internal speaker, making [Peter]’s build one of the smallest purpose-built Internet radios we’ve seen.

You can see [Peter]’s radio in action after the break.

Continue reading “Turning A Tiny Router Into A Webradio”

Giving The Hexbug Spider A Set Of Eyes

spider

The Hexbug Spider is a neat little robot toy available at just about any Target or Walmart for about $20. With a few extra parts, though, it can become a vastly more powerful robotics platform, as [eric] shows us with his experiments with a Hexbug and OpenCV.

Previously, we’ve seen [eric] turn a Hexbug spider into a line following robot with a pair of IR LEDs and a drop-in replacement motor driver. This time, instead of a few LEDs, [eric] turned to an Android smartphone running an OpenCV-based app.

The smartphone app detects a user-selectable hue – in this case a little Android toy robot – and sends commands to the MSP430-powered motor control board over the headphone jack to move the legs. It’s a neat build, and surprisingly nimble for a $20 plastic hexapod robot.

You can see the OpenCV-controlled Hexbug in action after the break, along with a video build log with [eric] showing everyone how to tear apart one of these robot toys.

Continue reading “Giving The Hexbug Spider A Set Of Eyes”