ESP32 Trail Camera Goes The Distance On AA Batteries

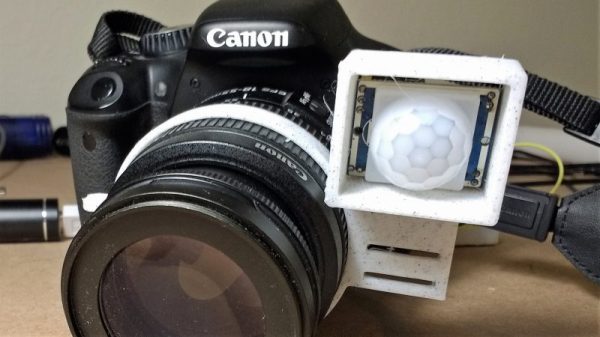
There’s no shortage of things to like about the ESP8266 and ESP32, but if we had to make a list of the best features these WiFi-enabled microcontrollers have to offer, their power management capabilities would certainly be near the top. Which is how we assumed [Mark] was able to take a whopping 23,475 pictures on his ESP32 camera while powered by nothing more exotic than four AA batteries from the grocery store.

But as it turns out, the full story is quite a bit more interesting. As far as we can tell, [Mark] isn’t bothering with the ESP32’s sleep modes all. In fact, it looks like you could pull this trick off with whatever chip you wanted, which certainly makes it worth mentally filing away for the future; even if it depends on a fairly specific use case.

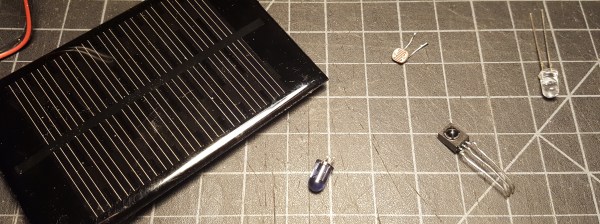
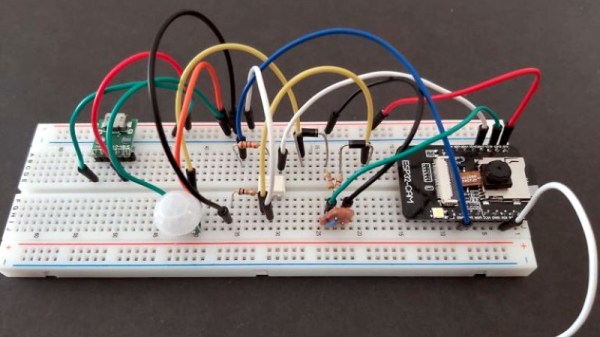
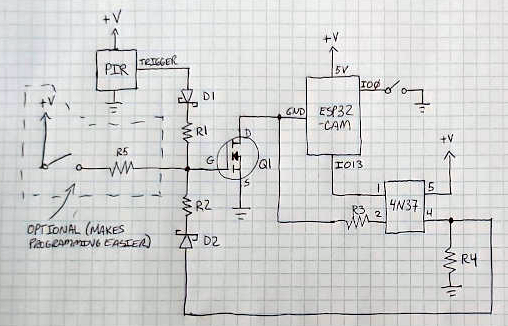
In the most simplistic of terms, [Mark] is cutting power to the ESP32 completely when it’s not actively taking pictures. The clever circuit he’s come up with only turns on the microcontroller when a PIR sensor detects something moving around in front of the camera. Once the chip is powered up and running code, it brings one of its GPIO pins high which in turn triggers a 4N37 optoisolator connected to the gate on the circuit’s MOSFET. As long as the pin remains high, the circuit won’t cut power to the ESP32. This gives the chip time to take the requested number of pictures and get everything in order before bringing the pin low and allowing the circuit to pull the plug.

If you’re looking to maximize runtime without wrangling any MOSFETs, we’ve seen some excellent examples of how the low power modes on the ESP8266 and ESP32 can be put to impressive use.

[Thanks to Jason for the tip.]

Logging Into Linux With A 1930s Teletype

Buried deep within all UNIX-based operating systems are vestiges of the earliest days of computing, when “hardware” more often than not meant actual mechanical devices with cams and levers and pulleys and grease. But just because UNIX, and by extension Linux, once supported mechanical terminals doesn’t mean that getting a teletype from the 1930s to work with it is easy.

Such was the lesson learned by [CuriousMarc] with his recently restored Model 15 Teletype; we covered a similar Model 19 restoration that he tackled. The essential problem is that the five-bit Baudot code that they speak predates the development of ASCII by several decades, making a converter necessary. A task like that is a perfect job for an Arduino — [Marc] put a Mega to work on that — but the interface of the Teletype proved a bit more challenging. Designed to connect two or more units together over phone lines, the high-voltage 60-mA current loop interface required some custom hardware. The testing process was fascinating, depending as it did on an old Hewlett-Packard serial signal generator to throw out a stream of five-bit serial pulses.

The big moment came when he used the Teletype to log into Linux on a (more or less) modern machine. After sorting out the mysteries of the stty command, he was able to log in, a painfully slow process at 45.5 bps but still a most satisfying hack. The ASCII art — or is it Baudot art? — is a nice bonus.

We love restorations like these, and can practically smell the grease and the faint tang of ozone around this device. We’re not thrilled by the current world situation, but we’re glad [CuriousMarc] was able to use the time to bring off a great hack that honors another piece of our computing history.

Continue reading “Logging Into Linux With A 1930s Teletype”

Super Simple Sensor Makes DSLR Camera Motion Sensitive

Do you have a need to photographically document the doings of warm-blooded animals? If so, a game camera from the nearest hunting supplier is probably your best bet. But if you don’t need the value-added features such as a weather-resistant housing that can be chained to a tree, this DIY motion trigger for a DSLR is a quick and easy build, and probably loads more fun.

The BOM on [Jeremy S Cook]’s build is extremely short – just a PIR sensor and an optoisolator, with a battery, a plug for the camera’s remote jack, and a 3D-printed bracket. The PIR sensor is housed in a shroud to limit its wide field of view; [Jeremy] added a second shroud when an even narrower field is needed. No microcontroller is needed because all it does is trigger the camera when motion is sensed, but one could be added to support more complicated use cases, like an intervalometer or constraining the motion sensing to certain times of the day. The video below shows the build and some quick tests.

Speaking of intervalometers, we’ve seen quite a few of those over the years. From the tiny to the tinier to the electromechanical, people seem to have a thing for taking snapshots at regular intervals.

Continue reading “Super Simple Sensor Makes DSLR Camera Motion Sensitive”

Quick And Dirty MIDI Interface With USBASP

[Robson Couto] recently found himself in need of MIDI interface for a project he was working on, but didn’t want to buy one just to use it once; we’ve all been there. Being the creative fellow that he is, he decided to come up with something that not only used the parts he had on-hand but could be completed in one afternoon. Truly a hacker after our own hearts.

Searching around online, he found documentation for using an ATtiny microcontroller as a MIDI interface using V-USB. He figured it shouldn’t be too difficult to adapt that project to run on one of the many USBASP programmers he had laying around, and got to work updating the code.

Originally written for the ATtiny2313, [Robson] first had to change around the pin configuration so it would work on the ATmega8 in the USBASP, and also updated the USB-V implementation to the latest version. With the code updated, he programmed one of the USBASP adapters with a second one by connecting them together and putting a jumper on the J2 header.

He had the software sorted, but there was still a bit of hardware work to do. To provide isolation for the MIDI device, he put together a small circuit utilizing a 6N137 optoisolator and a couple of passive components on a piece of perf board. It’s not pretty, but it does fit right into the programming connector on the USBASP. He could have fired up his PCB CNC but thought it was a bit overkill for such a simple board.

[Robson] notes that he hasn’t implemented MIDI output with his adapter, but that the code and the chip are perfectly capable of it if you need it for your project. Finding the schematic to hook up to the programmer’s TX pin is left as an exercise for the reader.

If you don’t have a USBASP in the parts bin, we’ve seen a very similar trick done with an Arduino clone in the past.

High Voltage Switching With MOSFETs

Using a MOSFET as a switch is generally pretty simple. Make the gate voltage sufficient with respect to the source and current flows through the channel. However, if you are switching higher voltages, you may need some additional circuitry to protect the device’s gate and possibly the microcontroller driving the whole thing, too. [Lewis] discusses high voltage switching in the latest in his series of videos dealing with MOSFETs. You can see the video below.

You’ll see in the video a breadboard setup driving a 50 V load and also a higher-voltage H-bridge. There are three major topics covered: Using an optoisolator, using a gate bleeder resistor, and using a zener diode to limit gate voltage.

Continue reading “High Voltage Switching With MOSFETs”

WiFi Pool Controller Only Cost $20

Pools have come a long way. It used to be you had a pump and if you were lucky it had a mechanical timer switch on it. That was it. Now you have digital controllers and spa jets and heaters. You can even get them that connect to your home automation system. If your pool isn’t new enough to do that already, you can get a range of add-on accessories. For a price. [Rob] paid $500 to get a remote for his pool. It wasn’t even WiFi, just a simple RF remote. In 3 years, the transmitter had burned out ($300 to replace) and he decided he had enough. For $20, [Rob] added MQTT control and monitoring to his pool using an ESP8266. You can see the video description of the project below.

Naturally, the instructions are a bit specific to the Pentair system he has. However, it isn’t as specialized as you might think. The project relies on the connection for a wired “spa-side remote” that most modern pool systems support. The electrical connections for these aren’t quite standard, but they are all very similar, so you have a good chance of reproducing this for your setup assuming you have a connection for one of these wired remotes.

Continue reading “WiFi Pool Controller Only Cost $20”

Is It On Yet? Sensing The World Around Us, Starting With Light

Arduino 101 is getting an LED to flash. From there you have a world of options for control, from MOSFETs to relays, solenoids and motors, all kinds of outputs. Here, we’re going to take a quick look at some inputs. While working on a recent project, I realized the variety of options in sensing something as simple as whether a light is on or off. This is a fundamental task for any system that reacts to the world; maybe a sensor that detects when the washer has finished and sends a text message, or an automated chicken coop that opens and closes with the sun, or a beam break that notifies when a sister has entered your sacred space. These are some of the tools you might use to sense light around you.

Continue reading “Is It On Yet? Sensing The World Around Us, Starting With Light”