Pull-out Pantry Fills Space Next To Refrigerator

pull-out-pantry


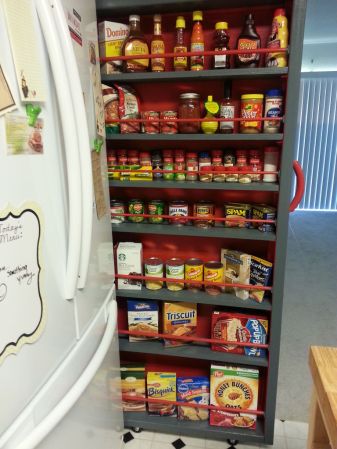
Your refrigerator needs a few inches of space on the hinge side in order for the door to open fully. If there’s a wall on that side it means you leave a gap. A bit of lumber and some inexpensive hardware can turn that gap into a pull-out pantry.

This picture is from [Ratmax00’s] pantry project. He had a 6.5″ gap to work with and started the build by making a wooden frame using pocket screws for the butt joints. Four casters were added to the bottom to make it roll in and out easily. He needed a handle and a way to make sure commodities didn’t fall off the shelves. He chose to use a 3D printer for brackets that hold the fence dowels and a custom handle. If you don’t have that just hit the cabinet hardware aisle at your local home store.

We wonder if it would have been possible to use full-extension draw rails mounted above and below the cabinet in addition to a couple of wheels? This would help keep the pantry from scraping against the fridge or the wall.

While you’re building bookshelf sized things why not get to work on a hidden door as well?

Turning A Router Into An Arduino Shield

[Dirk] had a problem: while he already had an Arduino with an Ethernet shield, he needed WiFi for an upcoming project. Running a Cat5 cable was out of the question, and a true Arduino WiFi shield is outrageously expensive. He did, however, have a WiFi router lying around, and decided it would make a perfect WiFi shield with just a little bit of cutting.

The router [Dirk] used was a TL-WR702N, a common router found in the parts bins of makers the world over. Inspiringly, the size of the router’s PCB was just larger than the space between the Arduino’s pin headers. Turning the router into a shield is simply a matter of scoring the edge of the board and gluing on a few pins for mechanical strength.

Power and ground lines were soldered between the pin headers and the router, while data is passed to the Arduino and Ethernet shield through a short cable. It may not look pretty, but if it works in a pinch we can’t complain.

Veronica 6502 Gets Keyboard Input Via USB

PS2

When building a homebrew computer, there are a few milestones that make all the work seem worth it. Of course, seeing the CPU step through address lines on the blinkenlights is near the top, but even more important is being able to type a character on a keyboard and have it show up on a display. [Quinn] didn’t want her Veronica computer to deal with serial terminals or PS/2 keyboards when she typed her first characters in; instead she wanted to read a USB keyboard using 80s-era hardware.

Back in the early days of USB, design specs and keyboard manufacturers included a legacy mode in nearly every USB keyboard ever manufactured. This allows a USB keyboard to work with the ancient PS/2 protocol. [Quinn] tapped into that functionality nearly every PS/2 keyboard has using a 6522 Versatile Interface Adapter. This VIA is in the same family of chips as the venerable 6502 CPU that provides GPIO pins and timers.

[Quinn] connected the keyboard connector tapped for PS/2 input to an ATtiny13. This microcontroller reads the scan codes from the keyboards and sends them to the VIA and the rest of Veronica. It’s quite a bit of work to get to this point, but [Quinn] finally has a computer she can type on, the first step to developing software for her homebrew computer.

LED Strip Pong As An Arduino Shield

led-pong-strip

[Schuyler Sowa] has been hard at work on his own version of LED strip Pong. We’d say his work has really paid off. The game is robust and full of features.

Unlike the original Pong video game LED pong only has one axis on which the ball travels. The ball will bounce back if the button at the end of the strip is pressed when either of the last two LED pixels are illuminated. To add in a difficulty adjustment [Schuyler] included a poteniometer which alters the speed.

The game board is one meter of LED strip with individually addressable pixels. It cost a whopping $28 and was the second kind he tried after having trouble with the WS2801 based version (which often come as strings of lights). An Arduino board controls the game, with a shield made from protoboard to connect the components. In addition to the two user buttons — which were hacked out of a computer keyboard — you’ll notice a pair of seven segment displays acting as a scoreboard and an HD44780 character LCD rounding out the user interface.

Continue reading “LED Strip Pong As An Arduino Shield”

The Best Photo Booth For Really Small Stuff

tank

[Doog] builds plastic models, and like anyone who makes really small stuff, he needed a good photo booth to show off his wares and techniques. He was working with the very common ‘poster board and work light’ setup we’ve all put together, but after photoshopping seam lines one too many times, he decided to upgrade his booth to something a little better.

The new setup consists of an aluminum frame with a 40×80 inch sheet of translucent plexiglass forming the bottom and backdrop of the booth. Two lights in diffuser bags illuminate the subject from the top, while the old worklights are attached to the bottom of the table frame to light the subject from beneath.

Compared to the ‘poster board and work light’ technique of the past, [Doog]’s new photo booth is absolutely incredible for taking pictures of very small things. This model of a Spitfire looks like it’s floating and this snap of a Thunderbolt is good enough to grace magazine covers.

Of course this photobooth isn’t just limited to models, so if you’re looking at taking some pictures of hand-soldered BGA circuits in the future, you may want to think about upgrading your studio setup.

MacBook Pro Retina Display With A Normal Computer

If you’ve seen one of the fancy, expensive MacBook Pro laptops with a Retina display, you’ll know how awesome having that much resolution actually is. This incredible resolution comes with a price, though: the MBP with a Retina display is about $500 more expensive than the normal resolution MPB model, and it’s very difficult to find a laptop of comparable resolution without cries of fanboyism being heard.

[Daniel] over at Rozsnyo came up with a neat solution that connects one of these fancy 15-inch Retina displays to just about any computer. The build is the beginning of a product that works just like the previous DisplayPort adapter for the iPad retina display, but with the possibility of a few added features such as HDMI input and use of the internal webcam and WiFi antennas.

This build isn’t really a finished product anyone can buy and plug into a replacement Retina display just yet. Even if it were, it’s extraordinarily difficult to find a replacement display for the high-end MacBook for under the price of a really good monitor, anyway. In a few years, though, when the old, busted Retina laptops are traded up for a new, shiny model, though, we’ll be the first to try out this mod and get some serious desktop space.

PlayStation 3 Controlled With Head Movement

Our excitement just keeps building about how hackers can ply their skills to develop new adaptive technologies. Here’s another great example of custom control technology that helped [Steven] get back into gaming. The effects of muscular dystrophy have left him unable to use the stock PS3 controller. But after being paired up with [John Schimmel] he’s able to game again thanks to a head motion control system.

[John] looked at the way [Steven] interacts with the assistive technology at hand. He can drive his wheelchair with one finger, and interacts with his computer by moving his head. The computer detects a marker on the brim of his hat. [John] grabs input from the computer using Java and sends it to an Arduino board connected via USB. The Arduino has a USB Bit Whacker board letting it also connect to the PS3 as a controller. In the image above you can see the computer screen has a GUI for each of the controller’s buttons. [John] moves his head to select a control and clicks a button with his finger to actuate it.

If you like this check out some of the other assistive gaming hacks we’ve seen lately.

[via The Controller Project]