Panelizing PCBs In Eagle

final_panel

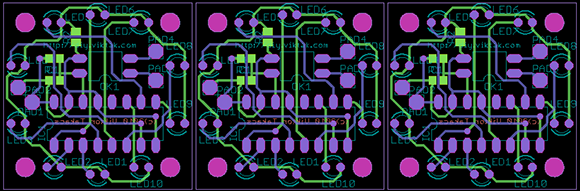
A lot of the board houses out there including Seeed and ITead studios have a fixed size for circuit boards before the price goes up. A one-inch square board costs the same as a much larger 5cm x 5cm board, making panelized PCBs a great way to get more boards for the same amount of money. Trying to panelize a board in Eagle with copy and paste is a chore without the right tools, though, so we’re happy to see a great panelization tutorial from [Victor].

To panelize one of his boards for a PCB order, [Victor] used one of Eagle’s User Language Programs to duplicate the part names on the additional boards. After that, it was a simple matter of running a CAM job to generate the necessary Gerber files.

Of course once the boards arrive, you’ll have to cut them apart from each other. This can be done with everything from a Dremel to a hack saw to a metal shear, but we’re wondering what other Hackaday readers are using to cut up PCBs. Leave a note in the comments with your preferred method of depanelization.

Hackaday Links: February 22, 2013

Playstation π

PS3

Yeah, it’s another home made Raspberry Pi case, but [Gabriel]’s Mini Playstation 3.14 is the bee’s knees. The enclosure was once a metal gift box originally intended for gift cards. With a few whacks of a Dremel, the world finally has a new PS3 that runs Linux.

Up there with The Secret Life of Machines

mechatronik

[Mattias] sent in a tip about a really cool TV show airing in Sweden. It’s called Mekatronik, and it’s basically the interesting parts of Mythbusters where [Jamie] and [Adam] build random cool stuff. It’s a Swedish language program, so if anyone would like to make some subs for the episodes, we’ll be more than happy to link to it again.

Web-based software defined radio

sdr

The amateur radio club at University of Twente in the Netherlands came up with something really cool: a web-based software defined radio.  So what, you ask? It’s just streaming audio or something over the Internet? Nope. You can actually control this SDR over the web.

We’re deeply sorry for turning the hardware turn to slag. Really, we are.

Junk box Tesla coil

tesla

[JJ] whipped up a homemade Tesla coil out of junk he had lying around. Basically, it’s a piece of PVC pipe, a tennis ball, and aluminum foil. Even the transformer was pulled from a long-forgotten project. [JJ] is getting some really good arcs, so we’ll call this a win.

Time circuits active

time

[Danilo] was invited to a costume party with a movie theme. He wanted something Back to the Future-is, so he whipped up a flux capacitor (translation). It’s based on a PIC12F675, with the microcontroller running a bit of code that flashes the LEDs just like the movie. Now on to the hoverboard project…

Build Your Own Dumb USB Power Strip

diy-usb-power-strip

Here’s a USB charging center which [Kenneth Finnegan] built using parts from his junk bin. We’d like to reiterate our claim that he must have the most magical of junk bins (the last thing we saw him pull out of it was a 24-port managed Ethernet switch).

The jack on the side accepts the barrel connector from a 12V wall wart. [Kenneth] mentions that the 2.1mm jack is a standard he uses in all of his projects. Inside there’s a switch mode power supply that provides the regulated 5V to each USB port. We really like the fact that he added some protection; diy is no fun if you end up frying your beloved multi-hundred dollar devices. The yellow components are polyfuses which will cut the power if 600 mA of current is exceeded. This works great for almost all of his devices, but his iPod 4G doesn’t like the system. It sees the voltage dip just a bit and stops charging entirely.

Arduino-controlled MIDI Sequencer

am808vx3-arduino-synth

[Christian] wrote in to tell us about his third-generation Arduino MIDI sequencer (translated) called the AM808 VX3. He had already laid a strong base for the project in his previous versions. But the user interface was still frustrating at times and that’s where this version comes in. it features a nice clean dashboard like interface, but also includes a configurable virtual interface.

The obvious components seen above include the slider and potentiometer band, as well as the repository of buttons mounted below that. But in the center of the board is a touchpad which [Christian] pulled out of an old Laptop. It interfaces as a PS2 device which makes it pretty simple to use in conjunction with the Arduino. But that’s not the only touch-enabled input device. The rectangle to the right of the touch pad is an LCD screen with a touch overlay. As you can see (and hear) in the clip after the break, the touch screen made it possible for him to rework the controls until they became simple and intuitive.

Continue reading “Arduino-controlled MIDI Sequencer”

LED Marquee Uses Discrete Through-hole Lights

through-hole-led-marquee

[Michael] built his own LED marquee using individual diodes. Despite his choice to forego the 8×8 or 5×7 modules we often see in these projects, his decision to spin a dedicated PCB saved him a lot of trouble during assembly. Sure, he still had to solder 180 leads on the 9×18 grid of lights, but at least he didn’t have to deal with wiring up the complex display layout.

The chip driving the display is an ATtiny24. You can see that it’s an SMD package and spans one row of the through hole LED footprint. There are way too few pins to drive a multiplexed display of this size. Instead of adding a separate driver IC he decided to design the display to use Charlieplexing. We didn’t see a schematic for the project, but judging from the board images all of the I/O pins are used by either the display itself, or the serial connection provided by that right angle pin header.

Self-waking Computer For DIY Cloud Storage

self-waking-cloud-storage

[Dominic] decided to take control of his cloud storage by switching to OwnCloud. Unlike most cloud storage solutions, this isn’t a company offering you free space. It’s an open source software package which your run on your own machine. [Dom] didn’t want to leave his box running 24/7 as it would be unused the majority of the time. So he hacked this router to switch on the computer whenever he tries to access the storage.

Obviously this is a Wake-On-Lan type of situation, but the hardware he has chosen to use doesn’t include those features. Since he already had this TP-Link 703n on hand he decided to use it as a controller for the computer. His method is quite clever. The router is running a script that monitors the computer and the bandwidth it’s using. When traffic from the network stops, the router will issue a shutdown command within just a few minutes. It then assigns itself the computer’s IP address so that it can listen for incoming requests and use the relay on that breadboard to turn the box back on. Obviously running the embedded system is much more efficient than having an entire computer turned on all the time, and it’s WiFi capabilities mean no cords to run to the home network.

Laser Spirograph

laser-spirograph

Here’s a weekend junk bin project if we’ve ever seen one. [Pat] used a quartet of computer fans to make his laser Spirograph. Deciding to try this simple build for yourself will run you through a lot of basics when it comes to interfacing hardware with a microcontroller. In this case it’s the Arduino Nano.

The Spirograph works by bouncing a laser off of mirrors which are attached to the PC fans. When the fans spin the slight alignment changes cause the laser dot to bob and weave in visually pleasing ways. You can catch twenty minutes of the light show in the clip after the break.

Three of the fans have mirrors attached, the housing of the fourth is used to host the laser diode and make assembly easier. A TC4469 motor driver is used to connect the fans to the Arduino. The light show can be manually controlled by turning the trio of potentiometers which are read using the Arduino’s ADC.

If you manage your way through this build perhaps you’ll move on to a setup that throws laser light all over the room.

Continue reading “Laser Spirograph”