Snapchat Person Verification Defeated In <100 Lines Of Code

out

[Steven Hickson] woke up this morning to an article about the new person verification system Snapchat has implemented. Thirty minutes later he cracked it to be solved by a computer, in less than 100 lines of code (GitHub).

First a little background. About a month ago, 4.6 million Snapchat users had their information compromised by a security hole. In an attempt to bump up security, Snapchat has implemented a new person verification method to ensure new accounts aren’t created by computers.

The method? Picking out a white ghost from a series of nine images. Kind of like a cute, less annoying Captcha. The problem? It’s a terrible way to prove you are a person. It took [Steven] only 30 minutes to write a program that uses simple thresholding, SURF keypoints and FLANN matching to find the ghost. In his tests, he’s found the ghost with 100% accuracy. He also muses that there is an even more efficient way to do it, he was just too lazy to do it.

Nice try Snapchat.

3D Printering: Making A Thing In Autodesk 123D

printering

In the continuing battle against 3D printers used exclusively for fabricating plastic octopodes and useless trinkets, here’s yet another installment of a Making A Thing tutorial. If you’ve ever wanted to make one single object in multiple 3D design softwares, this is for you.

Previously, we’ve built a ‘thing’ in a few different 3D modeling programs, including:

See that ‘Read more…’ link below? You might want to click that.

Continue reading “3D Printering: Making A Thing In Autodesk 123D”

Interactive Globe Is Awesome For Google Earth

projector

Time to brush up on your Portuguese if you want to learn how to build your own interactive globe! Or we guess we could use Google translate…

This project was originally presented at Campus Party 2012: an annual, week-long technology festival running 24 hours a day that features LAN parties, a hackathon, conferences, and more. It all started back in 1997 in Madrid, Spain. Today, there are now Campus Parties being held in Brazil, Colombia, Mexico, the USA, Ecuador, and Germany.

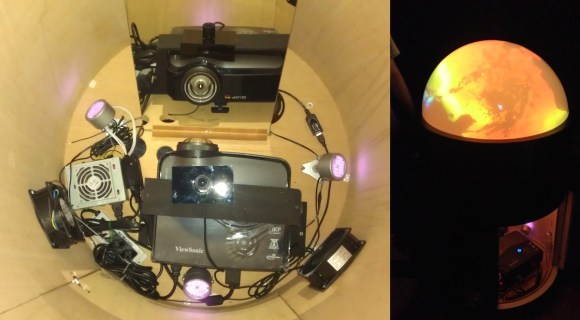
The team that created it—[Araujo, Barmak, Teo, Duprat, and Silva]—has now decided to give back to the community and share a tutorial on how make your very own. The globe uses a short throw projector, a mirror, a series of infrared lights, a modified PS3 Eye camera, and an acrylic dome with projector screen paint on the inside. The touchscreen works by the IR light being reflected off of your hand on contact, which is then picked up by the PS3 Eye camera that has had its IR filter removed.

Unless you can find a suitable acrylic dome, it is, unfortunately, rather expensive to make. They had to have one manufactured. Stick around after the break to see how it works!

Continue reading “Interactive Globe Is Awesome For Google Earth”

Body Of A Trinket, Soul Of A Digispark

TrinketDigispark

Adafruit’s Trinket and digiStump’s Digispark board are rather close cousins. Both use an ATtiny85 microcontroller, both have USB functionality, and both play nice with the Arduino IDE. [Ray] is a fan of both boards, but he likes the Trinket hardware a bit better. He also prefers the Digispark libraries and ecosystem. As such, he did the only logical thing: he turned his Trinket into a Digispark. Step 1 was to get rid of that pesky reset button. Trinket uses Pin 1/PB5 for reset, while Digispark retains it as an I/O pin. [Ray] removed and gutted the reset button, but elected to leave its metal shell on the board.

The next step was where things can get a bit dicey: flashing the Trinket with the Digispark firmware and fuses. [Ray] is quick to note that once flashed to Digispark firmware, the Trinket can’t restore itself back to stock. A high voltage programmer (aka device programmer) will be needed. The flashing process itself is quite a bit easier than a standard Trinket firmware flash. [Ray] uses the firmware upload tool from the Micronucleus project. Micronucleus has a 60 second polling period, which any Trinket veteran will tell you is a wonderful thing. No more pressing the button and hoping you start the download before everything times out! Once the Trinket is running Digispark firmware, it’s now open to a whole new set of libraries and software.

CFL + Bugzapper = Battery Operated Camping Light

CFLBugzapper_01_20

Knowing different ways of generating light is a great skill to have, so go ahead and add this one to your arsenal by combining a Bugzapper with a CFL Light Bulb.

Sure a CFL(Compact Fluorescent Lamp) works just fine on its own if you have AC mains, but what we’re talking about here is getting the light bulb to work off of a single D battery. We featured a similar hack a few months back by using a Joule-Thief to get the high voltage for the fluorescent tube, but if you can’t get your hands on discrete components, [Jan] shows us another way by gutting a tennis racket bugzapper for its booster board. Knowing that the bugzapper steps up the 3V to about 2000V, he decided to see if that same circuit would run off a single 1.5V D battery and achieve the voltage required to drive a CFL tube. After carefully removing the electronics from the CFL housing, [Jan] was able to directly connect the booster board to the electrode wires of the fluorescent tube, and voila; he now has a D-Battery operated camp light that has a run time of over 200 hours.

It would be interesting to see how this hack compares to the Joule-Thief method in terms of brightness and run-time. Before you go and scrap the parts out of the CFL light bulb, make sure you check out this detailed breakdown of popular CFL light bulbs.

Apex Electronics, Your Souce For Oscilloscopes And Drop Tanks

While some of the Hackaday crew is in LA for The Gathering, we decided to make a trip out to Apex Electronics, easily the oldest and largest electronics surplus store on the west coast.

Inside Apex, everything is stacked to the 20-foot ceiling with any electronic component you can imagine. Want a shopping cart full of huge capacitors? Awesome. Tube sockets? Done. Any kind of wire imaginable? That takes up two aisles. Test equipment abounds as well with oscilloscopes, signal analyzers and function generators, multimeters, and even a pair of cockpit voice recorders.

There’s also an outside yard at Apex containing at least two airplanes (one is a Cessna 150 that’s crying out to be made into a flight simulator), yet more test equipment, tons of video equipment, a few aircraft drop tanks, and enough aluminum extrusion to build anything.

If you’re wondering how fair the prices are at Apex, I picked up a grab bag assortment of wire wrap sockets (including a few 64-pin DIPs) that would cost $100 through the usual eBay/Chinese retailers for only $5. [Mike] picked up some stepper motors, proto boards, a pound of standoffs, and a dozen some vintage 7-segment displays for $20. No clue how much the test equipment costs, but from what we’ve seen the prices are low.

We’re not the first EE/Hacker Blog/Vlog to visit Apex. [Dave Jones] made the trek a few years ago and posted an awesome video. Below you’ll find a ton of pictures from our trip.

Continue reading “Apex Electronics, Your Souce For Oscilloscopes And Drop Tanks”

Final Key : A Mooltipass-like Device

Since the Hackaday community started working on our offline password keeper, Mooltipass, we’ve received several similar projects in our tips line. The Final Key may be the most professional looking one yet. Similarly to the Mooltipass, it is based on an Atmel ATMega32U4 but only includes one button and one LED, all enclosed in a 3D printed case.

The Final Key is connected to the host computer via USB and is enumerated as a composite Communication Device / HID Keyboard, requiring windows-based devices to install drivers. AES-256 encrypted passwords are stored on the device and can only be accessed once the button has been pressed and the correct 256 bit password has been presented through the command line interface. Credentials management and access is also done through the latter. Unfortunately, the Arduino source code can’t be found on [cyberstalker]’s website, so if you see interesting features that you would like to be integrated in Mooltipass you may send us a message to our Google Group.