Oscilloscope Repair Projects Still Probing For Success

lecroy-9450-oscilloscope-repair[Luke] isn’t able to declare total victory yet. His LeCroy 9450 oscilloscope repair project has seen some success, though. The glitchy screen seen above is just one of the problems it had, but has now been fixed. When [Luke] got his hands on it, this was one of three screen states: the other two being normal operation or completely dead. Replacing the screen connector was all it took, so he moved on to the second part.

This one is much less trivial. Only one of the two channels works—which might be the point at which many would abandon the repair—but it’s still a fine single-channel scope. [Luke] continued to trouble-shoot by disassembling the bottom of the case and breaking out the device’s schematics. He traced the circuit and found one module that is suspect (and is looking for help finding a replacement). Unfortunately, the problems don’t end there. Another unknown problem is causing erroneous signals on the displayed waveforms. It’s an odd issue but it really feels like he’s close to solving this one!

RasPi “Inception” CD-ROM Case Mod

raspiInception

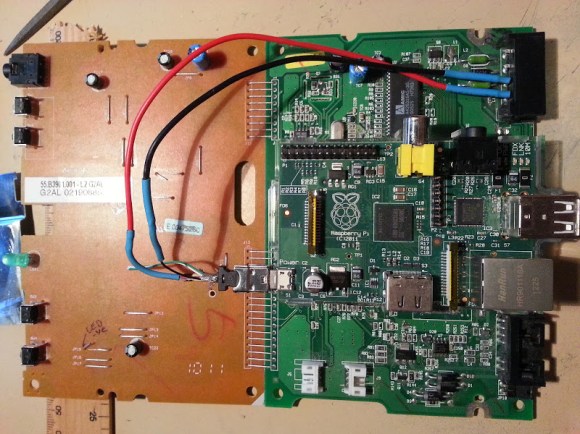
At first glance, [John’s] CD-ROM RasPi case may not seem all that unique, but we like both the implementation as well as the end-result functionality it provides. His goal was to use the Pi as a torrent downloader, and to store the downloaded files on a shared network drive. The Pi drive would slide into a bay in the server’s case—hence the Inception reference: a computer in a computer—allowing downloads while putting another step between the server and the outside world keeping, as well as guaranteeing that the network share would be available, because the server and the Pi would use the same power source.

[John] gutted the CD-ROM’s internals to leave only the PCB, which he stripped of most everything save for the power connector in the back. He then used the base of his old RasPi case as a standoff, mounting it to the top of the CD-ROM’s PCB. He soldered the power lines to the ROM’s power connector and temporarily hooked up a 5V adapter until he gets the server running. The final step was to carve out the back of the case for access to the Ethernet and USB ports, which [John] accomplished with a dremel, a hacksaw and a file. The front of the case still looks like a stock CD-ROM drive, and [John] has plans for future mods: re-purposing the LED to show network activity and modifying the buttons to serve as a reset, pause, or start for torrent downloads.

Controlling Alphanumeric LCDs With Two Wires

LCD

The Hitachi HD44780 LCD controller is the most common interface to all those alphanumeric LCDs out there, and there are a million and one tutorials for connecting these displays to any microcontroller imaginable. This still doesn’t mean hooking up these displays is necessarily simple, though: you still need at least four wires for the data, at least two for control signals, and power and ground lines for connecting the LCD the traditional way.

Here’s a neat trick for connecting HD44780 displays that only needs two wires. In this setup there’s only a ground and power+data wire. The interesting part of this build is using the power pin to transmit serial data with an RS-232-like format. The only difference is keeping the data line at +5 V when idle; a reasonable-sized cap keeps the display and controller alive when the master microcontroller is transmitting.

This technique does require a bit of logic on the receiving end, which a small 8-pin PIC can handle with ease. Communication between a microcontroller and this “smart” LCD is done at 2400 bps, which even the wimpiest micro can handle. All the software to make this setup work are available here, and we expect an Atmel-based version to hit the Hackaday tip line shortly.

DUO Portable: A Homebrew Computer With Keyboard And Display

duo

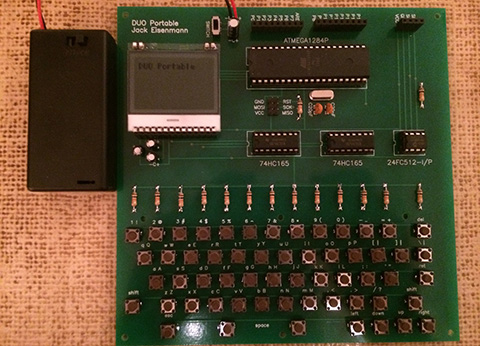
[Jack] is famous ’round these parts for his modern reinterpretations of very early computers. He’s created a computer entirely out of logic chips, a microcontroller-powered multicore box, and even a very odd one-instruction computer. For his latest project, he’s stepped up his game and made something that’s actually fairly useful: a microcontroller-powered system with an integrated keyboard and display.

The DUO Portable, as [Jack] calls his new toy, is built around an ATMega1284P microcontroller. Also on this board is a serial EEPROM that acts as a very small drive, a 102×64 pixel graphic display, and enough tact switches to create a QWERTY keyboard.

The DUO Portable boots to a primitive operating system where files can be created, edited, and saved. The programming language for this computer  is called DCPL – the DUO Portable Command Language – and can be used to create anything from a simple ‘Hello World’ program to a block-building game.

Like all of [Jack]’s homebrew computer projects, he’s written an emulator that can be run in a browser. There’s also video of [Jack] playing around with the DUO Portable available below.

Continue reading “DUO Portable: A Homebrew Computer With Keyboard And Display”

Autonomous Lighting With Intelligence

myra_light_01_29

Getting into home automation usually starts with lighting, like hacking your lights to automatically turn on when motion is detected, timer controls, or even tying everything into an app on your smart phone. [Ken] took things to a completely different level, by giving his lighting intelligence.

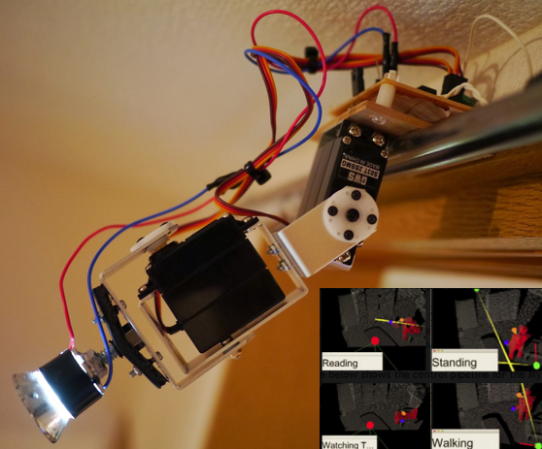
The system is called ‘Myra’, and it works by detecting what you’re doing in the room, and based on this, robotic lights will optimally adjust to the activity. For example, if you’re walking through the room, the system will attempt to illuminate your path as you walk. Other activities are detected as well, like reading a book, watching TV, or just standing still.

At the heart of the ‘Myra’ system is an RGBD Sensor (Microsoft Kinect/Asus Xtion). The space in the room is processed by a PC running an application to determine the current ‘activity’. Wireless robotic lights are strategically placed around the room; each with a 2-servo system and standalone Arduino. The PC sends out commands to each light with an angle for the two axis and the intensity of the light. The lights receive this command wirelessly via a 315MHz receiver, and the Arduino then ‘aims’ the beam according to the command.

This isn’t the first time we’ve seen [Ken’s] work; a couple of years ago we saw his extremely unique ‘real life’ weather display.  The ‘Myra’ system is still a work in progress, so we can’t wait to see how it all ends up.  Be sure to check out the video after the break for a demo of the system.

Continue reading “Autonomous Lighting With Intelligence”

ATMega & ATtiny Core Temperature Sensors

temp

We don’t know if this will come as a surprise to the regular Hackaday reader, but a whole bunch of Atmel microcontrollers have a very cool feature hidden away in their datasheets. Most of them – everything from the ATMega 168, 328, 32u4, to the ATtiny85 and  84 have a temperature sensor right on the chip. [Connor] did a little bit of research on this sensor and came up with a little bit of code that spits out the core temperature of these Atmel chips over the serial port.

The temperature sensor on these Atmel chips is accessed by writing a code – ‘100111’ for the Mega32u4 and ‘100010’ for the tiny84, for example – into the ADMUX register on the chip. According to the datasheet, the returned temperature is accurate to +- 10°C, but that can be easily calibrated by holding an ice cube (in a plastic bag, of course) up to the chip.

With a little more code, [Connor] is able to output the temperature of the microcontroller core over a serial port. In testing, his chip started out at 20°C and reached equilibrium at 24°C after about a minute. Pretty neat, and could be used as a temperature sensor for a project in a pinch.

PVC Cryptex Keeps Your Stuff Safe

Apparently we’ve never shared a Cryptex before! Made popular (and coined) by the Da Vinci Code, a Cryptex is a combination style lock originally used to store secret messages. You can make your very own using a few pieces of PVC pipe, some epoxy, and nuts and bolts!

Cryptexes have a clever design that cannot really be lock picked, without simply breaking it. In [Dan Brown’s] novel, it was said that some Cryptexes stored a fragile vial of vinegar with the message written on papyrus — that way, if it was forcibly opened the vile would break, dissolving the thin papyrus note.

They work similar to a bicycle’s combination lock, where if the correct password is guessed, the tumblers inside align, allowing the two halves of the cylinder to come apart. It’s actually a very simple design on the inside, and the whole mechanism can easily be made by yourself with minimal tools.

Continue reading “PVC Cryptex Keeps Your Stuff Safe”