Giant Tetris Adds Some Retro To Your Room

giant tetris

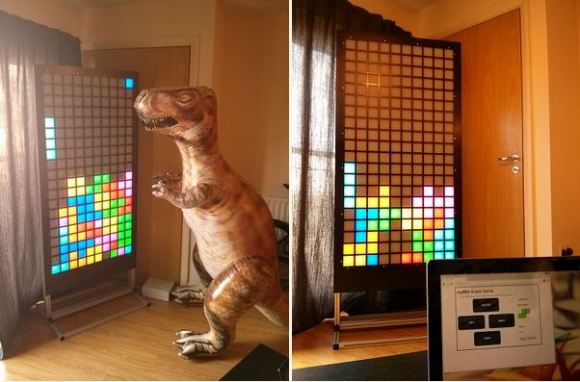
[Sam] just finished off this awesome 6 foot tall Tetris game using National Instruments myRIO with FPGA.

The build makes use of a 10 x 20 grid of RGB LEDs controlled by the myRIO. It’s played by using a web interface on any device, as long as you have WebSockets support. [Sam] had originally built it using an Arduino at the heart, but wanted a stand-alone device to do everything — no extra computer or Raspberry Pi for the web interface. That’s when he discovered the myRIO — it’s a pretty cool piece of hardware that we haven’t seen too much of yet, other than the recent Picasso with a Paintball gun project…

Don’t forget to watch the following video to see the game in action!

Continue reading “Giant Tetris Adds Some Retro To Your Room”

Twitch Plays Pokémon: Better Than Prime Time TV

What do you get when you put together a classic Game Boy game, some glue code, a streaming video website and 1 internet? Twitch Plays Pokémon (TPP), a social experiment where thousands of people “cooperatively” play a game of Pokémon Red/Blue. TPP was created by an anonymous Australian programmer who enjoyed the SaltyBet interactive channel on twitch.tv. Rather than use SaltyBet’s method of having users interact via an external website, [TPP’s creator] decided to use twitch’s own IRC based chat servers. Starting with VisualBoyAdvance, a popular C/C++ based Game Boy emulator, [TPP’s creator] began building the system. [TPP’s creator] went with python to create the web-to-emulator interface. A JavaScript app displays the live moves on the right side of the screen.

Gameplay is simple – users type their command (Up, Down, A, B) into their IRC or web client. In the original configuration, commands were processed in the order they arrived at the game. The system worked until the whole thing went viral. With thousands of people entering commands at any given time, poor “RED” would often be found spinning in place, or doing other odd things. The effect is so compelling that even [Randal Munroe] has written an XKCD entry about it. To help the players get through some of the tricky parts of the game, [TPP’s creator] added a game mode selection. Users can play in “Democracy” where the system takes votes for several seconds, then issues the highest voted command. The original anything goes game mode was renamed “Anarchy”. Switching from one mode to the other is determined by the users themselves in real-time.

[Devon], one of our readers, has been busy as well. He’s written up a tutorial on turning a Raspberry Pi into a dedicated TPP viewer. We’d love to see a TPP battlestation – a Game Boy modified to display TPP, as well as send commands to the IRC servers when buttons are pressed. Who will be the first reader to knock that hack out?

Hackaday 68k: Enclosure, Backplane, And Power

hero

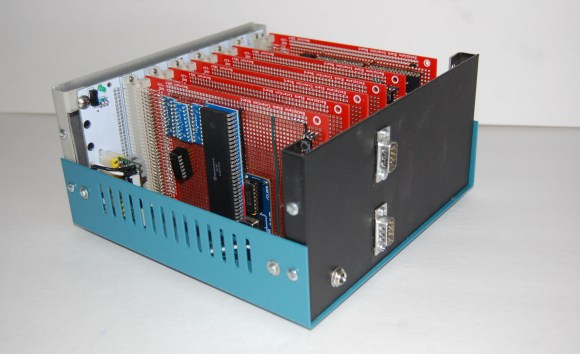
It’s about time for an update for Hackaday’s latest project – a modern retrocomputer based on the Motorola 68000 CPU. In this update, we’ll be taking a look at the enclosure, the backplane itself, and how we’re going to power this thing.

This is only an update to the project; you can check out the current status over on Hackaday Projects. It’s Hackaday’s new collaborative project hosting site where you (and your friends) can design, build, or document anything you have in mind. Request an invite for the alpha release of Hackaday Projects and you can give this project a skull! Seriously, this project is only the third ‘most skulled’ one on Hackaday Projects.

Now that the completely transparent pitch for Hackaday Projects is over with, we can get on to the update for the Hackaday 68k. Click that ‘Read More…’ link.

Continue reading “Hackaday 68k: Enclosure, Backplane, And Power”

Improving A Homebrew CT Scanner With Barium

CTscanner

[Peter] has been working on his homebrew CT scanner for a while, and it’s finally become something more than a spinning torus of plywood. He’s managed to image the inside of a few pieces of produce using an off-the-shelf radiation detector and a radioactive barium source

When we last saw [Peter]’s CT scanner, he had finished the mechanical and electronic part of the Stargate-like device, but the radioactive source was still out of reach. He had initially planned on using either cadmium 109 or barium 133. Both of these presented a few problems for the CT scanner.

The sensor [Peter] is a silicon photodiode high energy particle detector from Radiation Watch this detector was calibrated for cesium with a detection threshold of around 80keV. This just wasn’t sensitive enough to detect 22keV emissions from Cd109, but a small add-on board to the sensor can recalibrate the threshold of the sensor down to the noise floor.

Still, cadmium 109 just wasn’t giving [Peter] the results he wanted, resulting in a switch to barium 133. This was a much hotter source (but still negligible in the grand scheme of radioactivity) that allowed for a much better signal to noise ratio and shorter scans.

With a good source, [Peter] started to acquire some data on the internals of some fruit around his house. It’s still a slow process with very low resolution – the avocado in the pic above has 5mm resolution with an acquisition time of over an hour – but the whole thing works, imaging the internal structure of a bell pepper surprisingly well.
3D Printering: Making A Thing With Solidworks, Part II

printering1

Last week we started to Make a Thing  in Solidworks.  We got as far as sketching and extruding the base. This week we’ll make the back portion. We’ll use some of the same techniques in Part I and a few new features such as 3D filleting and the Hole Wizard.

As you know, this is not the first ‘Making a Thing’ tutorial. In case you missed them, the softwares previously covered in the 3D Printering series are:

engineeringdrawingblack1

Continue reading “3D Printering: Making A Thing With Solidworks, Part II”

Wireless AC Control With The Raspberry Pi

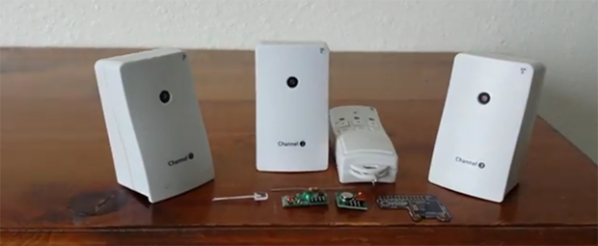
We’ve seen some of [Connor]’s work before, and it looks like he’s now turning to product design. He’s come up with an adapter for the Raspberry Pi to control a few wireless wall socket relays, allowing anyone with a Pi to control lights, coffee makers, TVs, and anything else that falls under the very broad home automation banner.

The system uses a 315MHz radio breakout board for a Raspberry Pi to control the relays in one of three wall socket adapters. There’s a script running on the Pi with a very nice GUI to turn the lights on and off.

[Connor]’s product is extremely similar to a certain WiFi-enabled wall-plug relay system controlled by a smartphone, and to that end, he’s decided to call his device the Belchin’ Emo Switch. The name might need work, but he’s selling three Raspberry Pi-controlled wall plugs for the same price of one wall plug from Brand A.

Below you’ll find [Connor]’s videos for his device. You can also check out this reddit thread where he shows off just how open source he can be; there are part suppliers and even how he’s packaging this system for shipment.

Continue reading “Wireless AC Control With The Raspberry Pi”

Get Your Hackerspace A 3D Printer

logo

LulzBot is yet again giving away a few of their very fancy and well-reviewed 3D printers away to a few hackerspaces.

This isn’t the first time LulzBot has given away a few of their printers; a year and a half ago, they gave away eight AO-100 printers and they also donated one to our ‘ol buddy [Caleb] for TheControllerProject, a forum to connect disabled gamers to people who have the means and ability to make custom gaming controllers.

The rules for this giveaway are simple: Be a hackerspace, and display, “creativity and contributions to the free software and open hardware community.” It’s as simple as that. If you’re a hackerspace without a 3D printer – which would be somewhat astounding at this point – here’s your chance to get one of the best 3D printers around.

The contest will be open starting March 1 and ends on March 14, with entry requiring a hackerspace fill out a form somewhere on the LulzBot servers.