Retrotechtacular: Forging Of Chain By Smiths

drop-forgingAh, the days when men were men and people died of asbestos related illnesses in their 30s. Let this video take you back to the ancient times when chains were forged by hand, destructively tested using wooden capstans, and sent off to furnish the ships of the line, way back in the year 1940.

The video is something of an advertisement for the Netherton iron works, located in the English midlands. Founded sometime in the mid 19th century, it appears the tooling and machinery didn’t change much the hundred years before this was filmed.

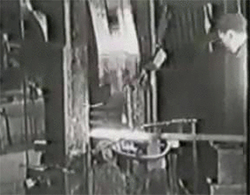
The chain begins as a gigantic mass of wrought iron bars brought in from a forge. These bars are stockpiled, then sent through chain shears that cut them into manageable lengths a foot or so long. The next scene would probably look the same in 1940 as 1840, with gangs of men taking one of the bars, heating it in a forge, beating it on an anvil, and threading it through the last link in the chain they worked on. This isn’t the satisfying machinations of industrial automata you’d see on How It’s Made. No, this is hard manual labor.

Whether through simple quality control or an edict from the crown, the completed chains are tested, or more specifically, proofed. Yard long samples are tested to their failure point, and entire chains are proofed to their carrying capacity in 15 fathom ( 90 feet) long lengths. These chains are then examined link by link, stamped and certified, and sent off to mines, factories, tramp steamers, and battleships.

Although the Netherton iron works no longer exists, it did boast a few claims to fame in its day. It manufactured the anchors and chain for both the Titanic and Lusitania. Of course, such a large-scale production of wrought chain in such an archaic method would be impossible today; today, every wrought iron foundry has been shuttered for decades. If you’ve ever wondered how such massive things were made with a minimal amount of machinery, though, there you go.

Continue reading “Retrotechtacular: Forging Of Chain By Smiths”

Get Your Uni, School Or College Involved In The Hackaday Prize

We’ve been busy contacting design tech and electrical engineering education departments to tell them about The Hackaday Prize, but there are only so many of us and we could do with your help to get the word out.

Are you excited about The Hackaday Prize? Do you think more people at your school should know about it so they can take part? Either way, please help us help them by emailing prize@hackaday.com to let us know what program coordinators, student group, or other people we should contact. If appropriate, we have a bunch of promotional materials we would like to send out to some of these awesome hackers.

You can also help us by telling your hacker designer friends, posting about The Hackaday Prize on college social media (#HackadayPrize), or letting the student newspaper know. We want to get as many universities, colleges and high schools involved as possible. Many senior year project ideas would make great starting points for THP entries, and we want to make sure students take up this opportunity to show off what they can do (and hopefully win some stuff in the process). This makes a great summer project, and looks great when applying for colleges or jobs in the future.

Remember you have until August to get your entry in, but the sooner you post it on Hackaday Projects, the sooner you can potentially start winning rewards. We have hundreds of tshirts, stickers, patches, posters and other swag up for grabs on the way to winning The Hackaday Prize.


Making Manual Lens Flares With A Few Simple Parts

DIY Lens Flare

If you’re an aspiring film maker hoping to be the next [J.J. Abram] with a mild (severe?) obsession with lens flares, then this Instructable is for you!

Modern camera lenses are designed to prevent lens flare, but sometimes, just sometimes, you want a cool lighting flare in your video. Of course you could add them in post production, but that’s kind of cheating, and if you don’t have expensive video editing software, not very easy to do either.

Now you could just throw a super bright LED flashlight on set and hope for the best, but you’ll never get that cool Star Wars or Star Trek blinding purple line… unless you add something on your camera to help scatter the light! [Jana Marie] has figured out just how to do that. Continue reading “Making Manual Lens Flares With A Few Simple Parts”

An Open Source Cortex-M0 Halogen Reflow Oven Controller With LCD

reflow oven controller

Homemade reflow ovens are a great inexpensive way to quickly solder multiple prototypes at once. [Andy] may just have built one of the best ones we’ve featured so far on Hackaday. For his project a £25 1300W 12litre halogen oven was chosen because of its low cost and fast heating time, the latter being required to follow typical reflow profile ramp-up stages.

To control the AC power [Andy] first bought a chinese Fotek Solid State Relay (SSR) on ebay, which was quickly replaced by an american one after reading concerning reports on the internet. He then made the same ‘mistake’ by buying the typical MAX6675 thermocouple-to-digital converter from the same website, as he spent much time understanding why the measurements were wrong when the IC was just defective. His final build is based around a 640×360 TFT LCD that he previously reverse engineered, the cortex-M0 STM32F051C8T7, a SPI flash, some power regulators and buttons. The firmware was written in C++ and we’ll let our readers visit [Andy]’s page to see how well  his oven performs.

Solderless Noise-o-Tron Kit Makes Noise At Chicago Makerfaire

Noise-o-Tron

Anyone who’s manned a hackerspace booth at an event knows how difficult it can be to describe to people what a hackerspace is. No matter what words you use to describe it, nothing really seems to do it justice. You simply can’t use words to make someone feel that sense of accomplishment and fun that you get when you learn something new and build something that actually works.

[Derek] had this same problem and decided to do something about it. He realized that in order to really share the experience of a hackerspace, he would have to bring a piece of the hackerspace to the people.  That meant getting people to build something simple, but fun. [Derek’s] design had to be easy enough for anyone to put together, and inexpensive enough that it can be produced in moderate quantities without breaking the bank.

[Derek] ended up building a simple “optical theremin”. The heart of this simple circuit is an ATTiny45. Arduino libraries have already been ported to this chip, so all [Derek] had to do was write a few simple lines of code and he was up and running. The chip is connected to a photocell so the pitch will vary with the amount of light that reaches the cell. The user can then change the pitch by moving their hand closer or further away, achieving a similar effect to a theremin.

[Derek] designed a simple “pcb” out of acrylic, with laser cut holes for all of the components. If you don’t have access to a laser cutter to cut the acrylic sheets, you could always build your own. The electronic components are placed into the holes and the leads are simply twisted together. This allows even an inexperienced builder to complete the project in just five to ten minutes with no complicated tools. The end result of his hard work was a crowded booth at a lot of happy new makers. All of [Derek’s] plans are available on github, and he hopes his project will find use at Makerfaires and hackerspace events all over the world.

A Quadcopter From Scratch

Quadcopter

[AwesomeAwesomeness] wanted a low cost quadcopter, so he built one from scratch. Okay, not quite from scratch. [AA’s] cookie mix came in the form of an Arduino Uno and some motors. He started with motors and propellers from a Hubsan X4 quadcopter. Once the power system was specified, [AA] designed a frame, arms, and motor pods in Solidworks. He printed his parts out and had a sweet quadcopter that just needed a brain.

Rather than buy a pre-made control board, [AA] started with an Arduino Uno.  An Arduino alone can’t source enough current to drive the Hubsan motors. To handle this, [AA] added a ULN2003A  Darlington transistor array. The 2003A did work, but [AA] had some glitching issues. We think FETs would do much better in this application, especially when running PWM.

On the control side of things, [AA] added an MPU-6050 Triple Axis Accelerometer and Gyro breakout from SparkFun. The 6050 has 3 gyros and 3 accelerometers in one package. Plenty for a quadcopter.

All this left was the coding. Multicopters generally use Proportional-Integral-Derivative (PID) control loops to maintain stability in the air. [AA] used the Arduino PID library for his quadcopter. He actually created two PID instances – one for pitch and one for roll.

[AA] doesn’t have any videos of his quadcopter in action yet, and we’re guessing this is due in part to weight. Lifting an Uno, a perfboard, and a frame is a tall task for those motors. Going with a one of the many tiny Arduino’s out there would help reduce weight. In addition, [AA] could use a gear system similar to what is used in the Syma X series quadcopters. Stick with it – you’re on the right track!


Rackmount RasPi Leaves No Excuse To Lose Data

RasPi backup server

[Frank] knows how important backups are for data security, but his old method of plugging a hard drive in to take manual backups every so often is not the most reliable or secure way of backing up data. He realized he was going to need a secure, automated solution. He didn’t need a full-sized computer with a ton of power; why waste electricity for something so simple? His solution was to use a Raspberry Pi as the backup computer.

The main problem he faced with the Pi was finding a way to make it rack mountable. [Frank] started with an empty 1U server case. He then had to bend a few metal plates in order to securely mount the backup drive into the case. A couple of small rubber pads help dampen any vibrations caused by the hard drive.

The computer power supply was able to put out the 12V needed for the hard disk, but not the 5V required to run the Pi. [Frank’s] solution was to use an LM2596 based switching supply to turn the 12V into 5V. He soldered the power supply wires directly to the Pi, thinking that a USB plug might vibrate loose over time. Mounting the Pi to the computer case should have been the trickiest part but [Frank] made it easy by simply gluing the Pi’s plastic case to the inside of the computer case. When all was said in done, the backup server pulls 29W under full load, 9W with the disk spinning, and only about 2W in an idle state.

On the software side of things, [Frank’s] backup box uses bash shell scripts to get the job done. The Pi connects to his main server via VPN and then the bash scripts use rsync to actually collect the files. The system not only saves backups every night, but also keeps week old backups just in case. If you are really paranoid about your backups, try hooking up a custom battery backup solution to your Pi. If a Pi just isn’t doing it for you, you can always try one of many other methods.