A Quadcopter From Scratch

Quadcopter

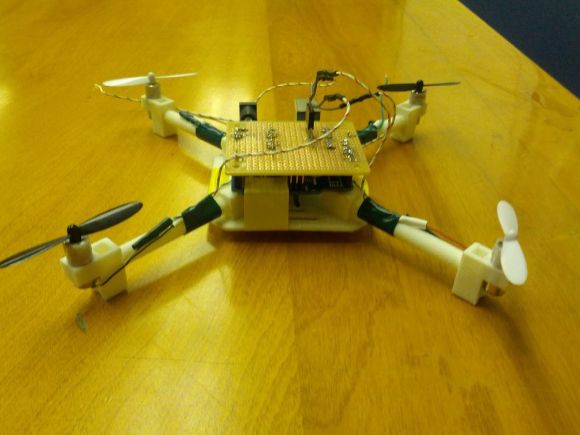
[AwesomeAwesomeness] wanted a low cost quadcopter, so he built one from scratch. Okay, not quite from scratch. [AA’s] cookie mix came in the form of an Arduino Uno and some motors. He started with motors and propellers from a Hubsan X4 quadcopter. Once the power system was specified, [AA] designed a frame, arms, and motor pods in Solidworks. He printed his parts out and had a sweet quadcopter that just needed a brain.

Rather than buy a pre-made control board, [AA] started with an Arduino Uno.  An Arduino alone can’t source enough current to drive the Hubsan motors. To handle this, [AA] added a ULN2003A  Darlington transistor array. The 2003A did work, but [AA] had some glitching issues. We think FETs would do much better in this application, especially when running PWM.

On the control side of things, [AA] added an MPU-6050 Triple Axis Accelerometer and Gyro breakout from SparkFun. The 6050 has 3 gyros and 3 accelerometers in one package. Plenty for a quadcopter.

All this left was the coding. Multicopters generally use Proportional-Integral-Derivative (PID) control loops to maintain stability in the air. [AA] used the Arduino PID library for his quadcopter. He actually created two PID instances – one for pitch and one for roll.

[AA] doesn’t have any videos of his quadcopter in action yet, and we’re guessing this is due in part to weight. Lifting an Uno, a perfboard, and a frame is a tall task for those motors. Going with a one of the many tiny Arduino’s out there would help reduce weight. In addition, [AA] could use a gear system similar to what is used in the Syma X series quadcopters. Stick with it – you’re on the right track!


Rackmount RasPi Leaves No Excuse To Lose Data

RasPi backup server

[Frank] knows how important backups are for data security, but his old method of plugging a hard drive in to take manual backups every so often is not the most reliable or secure way of backing up data. He realized he was going to need a secure, automated solution. He didn’t need a full-sized computer with a ton of power; why waste electricity for something so simple? His solution was to use a Raspberry Pi as the backup computer.

The main problem he faced with the Pi was finding a way to make it rack mountable. [Frank] started with an empty 1U server case. He then had to bend a few metal plates in order to securely mount the backup drive into the case. A couple of small rubber pads help dampen any vibrations caused by the hard drive.

The computer power supply was able to put out the 12V needed for the hard disk, but not the 5V required to run the Pi. [Frank’s] solution was to use an LM2596 based switching supply to turn the 12V into 5V. He soldered the power supply wires directly to the Pi, thinking that a USB plug might vibrate loose over time. Mounting the Pi to the computer case should have been the trickiest part but [Frank] made it easy by simply gluing the Pi’s plastic case to the inside of the computer case. When all was said in done, the backup server pulls 29W under full load, 9W with the disk spinning, and only about 2W in an idle state.

On the software side of things, [Frank’s] backup box uses bash shell scripts to get the job done. The Pi connects to his main server via VPN and then the bash scripts use rsync to actually collect the files. The system not only saves backups every night, but also keeps week old backups just in case. If you are really paranoid about your backups, try hooking up a custom battery backup solution to your Pi. If a Pi just isn’t doing it for you, you can always try one of many other methods.

Oinker Is Twitter For HAMs

oinker

Have you ever wanted to send a quick message to your HAM radio buddies over the air but then realized you forgot your radio at home? [Troy] created Oinker to remedy this problem. Oinker is a Perl script that turns emails into audio.

The script monitors an email account for new messages and then uses the Festival text-to-speech engine to transform the text into audio. [Troy] runs Oinker on a Raspberry Pi, with the Pi’s audio output plugged directly into an inexpensive ham radio. The radio is then manually tuned to the desired transmit frequency. Whenever Oinker see’s a new email, that message is converted into speech and then output to the transmitter.

The script automatically appends your HAM radio call sign to the end of every message to ensure you stay within FCC regulations. Now whenever [Troy] runs into some bad traffic on the road, he can send a quick SMS to his email address and warn his HAM radio buddies to stay clear of the area.

Injection Molding With Hot Glue

Injection molding is simply forcing a melted thermoplastic into a mold of some sort, letting it cool, and then prying the mold apart to get to the finished piece. Hot glue guns are basically handheld thermoplastic extruders, so when [scorch] dug up some old injection molds he had sitting around, it didn’t take long to put two and two together.

Injection molds aren’t something any normal person has sitting around, but a few years ago [scorch] found two books published by Gingery, the same people who have published instructions on how to build a metalshop from scrap. [scorch] created his molds on a small CNC mill – a Sieg X3 – and his initial experiments with injection molded plastic were fairly successful, even if the molds were made from self-cast billets.

After molding a few hot glue LEGO parts with his equipment, [scorch] had a look around the Internet and noticed this was nothing new. One company even sells a hot glue gun-based injection molding kit using polyethylene glue sticks. Their demo video (seen below) seems much more complicated than [scorch]’s efforts, so  we’ll say he came out ahead on this one.

Continue reading “Injection Molding With Hot Glue”

Hardware Startup Review: Spark

The Hardware Startup Review - Spark - Hackaday-01

Like it or not, a whole new wave of Hardware Startups is coming our way. Crowd Funding campaigns are making it possible for everyone with an idea to “test the waters”, tech-savvy Angel investors are eager to help successful ones cross over, and Venture Capitalists are sitting on the other side, always on the lookout for potential additions to their “hardware portfolio”. It’s these billion-dollar acquisitions that made everyone jump on the bandwagon, and there’s no going back. At least for now.

That’s all great, and we want to believe that good things will come out of this whole frenzy. But instead of staying on the sidelines, we thought Hackady should get involved and start asking some hard questions. After all, these guys didn’t think they’d be able to get away with some nicely produced videos and a couple of high-res photos, right?

For our first issue, we picked a relatively innocent target – Spark, the team behind the Spark Core development board. By embracing Open Source and Open Hardware as the core part of their strategy, Spark has so far been a positive example in the sea of otherwise dull (and potentially creepy) IoT “platforms”. So we thought we should give [Zach Supalla], CEO of Spark a call.

Continue reading “Hardware Startup Review: Spark”

Intelligent Roadways Pave Way To The Future

smart roadway with illuminated tiles

The idea of a road is relatively simple – a durable path from point A to point B. Development of roadways usable for wheeled carriages has been perfected over the centuries. The Romans, for instance, used a base layer of crushed limestone that would let water flow out, preventing clay soil from turning into mud. Some Roman roads were topped with six sided capstones, also known as pavers, many of which still exist today.

The invention of the horseless carriage necessitated roadways that could be used at high speeds. Tarmac, asphalt and concrete roads followed, and thus ends our short venture into the history of roads. Roadways simply haven’t changed much since then. Sure, we’ve painted some lines on them, even etched grooves in some to prevent accidents, but the core technology of the road is the same as it was a hundred years ago. Until now. Consider the Intelligent Roadway.

[Scott] is an electrical engineer, and had dreamed of solar powered roadways as a child. But it wasn’t until the realization of global warming did [Scott] and his wife, [Julie] start to take the concept seriously. Stick around after the break to find out just how smart [Scott’s] roadway of the future is.

Continue reading “Intelligent Roadways Pave Way To The Future”

Repairing A Damaged RC Rx Due To Reverse Polarity Power Input

Rx Receiver Repair

Once in a while all of us technocenti get a little complacent and do something that may be considered ‘dumb’ while working on a project…. like cutting the wrong side of a piece of wood or welding a bracket on in the wrong direction. [Santhosh] is human like everyone else and plugged in the power connector to his RC Receiver incorrectly, rendering the receiver useless. How will his Arduino-controlled Robot work without a functioning receiver?

[Santhosh] started by opening up the case to expose the circuit board and checking out the components inside. The first component in the power input path was a voltage regulator. Five volts DC was applied to the input side of the 3.3-volt regulator but only 1.21 came out the other end. Now that the problem was quickly identified the next step was to replace the faulty regulator. Purchasing an exact replacement would have been easy but cost both time and money. [Santhosh]’s parts bin contained a similar regulator, a little larger than the original but the pinout was the same.

Continue reading “Repairing A Damaged RC Rx Due To Reverse Polarity Power Input”