Hackable Arduino Cellphone

Phoenard: Arduino Phone As Small As An Arduino Mega

[youtube=https://www.youtube.com/watch?v=_hXgwTRqwRU&w=580]


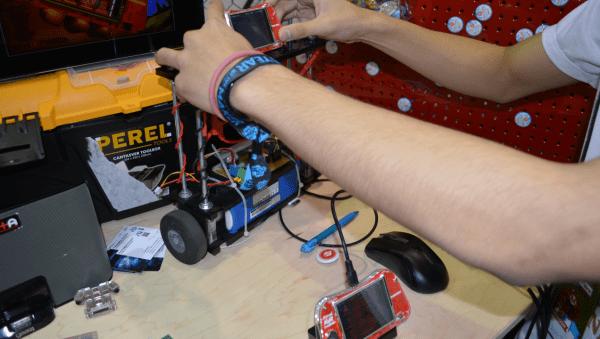
Hanging out at one side of the Atmel booth at Maker Faire was [Pamungkas Sumasta] who was showing off his Arduino cellphone called Phoenard. We really like the form-factor but its hackability is where it really shines. [Sumasta] showed off the menu system which is quite snappy and makes it simple for you to add your own applications. Software isn’t the only thing you can customize, as there’s a connector at the bottom of the phone. He showed off a breadboard attachment which was hosting LEDs of various colors. Their intensity can be altered using a simple slider app on the touchscreen. But there’s more power if want it. Also on exhibit was a self-balancing robot body which has a connector at the top for the phone.

[Sumasta] won the Atmel Hero contest and we assume that’s how he made it all the way to San Francisco from The Netherlands for Maker Faire. You can learn a few more technical details about Phoenard on the Facebook page.

Super Simple Gimbal For Multi-Rotor Aircraft Laughs In The Face Of Complexity

Super Simple Multi Rotor Gimbal

After the first flight of your newly built multi-copter, you will immediately want to add a camera. This sequence of events follows the laws of physics and is as predictable as gravity. Just strapping a camera on by way of a fixed bracket may technically solve that problem, but it creates another. A multi-copter tilts and rolls as a result of changing flight direction. If the multi-copter tilts and rolls, so does your camera. This is where a gimbal comes in handy, it adjusts the camera in an equal and opposite direction than that of the aircraft. If the aircraft tilts forward, the gimbal tilts the camera backward the same amount. The result is a steady camera for capturing some sweet videography.

Super Simple Multi Rotor GimbalTeam SSG over at rcgroups.com has come up with what they are calling the Super Simple Gimbal. Their vision was a gimbal that would be inexpensive, easy to build and add minimal weight to the aircraft. On a normal gimbal, there are two motors or servos, each one specifically controls a single axis of movement. On the SSG, there are 2 servos but they do not move independently from one another. The camera is mounted to a plate that is supported on one end by a piece of silicone tube which becomes a fulcrum for the system. The other side of this plate is supported by 2 linkages (also made of silicone tube) that are themselves connected to the servos. If both servos move up, the camera is tilted down. If the right servo moves up and the left down, the camera is tilted to the left.

Continue reading “Super Simple Gimbal For Multi-Rotor Aircraft Laughs In The Face Of Complexity”

Man Builds Concrete 3D Printer In His Garage

[Andrey Rudenko] is building a house in his garage. Not with nails and lumber, but with concrete extruded by his 3D printer. We’ve seen concrete 3D printers in the past, but unlike those projects, [Andrey] isn’t part of a of a university or corporation. He’s just a contractor with a dream. His printer is directly derived from the RepRap project. It’s even commanded by Pronterface.

[Andrey] started with an Arduino Mega 2560 based RepRap RAMPS style controller. His big printer needed big NEMA34 stepper motors, far beyond the current capacity of the stock RAMPS stepper drivers. [Andrey] got in touch with [James] at MassMind who helped him with an open source THB6064AH based driver. [James] even came up with an adaptor cable and PCB which makes the new drivers a drop-in replacement.

Now that his printer was moving, [Andrey] needed a material to print. Concrete chemistry is a science all its own. There are many specialty blends of concrete with specific strength and drying times. Trucking in custom mixtures can get expensive. [Andrey] has come up with his own mixture based on bags of regular concrete mix, sand, and some additives. [Andrey’s] special sauce doesn’t cure especially quickly, but it is viscous enough to print with.

Every piece of [Andrey’s] printer had to be designed and refined, including the nozzle. The concrete printer works somewhat like a frostruder, extruding concrete in 20mm wide by 5mm tall layers. He’s even managed to print overhanging layers and arches exactly like a giant RepRap Mendel.

The printer’s great unveiling will be this summer. [Andrey] plans to print a playhouse sized castle over the course of a week. He’s looking to collaborate with architects, builders, and other like-minded folks. We’d suggest uploading the project to  Hackaday.io!

Continue reading “Man Builds Concrete 3D Printer In His Garage”

Physical Keys Not Just For Doors Anymore, Now Available For Windows

Physical Key Locks and Unlocks Windows Computer

If you have ever forgotten your computer password after a long weekend or maybe you can remember it but just can’t seem to type it correctly, [Thomas] has a project for you. It’s a physical key that locks and unlocks your PC.

So how does it work? The heart of the project is an Arduino Leonardo. You may recall that this board is a bit different from the preceding Arduinos as it can enumerate on a host computer as a Human Interface Device (HID), such as a keyboard or mouse. The Arduino sketch continually reads an input pin using an internal pull-up resistor to make it logic high with the key switch connecting the signal to ground. When the Arduino sees the pin change from high to low, it sends out a keyboard command consisting of the Windows Key and “L”, which is the keyboard shortcut for locking the computer.

When the physical key is turned again, the Arduino sees the pin change back to a high state and it again emulates a keyboard but this time enters your password. You do have to include your password in the Arduino sketch for this to work. In addition, there are two LED’s wired up to show if the computer is locked or not, but you’ll be able to tell pretty quick when trying to get back to work.

Continue reading “Physical Keys Not Just For Doors Anymore, Now Available For Windows”

E-reader Becomes Sailplane And Paraglider Computer

sail 
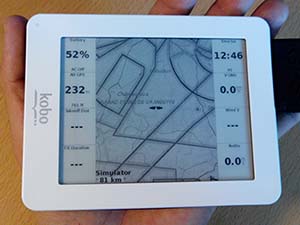
[Tweepy] flies unpowered aircraft, and he’d like to use the XCSoar flight computer app for gliders, sailplanes, and paragliders, but couldn’t find any hardware. XCSoar is an amazing app that can keep track of terrain, route, thermals, and a whole bunch of other variables that make flying more enjoyable, but running it on a device useful for a hang glider pilot is a challenge.

He eventually found a nearly perfect device in the Kobo mini e-reader. It’s e-ink, so it’s sunlight readable, uses a glove-compatible resistive touchscreen, runs Android, and is dirt cheap. The only thing lacking was a GPS receiver. What was [Tweepy] to do? Mod an e-reader, of course.

The electronic portion of the mod was simple enough; serial GPS units can be found just about everywhere, and the Kobo has a serial headers on the board. The case, however, required a bit of thingiverseing, and the completed case mod looks fairly professional.

With a few software updates, new maps, and of course the phenomenal XCSoar app, [Tweepy] had an awesome flight computer for under 100 Euro. The only thing missing is an integrated variometer, but a Game Boy will work in a pinch.

The Lightgame Project: A Multiplayer Arduino Game

lightgame_3Summer is upon us. The Lightgame Project is a multiplayer reaction time based game built around the Arduino. It’s a perfect rainy day project for those restless kids (and adults!). Designed by two undergraduate students [Efstathios] and [Thodoris] for a semester long project, all the hard work has already been done for you.

There are tons of reasons we love games that you can build yourself. For one, it’s an amazing way to get children interested in hobby electronics, making, and hacking. Especially when they can play the game with (and show off to) their friends. Another reason is that it is a perfect way to share your project with friends and family, showcasing what you have been learning. The game is based on your reaction time and whether or not you press your button when another players color is shown. The project is built around two Arduinos connected via I2C. The master handles the mechanics of the game, while the slave handles the TFT LCD and playing music through a buzzer.

I2C is a great communication protocol to be familiar with and this is a great project to give it a try. [Efstathios] and [Thodoris] did a great job writing up their post, plus they included all the code and schematics needed to build your own. It would be great to see more university professors foster open source hardware and software with their students. A special thanks goes out to [Dr. Dasygenis] for submitting his student’s work to us!

Continue reading “The Lightgame Project: A Multiplayer Arduino Game”

Blinding Shades Hide Wearer’s Four Eyes

We ran into [Garrett Mace] at Maker Faire. He wasn’t exhibiting, but in keeping with the fun he made something to show off. This pair of RGB LED Shades was assembled the night before. They may have been hacked together, but they were in no way a hack. Especially of interest to us is the hinge design which is made of PCB substrate and a few machine screws.

Our video above does a pretty good job of showing off the blinky patterns he coded. What’s surprising to us is that the wearer is almost no view of the light the specs are emitting. The slots aren’t that hard to see out of either, and they hide [Garrett’s] prescription glasses quite nicely. This pair steps up from the single color version we saw a couple of years back. That set was also on display, but you really do need to get a closer look at the newer design. Luckily it took us so long to get this video edited that the Macetech blog now has complete details.