DIY Lantern

Lantern Made In Preparation Of Zombie Apocalypse

[BenN] was at his local hackerspace one day when a friend stopped by and offered him a used 5AH lead acid battery. As any good tinkerer would, he jumped on the opportunity and immediately started looking around for a project to use the battery in. One of [BenN’s] recent other projects involved 12volt landscaping lights, the same voltage as the battery he was just given. At this point it was clear that he had a good start to making a lantern. This lantern project also supports [BenN’s] obsession with hobby of preparing for the zombie apocalypse.

A lantern needs an enclosure. Over on the hackerspace’s spare-parts rack was an old ATX power supply. All of the internal electrical components were removed to make room for the battery which fit inside nicely. The landscaping light just happened to be slightly larger than the power supply’s fan cut outs. Once the grill was removed from the metal power supply enclosure, the lamp fit in nicely and was secured using silicone glue which can tolerate any temperature the bulb can produce.

The feature that separates a lantern from a flashlight is the top-mounted carrying handle and this lantern will receive one made from the wiring removed from the ATX power supply. The electrical wiring is fairly straight forward. The battery is connected to the landscaping light by way of the original ATX on/off switch. The two terminals of the battery were also wired to the power supply’s AC input connector. This allows [BenN] to connect a DC battery charger to two of the three pins in order to charge the battery. Although this is a creative way to re-use the AC connector, it leaves quite a bit of potential to accidently plug in a 120v AC cord!


A DIY CNC dust collector

DIY CNC Dust Collection

CNC machines are great at churning out custom parts, but they tend to make a mess in the process. [Darcy] has built up his own CNC dust collection rig to collect the dust and keep his workspace clean.

To capture the dust, a custom dust skirt encloses the cutting tool and directs the vacuum. This was made by gluing acrylic parts together, creating a box that contains the dust and provides a connection for the vacuum system.

For $1, [Darcy] built a cyclone dust extractor. This spins air around in circles, causing the dust to fall to the bottom of a container. The result is less dust reaching the vacuum, and much less money spent on vacuum bags.

Since the vacuum makes quite a bit of noise, a muffler was needed. This is just a simple wood box to contain the machine. It can also be used to vent the exhaust outside to further prevent polluting the workspace.

While we’ve seen some similar builds in the past, [Darcy]’s design could be helpful for those looking to build their own system. He also gives us a video which shows the effectiveness of the dust skirt, which you can find after the break.

Continue reading “DIY CNC Dust Collection”

Hackaday Links, September 14, 2014

Photonicinduction is back! The Brit famous for not setting his attic on fire has built a 20,000 Watt power supply. It connects directly to England’s national grid with huge connectors. Impeccable fabrication and triple servo controlled variacs, and apparently this will be used for making a lot of hydrogen and oxygen through electrolysis of water.

In case you missed it, there’s a group buy for Flir’s Lepton thermal imaging module. Here’s the breakout board.

Need to solder something away from an outlet, and all you have is a disposable lighter? There’s a fix for that.

A Raspberry Pi case designed to be compatible with Lego. Now we need a hat/shield for NXT connectors.

Need another channel in your RC remote? Here’s this. It uses the gyro gain channel on a receiver. If someone wants to figure out how this works, wee do have a rather cool project hosting site.

0x06 0x1f1 CHSJOXWA OM YUFJPAI XFADBLY GIKQB CRZ MIXRB JRWV NN LZVOD XRI TBJKKVX MYYGID BLS LWNY XJVS FJO PYXBM MW D ELX ZG BIM CWMG JF PKI TKI ESZ WBME LKNLI BL 1407981609

Here’s something impossibly cool: The Macintosh PowerBop. It’s a Powerbook 170 with the floppy drive replaced with the radio in a cordless phone. It was part of France’s BiBop network, and you could buy private base stations for use at home. It is technically possible to use the radio as a wireless link to a modem, but [Pierre] couldn’t get PPP or a sufficiently ancient browser working. Plus ten points for taking it to an Apple store, and another twenty for trying to connect to our retro edition.

Chicken Lips. [Fran] and our very own [Bil Herd] are hanging out a bunch and recalling [Bil]’s time at Commodore. For this little featurette, [Bil] brought out his very own Commodore LCD. There are three of those in the world. Also included: tales of vertical integration, flipping bits with photons, and 80s era ERC.

ROM dump

Raiders Of The Lost ROM

Once upon a time, arcades were all the rage. You could head down to your local arcade with a pocket full of quarters and try many different games. These days, video arcades are less popular. As a result, many old arcade games are becoming increasingly difficult to find. They are almost like the artifacts of an ancient age. They are slowly left to rot and are often lost or forgotten with time. Enter, MAME.

MAME (Multiple Arcade Machine Emulator) is a software project, the goal of which is to protect gaming history by preventing these arcade machines from being lost or forgotten. The MAME emulator currently supports over 7000 titles, but there are still more out there that require preservation. The hackers who work on preserving these games are like the digital Indiana Jones of the world. They learn about lost games and seek them out for preservation. In some cases, they must circumvent security measures in order to accurately preserve content. Nothing as scary as giant rolling boulders or poison darts, but security nonetheless.

Many of the arcade cabinets produced by a publisher called NMK used a particular sound processor labeled, “NMK004”. This chip contains both a protected internal code ROM and an unprotected external ROM that controls the sound hardware. The actual music data is stored on a separate unprotected EEPROM and is different for each game. The system reads the music data from the EEPROM and then processes it using the secret data inside the NMK004.

The security in place around the internal ROM has prevented hackers from dumping its contents for all this time. The result is that NMK games using this chip have poorly emulated sound when played using MAME, since no one knows exactly how the original chip processed audio. [trap15] found it ridiculous that after 20 years, no one had attempted to circumvent the security and dump the ROM. He took matters into his own hands.

The full story is a bit long and contains several twists and turns, but its well worth the read. The condensed version is that after a lot of trial and error and after writing many custom tools, [trap15] was able to finally dump the ROM. He was able to accomplish this using a very clever trick, speculated by others but never before attempted on this hardware. [trap15] exploited a vulnerability found in the unprotected external ROM in order to trick the system into playing back the protected internal ROM as though it were the sound data stored on the EEPROM. The system would read through the internal ROM as though it were a song and play it out through the speakers. [trap15] recorded the resulting audio back into his PC as a WAV file. He then had to write a custom tool to decode the WAV file back into usable data.

[trap15] has released all of his tools with documentation so other hackers can use them for their own adventures into hardware hacking. The project was a long time in the making and it’s a great example of reverse engineering and perseverance.

[Thanks Ryan]

Inductive charger

Inductive Charger Mod Allows For Non-Stop Wireless Rocking

When you want to jam out to the tunes stored on your mobile devices, Bluetooth speakers are a good option. Battery power means you can take them on the go and the Bluetooth connection means you don’t have to worry about cables or wires dangling around. Unfortunately the batteries never seem to last as long as we want them too. You can always plug the speaker back in to charge up the battery… but when you unhook those cords they always seem to end up falling back behind the furniture.

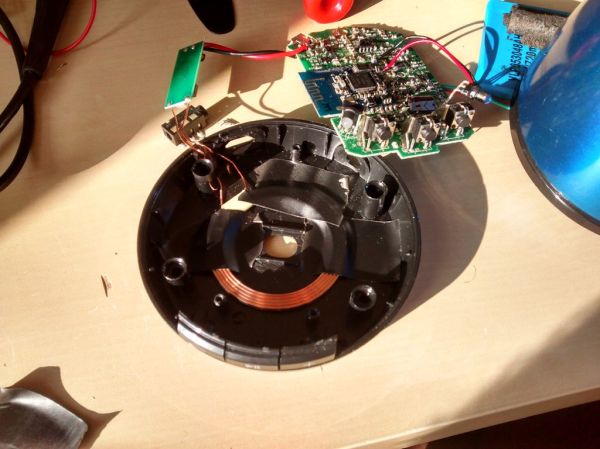
[Pierre] found himself with this problem, but being a hacker at heart meant that he was able to do something about it. He modified his JAM Classic Bluetooth Wireless Speaker to include an inductive charger. It used to be a lot of work to fabricate your own inductive charging system, or to rip it out of another device. But these days you can purchase kits outright.

The JAM speaker was simply put together with screws, so no cracking of the plastic was necessary. Once the case was removed, [Pierre] used a volt meter to locate the 5V input line. It looks like he just tapped into the USB port’s power and ground connections. The coil’s circuit is soldered in place with just the two wires.

All [Pierre] had left to do was to put the speaker back together, taking care to find space for the coil and the new circuit board. The coil was taped to the round base of the speaker. This meant that [Pierre] could simply tape the charging coil to the underside of a glass table top. Now whenever his Bluetooth speaker gets low on battery, he can simply place it on the corner of the table and it will charge itself. No need to mess with cables.


DIY Bike Turn Signals

DIY Bike Brake Light And Turn Signals

If you ever take your bike out and share the road with large automobiles, you know that sometimes it can get a little hairy. As a biker, you will stand no chance in a collision with a vehicle. Communicating your intentions, i.e. turning and braking, can certainly reduce your risk of getting in an accident. [Mike] didn’t like the traditional idea of taking a hand off the handlebars in order to signal to traffic so he did something about it, he built turn signals and a brake light for his bike.

The business end of this project is the rear-facing light bar mounted under the rider’s seat. It is made from Radio Shack project boxes and mounted to an off-the-shelf L bracket. A bunch of LEDs were installed in the project boxes, the yellow turn signal LEDs are arranged in the shape of arrows and the red brake light LEDs are in an oval. Inside the project boxes you will find the 9v battery that powers the circuit and also a breadboard that is home to the circuits responsible for blinking the turn signals.

DIY Bike Turn Signals

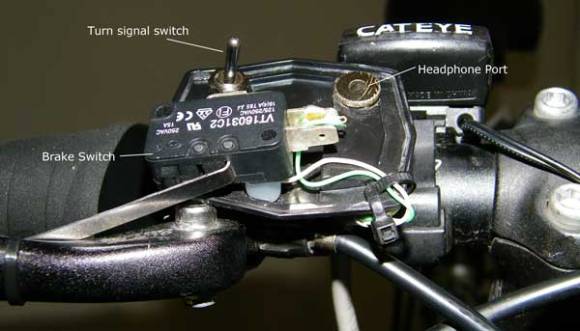
Check out the switch assembly that is mounted to the handle bars. It was built using an old reflector bracket which was already the correct size to mount to handle bars. As you would expect, there is a toggle switch for turning the turn signals on and off. A little bit more interesting is the brake switch. It is a hinge-lever style limit switch and positioned in a manner such that it is activated when the brake lever is pulled. There is no additional thought or effort required on the cyclist’s part!

Something that is certainly not expected on the switch assembly is the headphone jack. [Mike] likes to listen to music while he rides and a cord dangling around from a backpack or bike bag gets in the way. On the rear light bar, there is a headphone jack that allows an MP3 player to be plugged into. The audio signals travel up the same CAT5 cord used for the turn and brake signals. This allows only a short run of headphone cable from the handlebars to [Mike’s] ears.

THP Quarterfinalist: Hypoglycaemia

For somewhat obvious reasons, there aren’t many medical hacks making their way to the quarterfinal selection of The Hackaday Prize. One exception to this is [Thomas]’ Hypoglycaemia Alert System, a Bluetooth device that detects low blood sugar in sleeping diabetics and calls for help.

This isn’t the only blood glucose monitor that made it to the quarterfinals of The Hackaday Prize. [John Costik] reverse engineered a continuous glucose monitor for his Type 1 son (we also did a hacker bio on him). This project has a slightly different scope and doesn’t rely on pre-existing blood glucose sensors. In fact, it doesn’t detect glucose at all. Instead, it uses humidity and temperature sensors to detect the heavy sweating that often occurs with low blood glucose levels.

This hypoglycaemia monitor is meant to be worn by a user at night. Glucose levels can drop while sleeping, and if they drop too low blood sugar can result in death. When the monitor detects the symptoms of low blood glucose, it connects to a smartphone through a Bluetooth link and sends an SMS alert to phone numbers in the contact list. Whoever receives this message will then try to wake the potentially unresponsive diabetic, and failing that, would put some cake frosting under their gums (Seriously. Ask a police officer/EMT for cake frosting. The good ones have some).

[Thomas] is well on his way to a functional device despite having a few problems with his enclosure. Right now he’s working on the Bluetooth comms part of the build, and we hope a complete, working device is right around the corner.


SpaceWrencherThe project featured in this post is a semifinalist in The Hackaday Prize.