DIY Mini-Drill Would Make Mad Max Proud

mini-drill

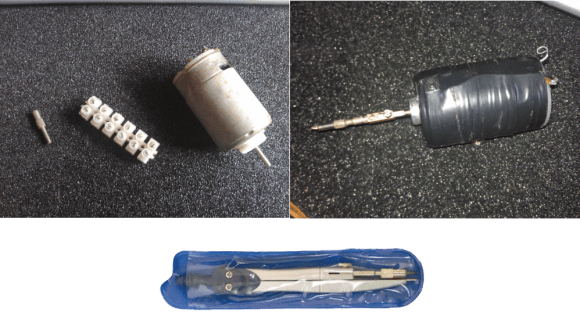
That’s not a prison tattoo gun up there, it’s [Szabolcs] DIY mini drill. Hackaday has been on a bit of a DIY tool kick lately – with improvised saws, grinders, and grinders converted to saws, among other things. We haven’t had any DIY drills yet, though. [Szabolcs] needed a drill for his home-made printed circuit boards. Usually a Dremel or similar rotary tool is pressed into service for drilling PCBs. However, for some reason he didn’t have access to one. [Szabolcs] called upon his inner MacGyver and built a drill from parts he had on hand.

Every drill needs a chuck, or at least a collet holder. This drill’s chuck is sourced from a drafting compass. Long ago in the dark ages before CAD, mechanical drawings were manually drawn up. Companies employed entire drafting departments to draw designs, blueprints, and schematics. These draftsmen used the compass to create accurate circles and arcs. [Szabolcs] re-used the lead holder from the compass as a chuck for his drill. A 540 or 550 brushed sealed endbell can motor, common to the R/C cars spins the drill up. We originally thought [Szabolcs] used an Erector or Meccano set piece as a shaft coupling. The truth is it’s the internals of a Euro style terminal strip. A small tactile button is used to activate the motor. Some electrical tape wrapped around the motor holds the button in place. The tape also makes sure that the user isn’t cut by the sheet metal field ring wrapped around the can. Power for the system can come from just about anywhere, though [Szabolcs] says he uses the 12v rail of an old ATX power supply.

MRRF: 3D Printed Resin Molds


Visiting the Midwest RepRap Festival, you will, of course, find a ton of 3D printed baubles and trinkets. A slightly more interesting find at this year’s MRRF was a lot of resin cast parts from [Mark VanDiepenbos]. He’s the guy behind the RotoMAAK, a spinny, ‘this was in the movie Contact‘-like device designed for spin casting with resins. At the festival, he’s showing off his latest project, 3D printed resin molds.

With the right mold, anyone with 2-part resins can replicate dozens of identical parts in an hour. The only problem is you need a mold to cast the parts. You could print a plastic part and make a silicone mold to cast your part. The much more clever solution would be to print the mold directly and fill it with resin.

[Mark] printed the two-part rabbit mold seen above out of ABS, filled it with urethane resin, and chucked it into his RotoMAAK spin casting machine. Six minutes later the part popped right out, and the mold was ready to make another rabbit.

Video below.

Continue reading “MRRF: 3D Printed Resin Molds”

Stuffing An RFID Card Into A Finger Ring

[Benjamin Blundell] loves wearable technology — but isn’t very happy with commercial offerings — at least not yet. He wanted to take one of his personal RFID cards, and fit it into a much smaller form factor, a 3D printed RFID ring.

The cool thing with most RFID cards today is they are made of a plastic that is quite easily dis-solvable in Acetone. Simply soak the card for about 30 minutes (depends on the card) and the plastic will simply peel away, revealing the microchip and copper antenna coil. It kind of looks alive when it’s melting…

The problem is, the antenna coil is generally the size of the card — how exactly are you going to fit that into a ring? [Benjamin] managed to find some surrogate RFID key tags, with a much smaller antenna coil. A little bit of solder later and he was able to attach his RFID microchip onto the new antenna! He mentions it is possible to wind your own antenna… but to get the frequency just right might be a bit challenging.

Continue reading “Stuffing An RFID Card Into A Finger Ring”

A 3-Axis Paper Cutting Mini Laser

LaserCutter

Laser are awesome, and so are projects that use lasers. A recent Instructable by [kokpat] gives an overview of how to create a fully functional laser paper cutter using CDROM stepper motors and an Arduino.

What is special about this build, is that it showcases how easy it can be to build a 3-axis mechanical system used for laser cutters, CNC machines, and 3D printers. Using a stepper stage that consist of a motor screw with a nut slider based carriage, the mechanical system can be put together quite easily and cost effectively. Luckily, from an electronics and software perspective, everything is quite standardized with the proliferation of the RepRap and similar machines. Simply pick any three stepper drivers, find the most pertinent firmware, and voilà! You’re done! Well, almost. Don’t forget a 100mW violet laser!

We have seen a ton of really cool laser cutters before, but this has to be one of the cheapest. See the laser cutter in action after the break.

Continue reading “A 3-Axis Paper Cutting Mini Laser”

A Different Kind Of CNC Workpiece Clamp

7

[Mike Douglas] joined the world DIY CNC machining recently with a FireBall X90 CNC router. Instead of buying an expensive aluminum T-slot bed, he decided to try something we haven’t seen before…

His local hardware store sells aluminum bar clamps designed for clamping wood together — the best part? Only $10 each. What he’s done is added the bar clamps along the two sides of his bed, by adding plywood braces attached to the outside frame of the machine. He is losing a few inches of his usable bed area, but the added convenience of a quick clamping system is well worth it.

With the clamps in place, all he has to do is add two wooden braces (the black bars in the image above) to hold his work piece in place. This wouldn’t work very well for cutting metal, but this CNC router isn’t designed for that anyway.

Too bad he didn’t finish it sooner — it would have been a great entry for our recent Hackaday Hackerspace Henchmen CNC contest!

Easily Silkscreen All The Things

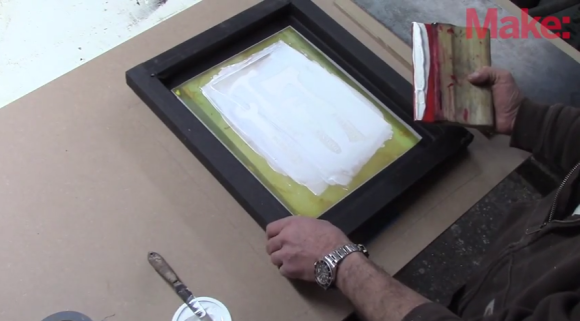
Silkscreening isn’t as hard as it might seem. For instance, it’s easier than block printing because you don’t have to reverse the image. [Jimmy DiResta] shows how easy it is to put a silkscreening setup together and print on wood, metal, and, of course, t-shirts.

Once you decide on a design, print it out on an acetate sheet which can be run through a regular household printer. You can buy ready-made meshed frames or even entire kits, but [Jimmy] shows you how to build a simple frame and staple screen mesh to it. After sealing up the edges, mix up some photo emulsion, cover the mesh, and let it dry in a dark room.

When it’s dry, place your acetate on the screen and expose the emulsion using whatever light is available. [Jimmy] built a milk crate tower up to his fluorescent work light and exposed it for about four minutes. Now you’re almost ready to make your mark. Peel off the acetate and remove excess emulsion with a squirt bottle and compressed air. Dry the whole thing with a hair dryer and you’re done. Load up a squeegee with silkscreen ink and draw it from top to bottom with nice, even pressure, and you’ve got yourself a silkscreened thing.

Continue reading “Easily Silkscreen All The Things”

Temperature Controller Gets Open Source Firmware Upgrade

stc1000

Beer lovers rejoice! [Mats] has reverse engineered a temperature controller and written new open source firmware for it. This effectively gives all us homebrewers a low cost, open source software driven controller. The STC-1000 is a cheap (under $20 USD) temperature controller mass-produced in the far east. The controllers do work, but have several limitations. The programming options are somewhat limited to basic set points for heat and cool. The controller also is only programmed for temperature display in Celsius, which is a bit of an annoyance for those of us who think in Fahrenheit. Under the hood, the STC-1000 utilizes a Microchip PIC16F1828 microcontroller. Unfortunately the PIC’s protection bits were set, so the original code would have been extremely difficult to extract. Not a problem, as [Mats] reverse engineered the hardware and wrote his own firmware. A 10k NTC thermister acts as the temperature probe. The probe is read by the PIC’s ADC. These probes are not very linear, so a look up table is used to convert from volts to degrees Celsius or Fahrenheit.

[Mats] new firmware allows for up to 6 profiles. Each profile has up to 10 set points and a time duration to hold each of the set points. Hysteresis and temperature offset values are also programmable via the front panel. PIC software is often written in C using Microchip’s MPLAB tool chain, and programmed with the PICkit 3 In Circuit Serial Programming (ICSP) tool. [Mats] decided to buck the system and wrote his C code using Small Device C Compiler. To keep things simple for homebrewers who may not have Microchip tools, [Mats] used an Arduino Uno for flashing duties. Thankfully the unholy matrimony of a PIC and an AVR has not yet caused a rift in time and space. The firmware is still very much in the beta stage, so if you want to help out, join the discussion on the homebrew talk forum. If you see [Mats] tell him we owe him a Haduino which he can use to almost open his beer.

[Thanks for the tip Parker!]