Turning A Router Into An Arduino Yún

yun

The Arduino Yún was the first of a new breed of Arduinos that added a big honkin’ Linux System on Chip to the familiar ATMega microcontroller and unique pin headers. It’s a surprisingly powerful system, but also very simple: basically, it’s just an Atheros AR9331 running Linux, an ATMega32u4 doing its Arduino thing, both connected by a serial connection. The Atheros AR9931 is also found in a router popular amongst hardware hackers. It really was only a matter of time before someone ported the Yun software to a router, then.

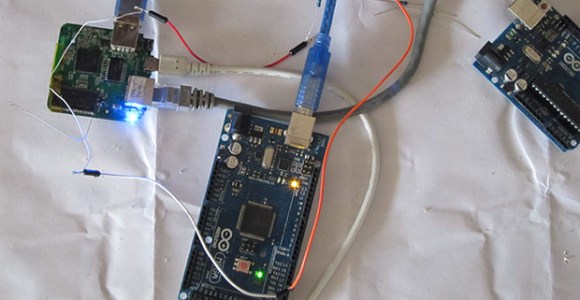
[Tony] took a TL-WR703N router and put OpenWRT on it. Turning this router into the Linux side of a Yún was a simple matter of uploading the Yún software to the root directory of the router and rebooting it. The Arduino side of the Yún is handled by an Arduino Mega connected to the USB port of the router. A quick update to Arduino’s boards.txt file, and a hacked together Yún is just a strip of duct tape away.

The Yún may not be extremely popular, but it does have a few interesting use cases. Maybe not enough to drop $70 on a board, but if you already have a WR703 router, this is a great way to experiment.

Thanks [Matt] for the tip.

Hanging Table Makes Room For Activities

F2N02EOHS18CAZE.MEDIUM

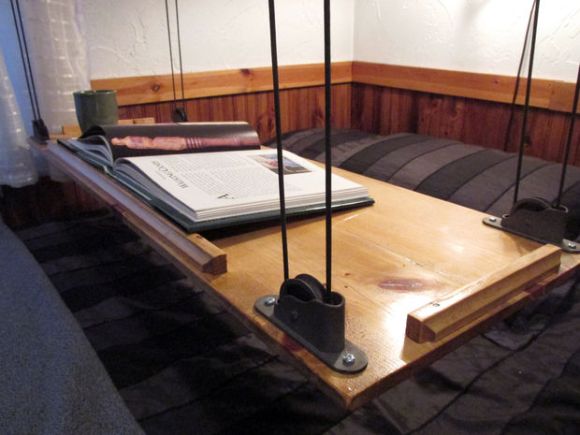
[Matt Silver] usually enjoys a cup of tea in the evening. Unfortunately, this habit can be frustrating and dangerous while sitting in bed. He rectified the problem by building this awesome space-saving table, which can be stored on the ceiling of all places! Depending on the supplies you might already have, this could be a relatively cheap build of about $40 or less. [Matt’s] using pine board for everything, but notes you could save time and money by re-purposing an existing coffee table. You will, however, need to make the ceiling frame to support it.

At the heart of this build is our favorite rope—Paracord 550. [Matt] used a single piece to tie the whole thing together, which can cause the table to lower crooked, but [Matt] found he can keep it level by putting a hand on it while it descends. You also get mechanical advantage from the pulleys this way! If you’re not crazy about the potential unevenness, you could redesign the pulley and eyelet layout to allow for four ropes to ensure a reliably horizontal surface.

Why not pair this idea with the portable electronics lab we shared a few days ago? You could have a full series of drop-down tool labs in your workshop. Think of all the space saving opportunities!

Face Tanner PCB UV Lamp Is So Bright, You Gotta Wear Shades

There may be nothing new under the sun when it comes to etching PCBs with UV light, but [Heliosoph] has brought finer control to a used face tanner he bought that now exposes his boards in ~50 seconds.

The original system allowed for exposure times from 1-99 minutes to be programmed in 1-minute increments. [Heliosoph] though it would be perfect as-is, but the lamp is so powerful that even one minute of exposure was too much. He hoped to find TTL when he opened the thing and was pleasantly surprised to discover a COP410L microcontroller and an MM5484 display driver. Unfortunately, the COP410L’s clock range is too small and he didn’t want to overclock it.

[Heliosoph] built a new board based on the ATMega328P with a salvaged 16×2 LCD, which he was able to easily integrate using the library that ships with the Arduino IDE. He then replaced the BT136 triac lamp switch with a solid state relay, conveniently isolating the electronics from mains power. He re-purposed the unit’s push buttons using the M2tklib, which supports a plethora of common menu functions.

If you need some help with the whole UV PCB etching process, you can’t go wrong with this tutorial from [CNLohr].

Building A Chainsaw Mill To Make Planks

Here’s a chainsaw hack that makes a lot more sense than the last one we shared…  It’s a setup you can build to help cut down logs into usable planks for your own projects!

Our guide on this tool hack is [BongoDrummer], who is the co-founder of a group in Wales called the Flowering Elbow, dedicated to imagining and making better futures by helping inspire people with inventions, encouraging project collaborations, and contributing to the community. We think he’s just a wee bit more knowledgeable than our previous grinder-chainsaw inventor…

[BongoDrummer] starts out with a proper note on safety, explaining accident statistics and offering up a refresher guide on proper chainsaw use. From there he gets right into the design and build of the mill. He’s chosen to use aluminum extrusion because it’s strong, light, and easy to work with—not to mention easy to assemble! Videos and more info after the jump.

Continue reading “Building A Chainsaw Mill To Make Planks”

Help Wanted Sign

We’re Hiring

The title says it all. We need more writers to keep the fresh hacks coming, now’s your chance to apply for the job.

Contributors are hired as private contractors and paid for each post. Writers should have the technical expertise to understand the projects they are writing about, and a passion for the wide range of topics we feature. If you’re interested, please email our jobs line and include:

  • Details about your background (education, employment, etc.) that make you a valuable addition to the team
  • Links to your blog/project posts/etc. which have been published on the Internet
  • One example post written in the voice of Hack a Day. Include a banner image, 150 words, the link to the project, and any in-links to related and relevant Hack a Day features.

Words of encouragement

First off, we won’t be discussing compensation publicly. Want to know what we pay? Send in a successful application and we’ll talk about it.

Secondly, don’t pass up this opportunity. I watched one of these posts go by and waited another year before I saw the next one and applied. Now I’m running the place. Our team is made up of avid readers. If you’re passionate about the stuff here and you have a few hours each week to do some writing you need to apply now!

Why are we hiring more writers?

You may have noticed that we’re starting to send people to events, and continuing our push to develop our own unique original content. Both of these take time and we need more team members to fill in the publishing schedule so that the Hackaday community gets the posts that it deserves.

So what are you waiting for? Ladies and Gentlemen, start your applications!

The Mystery Of Zombie RAM

[Josh] had a little project where he needed to keep a variable in RAM while a microcontroller was disconnected from a power source. Yes, the EEPROM on board would be able to store a variable without power, but that means writing to the EEPROM a lot, killing the lifetime of the chip. He found an ATTiny can keep the RAM alive for a variable amount of time – somewhere between 150ms and 10 minutes. Wanting to understand this variability, he decided to solve the mystery of the zombie RAM.

The first experiment involved writing a little bit of code for an ATTiny4313 that looked for a value in RAM on power up and light up a LED if it saw the right value. The test circuit consisted of a simple switch connected to the power pin. Initial tests were astonishing; the ATTiny could hold a value in RAM for up to 10 minutes without power.

With the experiment a success, [Josh] updated his project to use this new EEPROM-saving technique. Only this time, it didn’t work. The value hidden away in RAM would die in a matter of milliseconds, not minutes. After tearing his hair out looking for something different, [Josh] rigged up an Arduino based test circuit with humidity and temperature sensors to see if that had any effect. It didn’t, and the zombie RAM was still not-undead.

The key insight into how the RAM in an ATtiny could stay alive for so long came when [Josh] noticed his test circuit had a LED, but the actual project didn’t. Apparently this LED was functioning as a very tiny solar cell, generating a tiny bit of current that kept the RAM alive. A dark room with a flashlight confirmed this hypothesis, and once [Josh] gets his uCurrent from Kickstarter he’ll know exactly how much current this LED is supplying.

Fail Of The Week: WS2811 Pixel Failure On FLED

This Fail of the Week project comes from one of Hackaday’s own. [Ben] took on the FLED data visualization project as a way to make the SupplyFrame decor a lot more fun. He had quite a bit of help soldering the 96 WS2811 pixels into their custom made 6’x4′ enclosure and the results are really awesome. In addition to showing server load and playing games, FLED has become something of a job interview. Sit the prospective employee down at a terminal and give them an hour to code the most interesting visualization they are capable of.

But two weeks ago [Ben] staggered into the office and found the display was dead. Did he try turning it off and back on again? Yes, but to no avail. The power supply wasn’t the issue and there was no option but to pull the display off the wall and crack it open for a look at all those pixels. Since every one of them had 4 solder joints on either side he figured the problem was with a broken connection. But not so. He resorted to a binary search for the offending pixel by  cutting the strand in half, and testing each portion. He tracked it down to the pixel whose underside was blackened as you can see above.

[Ben] thinks one of the capacitors inside the sealed enclosure blew, but isn’t certain. Feel free to tell us what you think failed in this component. But the thing we’d really like to know is if there is a more clever way to sniff out the offensive pixel without cutting the connections? Four hours on the floor with this thing (and no knee-pads) and [Ben] has sworn off sourcing pixels from random Chinese suppliers. He might go with pre-assembled strings next time. We chuckle; this is the high-tech equivalent of trying to get old strands of Christmas lights to work.

If you haven’t seen FLED in action, check it out after the break. It amazing how LED intensity and quality diffuser material can make a perfect grid of LEDs seem to dance in waves and color curves.

Continue reading “Fail Of The Week: WS2811 Pixel Failure On FLED”