Update: Tetris Handheld Get PCB And Case

update-handheld-tetris

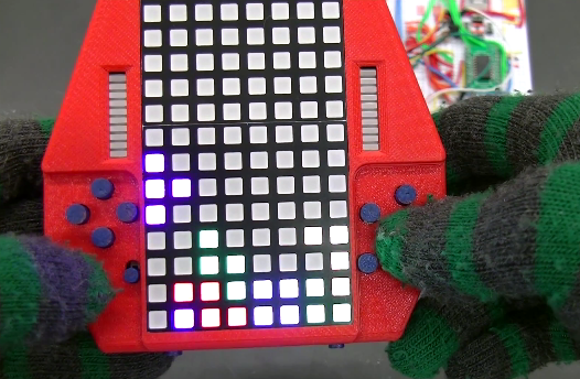
Check out this sweet-piece of homemade handheld gaming! [Jianan Li] has been hard at work on the project and published the updates in two parts, one that shows off the PCB he had fabbed for the project, and another which details the 3D printed case. This is, of course, is the culmination of the Tetris project we first saw as an incredbily packed, yet thouroughly tidy breadboarded circuit.

We really enjoy the 8-sided PCB design which hosts all the parts and gives you a place to hold and control the unit, all without seeming to waste much real estate. The case itself is quite impressive. The openings for the square-pixel LED matrices (the original design had round pixels) and the bar graphs all have nice bevel features around them. The control area has a pleasant swooping cutout, with blue buttons which stand out nicely against the red. Check out the slider switch by his left thumb. He printed matching covers for this slider, and the two that stick out the bottom. Also on the bottom are female pin headers so that you don’t need to disassemble the case to interface with the electronics.

All of this and more are shown off in the clip after the break.

Continue reading “Update: Tetris Handheld Get PCB And Case”

4 Axis Delta Router Says Hello World

deltaRouter

[Bart] stood upon the shoulders of the delta 3D printer giants and created this 4 axis delta router. The router was originally created for ORD Camp, an invite only hackers gathering. Each year he creates a new thing with one main purpose: to spark conversation. In his own words “Practicality and suitability are way down the list, so go ahead and snark away. If you do, you are missing the point.”

[Bart] did things a bit differently with his delta. For motors, he went with non captive steppers. “Non captive” means that rather than a shaft, the motor has a hollow threaded nut which rotates. A lead screw (usually with an acme thread) is passed through this nut. As the motor’s nut turns, the screw is pushed or pulled through the motor, creating a linear actuator. The only major downside is that a non captive stepper motor can’t be adjusted by hand. The screw doesn’t turn and neither do any external parts of the motor. For structure, the router uses MakerSlide and v-grove wheels. The spindle is a simple brushless hobby motor and 30 amp speed control. Rather than the outrunner motors we’ve seen lately, [Bart] wisely chose an inrunner motor normally used on R/C cars. Inrunners generally have less torque than their outrunner counterparts, but they make up for this in RPM. [Bart’s] motor is capable of 30,000 RPM, which is plenty for spindle duty. We think the motor bearings will probably need an upgrade, as the original motor bearings weren’t designed for side loads. For a controller, [Bart] utilized an  Azteeg X3 running Repetier.

The router made a great showing at camp, and [Bart] decided it needed a 4th axis. He sourced a rotary axis from eBay. To keep the software simple, he connected the rotary axis to the extruder outputs on his controller. He was then able to hack the mach3 wrapped rotary post processor to output extruder commands. The results look great. [Bart] says the system definitely needs a tailstock, and we agree. We’re looking forward to the next update on this machine!

Continue reading “4 Axis Delta Router Says Hello World”

The Three Chip Retrocomputer

Where homebrew computers are usually complex bundles of wires and chips, [Mike]’s own single board computer is not. It’s a three-chip computer with only a CPU, RAM, and a microcontroller that is able to emulate the retrocomputers of yore.

Normally, a homebrew computer project requires some amount of ‘glue’ logic – a few NAND, OR, or inverters to combine signals and send them where they’re needed for address decoding. This tiny pocket computer doesn’t need any of that; all the address decoding is done on a 40-pin PIC microcontroller.

With 64kB on the PIC 18F46K22, there’s enough space for all the address decoding logic, space for a pseudo ACIA mapped onto the $DF page, and a ROM image that provides a monitor program and a copy of BASIC. Basically, with the addition of a USB to serial adapter, this is a three chip 6502 single board computer, and with the right ROM monitor can emulate an Apple I, Woz monitor included.

Yes, 6502 projects are a dime a dozen, but [Mike]’s work with the address decoding logic on the microcontroller is top-notch. There are a few remaining chip select lines in his schematic, and with another microcontroller it would be easy to add VGA out, a compact flash adapter, or some other really cool peripherals. Good thing there’s an expansion port on this thing.

A Reel To Reel Clock

And this is how the clock will tell time!

Word clocks – time pieces that spell out the current time with words – are awesome. They’re usually entirely electronic, illuminating LEDs to display the time. Not this one. It’s a mechanical masterpiece that shows the current time in words using motors and 35mm film leader.

The mechanics of this clock are fairly simple: text is transferred onto 35mm film leaders with water slide decals, which are then rolled onto film reels. These film reels are mounted on stepper motors attached to a frame with Meccano. There are four film strips, making this a surprisingly similar a word clock but using motors instead of LEDs.

Because this clock was originally built in 2008, the electronics are a bit… strange through the lens of a post-Arduino skill set. [David] is using a homebrew BASIC Stamp with eight Step Genie ICs and MOSFETs for each motor. Calibration of the clock is handled by an IR detector and a mark on each piece of film leader.

It’s an impressive example of mashing up spare and surplus parts to make something cool, but unfortunately we can’t find a video of this clock in action. If you manage to find one, put a link in the comments and we’ll add it below.

Cheap, Resourceful DIY Mini CNC Router/Mill Contraption

Few Hackaday Readers would disagree with the classic phrase: Necessity is the mother of invention. That statement is certainly no exaggeration when it comes to this mini 3-axis CNC Machine. The builder, [Jonathan], needed a way to prototype circuit boards that he designed. And although he admittedly doesn’t use it as much as he intended, the journey is one of invention and problem solving.

[Jonathan] started from the ground up with his own design. His first machine was a moving gantry style (work piece doesn’t move) and ended up not performing to his expectations. The main problem was alignment of the axis rails. Not becoming discouraged, [Jonathan] started on version 2. This time around the work piece would move in the X and Y directions like a conventional vertical milling machine. The Porter-Cable laminate trimmer would move up and down for the Z axis. It is clear that the frame is built specifically for this project. Although not the prettiest, the frame is completely functional and satisfactorily stiff for what it needs to do.

Continue reading “Cheap, Resourceful DIY Mini CNC Router/Mill Contraption”

Self-Balancing Uni-board?

Capture

There are skateboards, long boards, and snowboards. This was originally a snowboard, but we’re not quite sure how to classify it now… Introducing the Segbot Snowboard.

[Steve Ghertner] has been playing around with accelerometers lately and decided to try making something practical. He’s taken a snowboard and turned it into a two-wheeled, segway-like balancing board. The two parallel wheels are powered individually by 12V scooter motors. An Arduino Uno takes care of processing the data from a MPU-6050, which is a triple axis gyro and accelerometer.

You can control the board by leaning, or  by using a small two-button remote. He hasn’t taken it very far out of the lab yet, but plans to after cleaning up the programming a bit.

Stick around for the following video where he explains it at his local hackerspace in Nashville, the Middle TN Robotic Arts Society where members strive to “Control Them (robots) Before They Control You!”

Continue reading “Self-Balancing Uni-board?”

The Mac9000 — A Photo Frame With Style (Maybe?)

Digital photo frames — as tacky as they may be — are a handy way to show off photos, especially considering how few photos get printed these days! [Rene] decided he could really use one at work, but he wanted it to look cool as well. Feeling a bit nostalgic with the 30th anniversary of the Macintosh Classic II, he decided to gut one and turn it into this awesome linux based “Mac9000”!

He started by picking up the Mac off eBay and cleaning it up a bit. It had definitely belonged to a school considering how worn it was. A bunch of sandpaper, bleach wipes, and elbow grease later, and it almost looks like new again! The next step was gutting the insides to make room for the new hardware. This is a bit tricky because you are dealing with high-voltage equipment! Make sure to discharge it safely before sticking your hands in!

Once the unit was empty, he began upgrading it with some more recent technology. A 7″ LCD, a Raspberry Pi (with PIR sensor), and a WiFi adapter to name a few. In addition to his blog, he also has a great photo gallery of the entire process over at LYTRO. He’s set up Raspbian “Wheezy” to automatically snag photos off of a DropBox directory, making this one of the easiest to use photo frames we’ve ever seen. He also plans to show videos on it, but alas, that is a project for another day.