Hack With Us In The City That Never Sleeps

We’re hosting one day of hacking in New York City next week. Stretch your skills with the power of deadlines and you can be immortalized in Hackaday history. If that kind of cred doesn’t do it for you, Hackaday is bringing along $1500 in prizes and there’s another $5000 cash prize at stake as well.

Only Hackaday can bring hardware to the TechCrunch NYC Hackathon on May 2nd. We need you to make it happen. Get your free ticket now (UPDATE: Our special tickets are all sold out but you might still be able to get some in the last few ticket releases. Check back often.). From there join the comment thread on our events page to connect with the rest of us who will be there.

Break the Hardware and Software Divide

techcrunch-disrupt-hackathon-2014
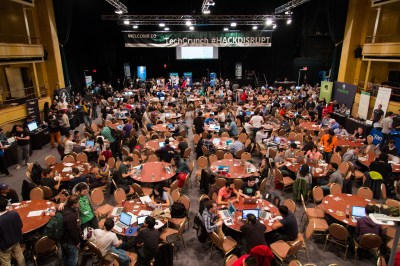
Check out these pictures of last year’s TechCrunch hackathon. There’s a ton of people, they all seem to be having fun, but when it comes down to the end, they’re pointing to the screens of their Macbooks. This year you need to break that mold and and rise to the top with a hardware product to hold up as you are awarded TechCrunch’s comically large $5000 check.

Holding a hunk of hardware with electrons running through its veins is way more hardcore than software alone. We will end the segregation of software-only and hardware-only hackathons. After all, most hardware hacks these days are also software hacks. Team up with one of the iOS/Android app groups and add hardware to the mix. We want to see at least twenty of those tables strewn with jumper wires, breakout boards, and soldering irons. And we want to see someone from the Hackaday Community win this thing. So here’s the agreement — we’ll get you in, we’ll bring the hardware, you bring the awesome.

All Work and No Play (yeah right)

Ha! Like that has ever been our mantra. This is going to be a blast and because of it the Hackaday crew is flocking to town from all over the country. Confirmed so far are [Adam], [Alek], [Amar], [Brian], [Chris], [Jasmine], [Matt], [Mike], [Rob], [Sophi], and [Theodora]. We’re there to have fun, and you’re invited.

Most of the crew will arrive in town on Thursday night and we’ll definitely be meeting up. Anyone who registers for the Hackathon is invited for these pre-game festivities. Drop a comment on the events page and we’ll PM you details about where and when. But at the event our collective skills will be available to get your project past the sticking points. Of course we also need many hands to distribute all the swag we’re bringing along.

Kickstarting Router-Based Development Boards

[Squonk] is rather famous in the world of repurposed routers, having reverse engineered the TL-WR703N wireless router from TP-Link a few years ago. With that knowledge, he’s developed an open platform for Things on the Internet called Domino. It’s pretty much exactly what you would get by cracking open a router bought on AliBaba, only in a much more convenient package with many more pins broken out.

The Domino builds on [Squonk]’s reverse engineering efforts of the TP-Link TL-WR703N wireless router, the router that has stolen the thunder from the Linksys WRT54G for all those sweet, sweet, embedded hacks. Both the 703N and the Domino are built around the Atheros AR9331. While the router version of this chipset only breaks out a few GPIOs and other interesting pins, the Domino breaks out just about everything – GPIO, JTAG, I2S, UART, SPI, USB, and Ethernet can be found on the device.

The basic Domino can hopefully be had with a $25 pledge to the Kickstarter campaign. That’s a little less than the normal price for a WR-703N, and if you’re putting a router in a hat it might be worth your while. There are a few advanced versions that include an ATMega32u4 microcontroller, making it compatible with the Arduino Yun as well.

Retrotechtacular: Stateside Assembly And Launch Of V-2 Rockets

At the end of World War II, the United States engaged in Operation Paperclip to round up German V-2 rockets and their engineers. The destination for these rockets? White Sands Proving Grounds in the New Mexico desert, where they would be launched 100 miles above the Earth for the purpose of high altitude research.

This 1947 War Department Film Bulletin takes a look inside the activities at White Sands. Here, V-2 rockets are assembled from 98% German-made parts constructed before V-E day. The hull of each rocket is lined with glass wool insulation by men without masks. The alcohol and liquid oxygen tanks are connected together, and skins are fitted around them to keep fuel from leaking out. Once the hull is in place around the fuel tanks, the ends are packed with more glass wool. Now the rocket is ready for its propulsion unit.

In the course of operation, alcohol and liquid oxygen are pumped through a series of eighteen jets to the combustion chamber. The centrifugal fuel pump is powered by steam, which is generated separately by the reaction between hydrogen peroxide and sodium permanganate.

A series of antennas are affixed to the rocket’s fins. Instead of explosives, the warhead is packed with instruments to report on high altitude conditions. Prior to launch, the rocket’s tare weight is roughly five tons. It will be filled with nine tons of fuel once it is erected and unclamped.

At the launch site, a gantry crane is used to add the alcohol, the liquid oxygen, and the steam turbine fuels after the controls are wired up. The launch crew assembles in a blockhouse with a 27-foot-thick roof of reinforced concrete and runs through the protocol. Once the rocket has returned to Earth, they track down the pieces using radar, scouting planes, and jeeps to recover the instruments.

Thanks for the tip, [Thomas].

Retrotechtacular is a weekly column featuring hacks, technology, and kitsch from ages of yore. Help keep it fresh by sending in your ideas for future installments.

diy power wagon

Snow Blower Turned Power Wagon

Winter is now gone and it’s time to put away that snowblower. Well, it seems that [SWNH] either didn’t hear the news or thought not using his snowblower for most of the year was a waste of a great resource. No, he’s not using it to blow dirt around, he converted it into a Power Wagon.

A Power Wagon is just what it sounds like, a wagon that is motorized and it is used for moving stuff around your yard. [SWNH] started by disassembling the 2 stages of the snowblower. They came off as a unit with only 6 bolts. Next up, the wagon bed was made, starting with an angle iron frame with a plywood bottom and sides. Two large casters with rubber wheels supports the front of the wagon.

Using the power wagon is easy, fill up the bin and use the snowblower controls to drive the cargo around. [SWNH] says that it steers like a shopping cart. And since the wagon bed is bolt-on, it can be removed and the blower assembly re-installed next winter to take care of that pesky snow.

Powerwheels Jeep

Powerwheels Racing Series In Detroit

[Transistor-Man] and the gang finally got around to documenting their experience at the Detroit Makerfaire 2014 and the Powerwheels racing series. They weren’t planning on entering, but in a last-minute decision they decided to see if they could whip up an entry just over one week before the competition! They did — and it’s awesome. They call it the Chibi-Atomic-Jeep.

As the competition name implies, they had to base the vehicle off of a Powerwheels frame. Bunch of steel tubing, some TIG welding and a nice paint job, and they had the base frame of their vehicle. At the heart of it? An alternator from a van — surprisingly powerful and easy to control. They used cheap 8″ wheels from Harbor Freight Tools — they worked great, just didn’t last very long… By the time the races were over, they went through NINE of these tires. Good thing they’re cheap!

The most impressive part of the build is the gears. They made them using a water-jet cutter at the local hobby shop and a Bridgeport mill with an indexing head — not an easy task to complete!

Continue reading “Powerwheels Racing Series In Detroit”

Interactive Software To Solve Crosstalk Problems

A link to this video demonstrating PCB cross-talk ended up in my mailbox the other day as I tend to stay on the mailing lists of the some of the high end CAD companies. There are some really interesting and powerful “mega-tools” that do things like plot noise density for decoupling analysis and extremely high speed timing analysis, though the costs of these tools are commensurate with their capabilities. This one is part of the Mentor Graphics PCB Simulation software.

The tool shown does the math needed to predict the induced voltage noise (cross-talk) generated by the proximity of noise sources to the noise susceptible elements, and the tool does so interactively. This is remarkable… in the past we would calculate some examples of trace width, spacing, and the type of signals involved, and then generate some rules of thumb that we tried to apply during the layout process. It was an educated guess that was sometimes not as close as we would have liked.

Virtual Scope Showing Predicted Crosstalk
Virtual Scope Showing Predicted Cross-talk


The cool part of this software is the interactive nature. One can learn the effects of placement on cross-talk in real time, which helps build an intuitive understanding.

I will add the standard disclaimer that a tool is exactly that, a tool, and it only represents an approximation of real life at best. It’s tempting to design to the tool itself, and many engineers have learned the limitation of a tool the hard way. Instead think of the tool as another opinion, or as mentioned, a learning aid to gather an intuitive feel for the effects of placement on circuit performance.

circuit board

Driving A Brushless DC Motor Sloooooooowly

Driving a brushless DC (gimbal) motor can be a pain in the transistors. [Ignas] has written up a nice article not only explaining how to do just this with an Arduino, but also explaining a little bit on how the process works. He uses a L6234 Three Phase Motor Driver, but points out that there are other ways to interface the BLDC motor with the Arduino.

warningA warning is warranted – this is not for the faint of heart. You can easily destroy your microcontroller if you’re not careful. [Ignas] added several current limiting resistors and capacitors as advised in the application note (PDF warning) to keep things safe.

Everything worked well at high speeds, but for slower speeds the motor was choppy. [Ingus] solved this riddle by changing over to a sine wave to drive the motor. Instead of making the Arduino calculate the wave, he used a look up table.

Be sure to check out his blog for full source and schematics. There is also a video demonstrating just how slow he can make the motor move below.

Continue reading “Driving A Brushless DC Motor Sloooooooowly”