Astronaut Or Astronot: Random Stuff For Random People

In case you’re not aware, we’re running a contest to send one lucky hacker into space. We’re already giving out $50k in prizes to entice the most worthy hackers to submit their project to the The Hackaday Prize. Now it’s time for community voting, and that means trotting out Astronaut Or Astronot, where you decide the best project for this week’s theme. Projects voted into the top ten for each theme will receive Hackaday Prize t-shirts.

But there’s something in it for you too. Everyone who votes in the community voting rounds will be eligible to win a $1000 gift card to The Hackaday Store.

Most Likely To Be Widely Used

This week’s round of community voting will decide which project entered into the Hackaday Prize will be the most likely to be widely used. Everyone on Hackaday.io gets 50 votes to pick the project that will be the most popular, most game changing, and most useful. Head on over to the voting page and spend those votes wisely.

Submit Your Entry For Community Feedback

We’ll be doing a new round of community voting as often as every seven days. Everyone registered on Hackaday.io gets 50 votes for each round of voting, and every Friday (around 20:00 UTC), we’ll randomly select one person registered on Hackaday.io. If that person has voted, they get a $1000 gift card for The Hackaday Store. If they haven’t vote — nothing.

So what do you need to get in on this action? Vote, obviously. We’ll be tracking which projects make it to the top of the list, and next week we’ll do it all over again. Enter your project now because we’re giving away a trip to space and hundreds of other prizes.

Nice Looking Countdown Timer For The Home Game Show Enthusiast

Every couple of weeks, [Roo’s] place of employment, TMW Unlimited, has a contest. This contest takes place in the form of a game show and the contestants have 30 seconds to pitch their current project to the group. A panel of judges vote on the best pitches. Winners receive cupcakes and drinks. Originally, stopwatches were used to keep track of the elapsed time, however, a stopwatch is not very game showy. [Roo] set out to make a countdown timer to add some authenticity to the bi-weekly event.

The main enclosure is a plastic fence post. Fifteen holes and 15 large LEDs are covered up by large plastic translucent spheres. End caps were designed and 3D printed to not only make the rig look good but also to serve as a speaker mount. Inside resides an Arduino that does the counting and turns off the row of lights, one every 2 seconds, as the countdown continues. A speaker not only ticks and tocks its way down with the lights, it also buzzes when time is up. Starting and resetting the timer is as easy as pushing a single button mounted on the case.

If you’ve already built a game show timer, you may want to check out this DIY game buzzer system!

Continue reading “Nice Looking Countdown Timer For The Home Game Show Enthusiast”

Anodized aluminium phone mount for a bike

Anodized Phone Mount For Your Bike

There’s a slew of apps out there for tracking your bike rides. If you want to monitor your ride while using the app, you’ll need it securely affixed to your bike. That’s where [Gord]’s No Dropped Calls build comes in. This aluminium mount was hand milled and anodized, which gives it a professional finish.

The mount consists of 3 parts which were machined out of stock 6061 aluminium. The plans were dreamt up in [Gord]’s head, and not drawn out, but the build log gives a good summary of the process. By milling away all of the unnecessary material, the weight of the mount was minimized.

Once the aluminium parts were finished, they were anodized. Anodization is a process that accelerates the oxidization of aluminum, creating a protective layer of aluminium oxide. [Greg] does this with a bucket of sulphuric acid and a power supply. Once the anodization is complete, the part is dyed for coloring. If you’re interested, [Gord] has a detailed writeup on home anodization.

The final product looks great, puts the phone within reach while biking, and prevents phone damage due to “dropped calls.”

Hackaday Prize Entry: Very, Very Small Logic

Despite the existence of FPGAs and CPLDs, there’s still a necessity for very small programmable logic devices. GALs, PALs, and other old tech just won’t cut it, though, and so we are left with a new generation of programmable devices that aren’t microcontrollers or CPUs. The GreenPAC from Silego fill this niche quite nicely, with the ability to implement counters, ADCs, logic glue, level shifting, and comparators in a single chip. For any homebrew electronics tinkerer, these devices have one very obvious problem: they’re really, really small. The smallest GreenPAC device has 12 pins stuffed into a 1.6 x 1.6mm QFN package. You’re not hand soldering this thing.

For [Nick Johnson]’s Hackaday Prize entry, he’s taking these small programmable logic chips and making it easy to create your own custom ICs. Basically, it’s a breakout board for GreenPAC devices that stuffs these tiny chips onto a much more reasonable DIP package.

Breakouts aren’t enough, and to program these small chips, [Nick] is also building a board based on an ARM microcontroller. With USB input, a way to generate the 7.5V used for programming, and a breadboard friendly format, this programmer will tell these tiny chips what to do.

Not many people are building stuff with PALs and GALs anymore, but there are still a lot of work that can be done with small programmable chips. There’s certainly a place for tiny programmable logic chips like this, and anything that gets them in to the hands of more people is okay in our book.


The 2015 Hackaday Prize is sponsored by:

Googly Eyes Follow You Around The Room

If you’re looking to build the next creepy Halloween decoration or simply thinking about trying out OpenCV for the first time, this next project will have you covered. [Glen] made a pair of giant googly eyes that follow you around the room using some servos and some very powerful software.

The project was documented in three parts. In Part 1, [Glen] models and builds the eyes themselves, including installing the servo motors that will eventually move them around. The second part involves an Arduino and power supply that will control the servos, and the third part goes over using OpenCV to track faces.

This part of the project is arguably the most interesting if you’re new to OpenCV; [Glen] uses this software package to recognize different faces. From there, the computer picks out the most prominent face and sends commands to the Arduino to move the eyes to the appropriate position. The project goes into great detail, from Arduino code to installing Ubuntu to running OpenCV for the first time!

We’ve featured some of [Glen]’s projects before, like his FPGA-driven LED wall, and it’s good to see he’s still making great things!

Continue reading “Googly Eyes Follow You Around The Room”

Startup Bus: Hardware Hacking On The Highway

Get this, 30 people piled aboard a bus today and will spend the next 72 hours hacking their way to a successful startup idea. Oh and the bus will be moving the entire time; like the hacker version of Speed. Well, kind of.

What’s missing from this description? Hardware! That’s where Hackaday comes in. Just like with the NYC Hackathon, Hackaday wants to bring hardware to hackathons everywhere. We have a Hackathon page for StartupBus to document their builds and shipped them a box overflowing with Texas Instruments hardware (one of our illustrious Hackaday Prize sponsors). All that’s left is for the sleep (and shower) deprived passengers to hack together the next great thing.

Scheduled stops on the journey include Detroit (6/4), Pittsburgh (6/5), and their final destination of Nashville. We’ll be keeping our eye out for project updates from the contestants. But if you are one of the 30 hackers on the bus we’d love to see some pictures. Tweet your photos to @hackaday!

[Photo Source: Entrepreneurship Club]

Embedding PCBs In 3D Prints

The folks over at Lunchbox Electronics are working on a very cool prototype: embedding LEDs inside standard 1×1 Lego bricks. Being a prototype, they needed a cheap way to produce Lego bricks stuffed with electronics. It turns out a normal 3D printer has okay-enough resolution, but how to put the electronics in the bricks? Gcode wizardry, of course.

3d-printed-LEGO-w-pcb-thumb
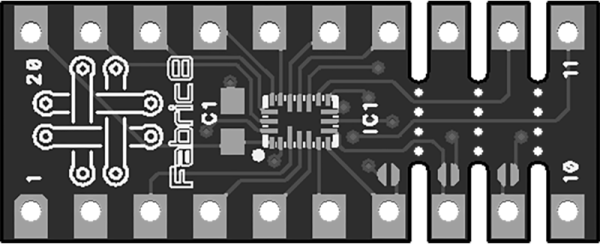
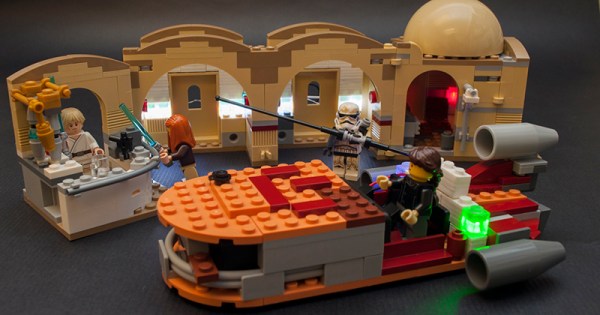
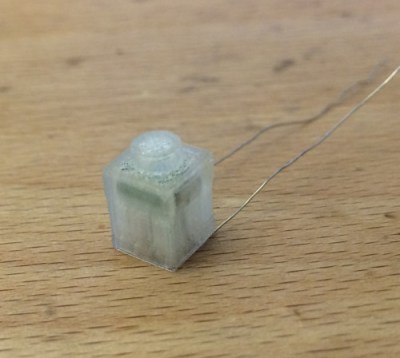
The electronics being stuffed into the bricks isn’t much – just a small PCB with an LED. It does, however, need to get inside the brick. This requires stopping the 3D printer at the right layer, moving the print head out of the way, inserting the PCB, and moving the head back to where it stopped.

Gcode to the rescue. By inserting a few lines into the Gcode of the print, the print can be paused, the print head raised and returned, and the print continued.

If you want to check out what these light up Lego look like, There’s a Kickstarter happening now. It’s exactly what the 80s space sets needed, only thirty years late.