Crazy Good Odds To Win The Hackaday Prize

I entered the Hackaday Prize in 2014. I entered because Hackaday editor [Brian Benchoff] persuaded me to. I ran into Brian at the HOPE conference in NYC and he told me that there were about only 800 entries to compete against.

I didn’t enter until a day or two before the deadline, which is where we are today. The deadline for this year’s 2015 Hackaday Prize is on Monday. Again there are around 800 entries to compete against.

When I entered the competition last year I never dreamed that I’d be managing the same contest this year. I didn’t know much about contests, and I certainly never thought that the odds of winning anything were very good. It is very easy to talk yourself into thinking that everyone else’s project has a better chance of winning.

So now that I’m working in it, I see all of the entries every day, I talk to all of you daily about your projects (which is an awesome part of my life, thank you!) and I can tell you that everyone else’s project does not have a better chance of winning than yours.

Best Product Has Crazy Good Odds

New to the 2015 Hackaday Prize we added a Best Product category. The Best Product is meant to encourage that small window of opportunity between project prototype and product. We ask that products entered into this category get 3 copies of that product to us before we close entries on Monday. Three copies means that you can duplicate your product, but you still may not yet be in a place where you can turn that into a company.

The crazy thing is that we haven’t received so many entries for this, and the prize for Best Product, besides keeping you in the running for the main Hackaday Prize, is $100,000 and 6 months free rent in the Supplyframe Design Lab. This is a recipe for a successful business start.

The odds are insanely good this time around. For Best Product so far, we’ve got under 100 entries. This means you have a 1 in under 100 chance of winning $100,000. For the main Hackaday Prize, we’ve got under 1000 entries and 5 prizes, so you have a 5 in 1000 chance of winning some portion of $500,000 in cash or prizes.

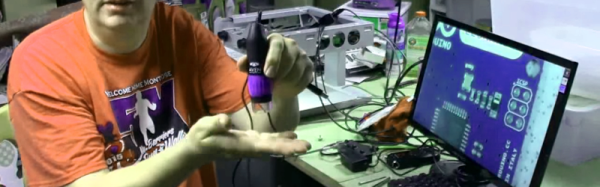
How do you make sure you’re actually in the running?  You complete the requirements! Make your project logs, your cell phone video and your system diagram. You can do this in under a day, so make it happen!

Read the Official Rules Here

Why Enter?

Last year’s Hackaday Prize theme was to “design a connected device” so we upped the bar a little this year. Actually, we upped the bar a lot with a theme of “design a solution to an important problem”. We want you to come up with ideas that have the potential to help a lot of people. We want you to not only think about winning money and trips to space, but to think about others. We gave away stuff — lots of stuff — during the contest to encourage those ideas. I think we all won with that.

We started Hack Chats weekly for the past couple of months and I’ve seen people get job offers, collaborate and start new projects from those chats. So, come to the Hack Chats, get your Prize entries in and use your smarts to effect change!

Octopart And Altium Join Forces

Octopart, the search engine for electronic parts, is now a wholly owned subsidiary of Altium.

This acquisition is neither Altium’s first parts database purchase, nor is it Octopart’s first interaction with Altium. Ciiva, a parts and datasheet search engine was acquired by Altium a few years ago, and Altium Circuit Maker features an interface to the Octopart database.

Under the deal, Octopart will remain independent of Altium and operate out of their NYC office, and plans are for the part search engine to remain free and open.

Disclosure: Hackaday’s parent company, Supplyframe, also runs FindChips.com and Parts.io, component search tools.

Where Are They Now: Terrible Kickstarters

Kickstarter started out as a platform for group buys, low-volume manufacturing, and a place to fund projects that would otherwise go unfinished. It would be naive of anyone to think this would last forever, and since these humble beginnings, we’re well into Peak Kickstarter. Now, Kickstarter, Indiegogo, and every other crowdfunding platform is just another mouthpiece for product launches, and just another strategy for anyone who needs or wants money, but has never heard of a business loan.

Of course there will be some shady businesses trying to cash in on the Kickstarter craze, and over the last few years we’ve done our best to point out the bad ones. Finding every terrible Kickstarter is several full-time jobs, but we’ve done our best to weed out these shining examples of the worst. Following up on these failed projects is something we have been neglecting, but no longer.

Below are some of the most outrageous Kickstarters and crowdfunding campaigns we’ve run across, and the current status of these failed entrepreneurial endeavors.

Continue reading “Where Are They Now: Terrible Kickstarters”

Panel-Mounted Breadboard Accessories

[Chuck Stephens] grew up with Radio Shack 100-in-1 electronic kits. The ones with lots of components and spring terminals that could be wired to be a radio, a burglar alarm, or whatever.[Chuck] graduated to solderless breadboard, but did miss having panel mounted components like pots and switches easily available. So he has been building his own accessory boxes.

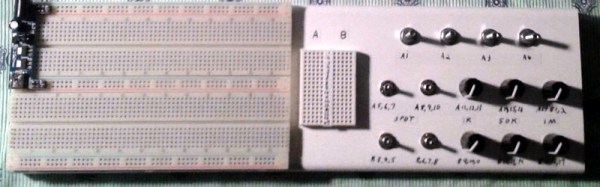
Of course, it is easy enough to just connect breadboard wires to component, but [Chuck] went further than that. Using boxes of different types (including a cigar box), he mounted the components properly and also wired them to a breadboard for easy connection.

If you’ve ever tried to solder to breadboard springs (we have), you’ve found it is hard to get adhesion to the shiny metal. [Chuck] solved the problem by crimping little wire hooks to the springs. The result is a good looking and functional prototyping aid.

They do make tiny breadboard style contacts (called tie point blocks; good luck finding them) for this kind of application, but the crimp technique works on common breadboards. These are cheap and much easier to find.

Of course, these days, we are as likely to want to mount SMDs than panel mounted controls. Now if we could only figure out where to put the components. If you want something less involved, take a look at the video below.

Continue reading “Panel-Mounted Breadboard Accessories”

3D Printed Vice Holds Dev Boards Beside Breadboard

The Stickvise has been a staple of the Hackaday community for a while now. If you need something held for soldering there’s no better low-cost helping hand. But if you’re just using a breadboard and a dev board of some sort, there’s another vice on the horizon that uses similar spring clamping to hold everything in place while you build something awesome.

BreadboardVise1-cropped
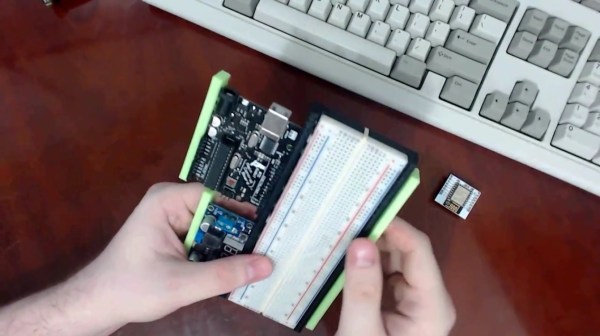
While [Pat]’s inspiration came from the aforementioned Stickvise, the new 3d-printed vice is just what you’ll need before you’re ready to do the soldering. The vice is spring-loaded using rubber bands. The base is sized to fit a standard breadboard in the center with clamping arms on either side to hold dev boards such as an Arduino. This innovative yet simple de”vice” grips boards well enough that you won’t be chasing them around your desk, knocking wires out of place, anymore.

There are some nuances to this board, so be sure to check out the video below to see it in action. As we mentioned, it uses rubber bands instead of springs to keep it simple, and it has some shapes that are easily 3d printed such as the triangular rails. If you want to 3d print your own, the files you’ll need are available on the project’s site. If you want to get even simpler, we’ve seen a few other vices around here as well.

The Stickvise is available for sale in the Hackaday Store.

Continue reading “3D Printed Vice Holds Dev Boards Beside Breadboard”

Hackaday Prize Entry: A Sixth Sense

There’s far more going on in the environment that humans have the senses to detect. Birds migrate with the help of the Earth’s magnetic field, and certain species of fish can detect electrical fields. For his Hackaday Prize entry, [Sebastian] is giving us a sixth sense. He’s building a device that allows anyone to detect the Earth’s magnetic field and find their way north for the summer.

The initial idea for [Sebastian]’s project came after his father’s inner ear was damaged. The doctor told him his brain needed to be trained to work with only one inner ear. If it works for balance, [Sebastian] wondered, why couldn’t the brain be trained to listen to an extra sensory input?

[Sebastian]’s device is an accelerometer and magnetometer, connected to a microcontroller that drives a few vibration motors. By mounting these motors around an ankle strap, [Sebastian] hopes to train his brain to listen to the magnetic fields.

So far, [Sebastian] has a device that can sense the Earth’s magnetic field and buzzes the motor closest to magnetic north. There’s still a lot of work to do, including filtering the magnetometer inputs, adding a ‘sleep’ mode, and putting Bluetooth functionality on board, but it’s already a very well-designed project.


The 2015 Hackaday Prize is sponsored by:

Junked Inspection Camera Given 15-Year Face-lift With Raspberry Pi

The nice thing with having a hacker cred is that family and friends are always on the lookout for stuff they think might be useful to you. [Craig Hollabaugh]’s son-in-law found an inspection camera and thought it would be handy for his hobby work. The MagniSight Explorer was first introduced in 2001. It is good for surface mount board work and inspection, except that its analog 480p video is quite dated by today’s standards. So [Craig] upgraded it for crystal clear 1080P/30 video and 5 megapixel images using a $35 Raspberry Pi 2 and a $26 Raspberry Pi Camera Module. After the upgrade, the unit is now a great tool for SMT rework.

There’s not a lot to the upgrade, but [Craig] gives a nice rundown in the 15 minute video of the MagniSight’s internals. He shows us the original analog camera module and its video card, which is able to do some additional processing like black and white output and reverse video (negative). As he mentions, it would be easy for him to do the same via software on the Raspberry Pi. A video camera lens takes care of magnification and two shafts coupled to it via flat belts (rubber bands?) take care of zoom and focus. A front coated mirror angled 45 degrees in front of the lens turns the optical path 90 degrees to allow the lens/camera to “look down”. After experimenting a bit to find the correct focal spot behind the lens unit for the Raspberry Pi camera, he covered the camera module with insulation tape and then just glued it to the old camera mount. After hooking it up to an HDMI monitor, the results are quite nice and he reckons he can easily work with components down to 0402 in size.

He’s got a couple of more upgrades in mind to make the system even better. He plans to replace the existing compact fluorescent lamps with a string of LED’s which will provide more uniform illumination. Plus, he can control their brightness, and selectively turn them on or off to get the optimum lighting. The other interesting upgrade would be to add stepper motors to the X-Y translation stage and automate their movement. After looking up a board file and its BoM, he may even be able to search for a part designator and move the stage to bring the part into focus.

Continue reading “Junked Inspection Camera Given 15-Year Face-lift With Raspberry Pi”