LED Ring Around The ESP8266

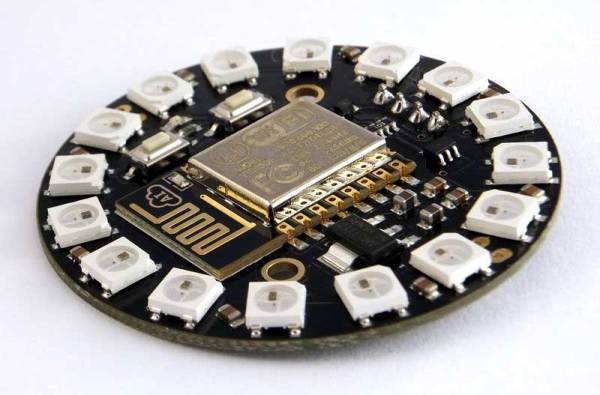
The world needs more blinky lights, and [Bertus Kruger] has created a neat way to make lights blink wirelessly. He has a footprint in the middle of the board for soldering the castellated ESP8266 module, and an LED ring around it to create the WiFi Pixel. It’s an LED ring that can be controlled over a WiFi connection. His design is based on a combination of the ubiquitous ESP8266 WiFi chip and a NeoPixel ring from AdaFruit, so there are already great examples of how to code and control the hardware. The project is still in progress, but he has released all of the details, including the Gerber files for the board and the Arduino code that the ESP8266 is running.

It’s a great start: add in battery support and you could have an awesome way to have portable LED blinky light rings. For those who want to try it out without building your own circuit boards, [Bertus] says that it could be built with an ESP8266 dev board and an Adafruit NeoPixel ring. Currently, he is running the device from USB, but there is no reason why it couldn’t be powered from a battery for some portable USB blinkiness.

Continue reading “LED Ring Around The ESP8266”

The Most Self-Replicating RepRap Yet

The goal of the RepRap project was always a machine that could replicate itself. The project began with the RepRap Darwin, a machine with a frame made nearly entirely of threaded rods, and progressed to the Mendel, with a slightly higher proportion of printed parts. Around 2011, the goal of self-replication fell by the wayside after some money was thrown around. The goal now, it seems, is to create the 3D printer with the best profit margins. That doesn’t mean there still isn’t a small contingent of RepRappers out there trying to improve the status quo and create a printer that can truly self-replicate. [Revar] is one of those tinkerers, and he has just released the RepRap Snappy, a snap-together 3D printer built nearly entirely out of 3D printed parts.

Other 3D printers designed around the idea of self-replication, like the RepRap Morgan and the Simpson family of printers, use strange kinematics. The reason for this is that Cartesian bots can’t print up to the limits of their frame, yet self-replication requires all parts be replicated at the same scale.

[Revar] is setting a new tack in the problem of printer self-replication and is joining parts together with snap fit connectors. The entire frame of the Snappy printer is built out of small parts that interlock to form larger units.

Another of the tricks up [Revar]’s scheme is reducing the number of ‘vitamins’ or parts that cannot be 3D printed. This includes belts, motors, screws, and electronics. You can’t really print machine screws yet, but [Revar] did manage to eliminate some belts and bearings. He’s using a rack and pinion system, all made with printed parts. It’s a technique that hasn’t been seen before, but it does seem to work rather well.

[Revar] has made all the files for the printed parts available in his repository. If you have enough filament, these files are enough to print 73% of the RepRap Snappy.

Thanks [Matt] for sending this one in. Video below.

Continue reading “The Most Self-Replicating RepRap Yet”

Surface Mount Soldering Workshop Shares Secrets Of CM

Friday afternoon I had the pleasure of sitting in on a surface mount soldering workshop. I’ve done some surface mount soldering before and am quite adept with a soldering iron, but this focused on solder paste and a hot air pencil. [Bob Cogeshall] ran the workshop and went beyond the most basic information. His experience founding Small Batch Assembly, a contract manufacturer whose offices are in the Nova Labs hackerspace, has led him to learn a lot of tricks of the trade.

Continue reading “Surface Mount Soldering Workshop Shares Secrets Of CM”

Resistance Is… There’s An Augmented Reality App For That!

Like many engineers of a certain age I learned the resistor color code using a mnemonic device that is so politically incorrect, only Tosh might venture to utter it in public today. When teaching kids, I have to resort to the old Radio Shack standby: Big Boys Race Our Young Girls But Violet Generally Wins. Doesn’t really roll off the tongue or beg to be remembered. Maybe: Bad Beer Rots Our Young Guts But Vodka Goes Well. But again, when teaching kids that’s probably not ideal either.

Maybe you can forget all those old memory crutches. For one thing, the world’s going surface mount and color coded resistors are becoming a thing of the past. However, if you really need to read the color code, there’s at least three apps on the Google Play Store that try to do the job. The latest one is ScanR, although there is also Resistor Scanner and Resistor Scan. If you use an iPhone, you might try this app, although not being an Apple guy, I can’t give you my feedback on that one.

Continue reading “Resistance Is… There’s An Augmented Reality App For That!”

Simplest Electricity Monitoring Solution Yet

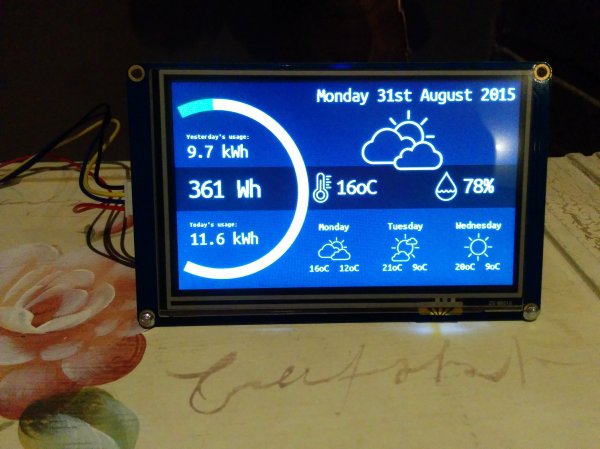
Monitoring your home’s energy use is the best way to get a handle on your utility bills. After all, you can’t manage what you can’t measure! The only problem is that most home energy monitoring systems are cumbersome, complicated, or expensive. At least, until now. [Kevin] has created a new electricity meter based on Particle Photons which should alleviate all of these problems.

The Particle Photon (we get confused on the naming scheme but believe this the new version of what used to be called the Spark Core) is a WiFi-enabled development board. [Kevin] is using two, one to drive the display and one to monitor the electricity usage. This part is simple enough, each watt-hour is accompanied by a pulse of an LED on the meter which is picked up by a TLS257 light-to-voltage sensor. The display is a Nextion TFT HMI (touch screen) which is pretty well suited for this application. The data is corralled by emoncms, part of the OpenEnergyMonitor platform, which ties everything together.

For a project that has been done more than a few times, this one does a great job of keeping the price down while maintaining a great aesthetic. Make sure to check out the video below to see it in action.

Continue reading “Simplest Electricity Monitoring Solution Yet”

Hackaday Prize Semifinalist: Better DIY Aquaculture

The theme of this year’s Hackaday Prize is ‘build something that matters’. For a lot of the teams entering a project, that means solving world hunger, specifically though agriculture. Grains are great, but proteins generally taste better and [Michael Ratcliffe] is focusing his project on aquaculture, or farming fish and other aquatic life.

The problem [Michael] decided to tackle is feeding fish at regular intervals according to water temperature, the age of the fish, and how much food is already floating in the tank. This is actually a difficult problem to solve; fish grow better when they’re fed more than once a day. Currently, most aquaculture setups feed fish once a day simply because it’s so time-consuming.

[Michael] is using Pis, Arduinos, USB cameras, and a lot of experience in automation and control systems to feed fish in the most efficient way. The possibilities of the project are interesting; the best research says a more efficient feeding schedule can translate into a 20% increase in production, which is a lot of extra food for the world.

You can check out [Michael]’s introductory video below.

The 2015 Hackaday Prize is sponsored by:

Continue reading “Hackaday Prize Semifinalist: Better DIY Aquaculture”

Laptop Broken? Get A Bigger Hammer

The weakest point in a laptop case may be the screen hinges, especially in heavily used machines. The mechanical stresses involved with opening a laptop can often break the thin plastic screw bosses and cause the threaded insert to pop out. What do you do? Get a hammer and some tacks of course!

[mightysinetheta]’s solution involves popping the bezel off the offending screen, then aligning the hinges in preparation for drilling holes though the computer’s plastic lid. Then he placed some short tacks though the holes and the hinges. Pressing the hinge down into the lid to ensure a tight fit, the hammer comes out to peen over the tip of the nail. Course that can be time consuming so just bending the tack over and flattening it down with the hammer works just as well.

With the hinge secured back into place his trusty laptop is back in service. The new additions on the back of the lid add a bit of a custom look that is purely functional.

While you’re in there… might want to replace that charging port that’s been wiggling mysteriously.