Chain Cleaner

DIY Automatic Chain Cleaning Machine

Spring is here and it’s time to pull the bikes out of the shed. One think that is often overlooked is bicycle maintenance. No one wants to be that guy walking his bike home after a part failure renders the bike unrideable. One portion of proper bike maintenance is cleaning the chain. A contaminated bike chain can wear quicker, not be as flexible, hinder shifting and increase wear to the drivetrain cogs. Tired of sitting there cleaning his chain with a tooth brush, [Ally] built a washing machine for bike chains.

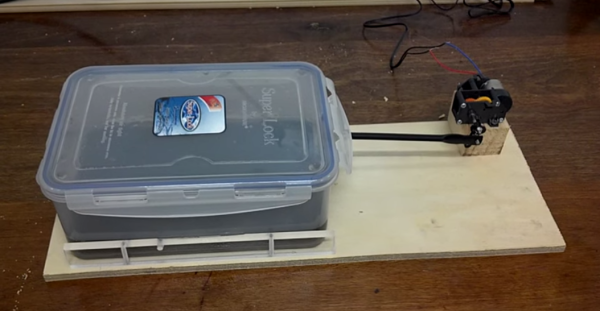
This machine is quite simple, it’s a plastic box full of turpentine and dish detergent. The chain is submerged in the liquid and a lid is put on the box. At the local hobby store, [Ally] purchased a small gearbox and motor assembly. Powered by a 5vdc wall wart, the output shaft of the gearbox spins a crank that in-turn agitates the box, chain and cleaning liquid. After about 5 minutes the chain is free of grit and gunk. Not bad for a few dollars, spare parts and a little bit of time. Check out the video of it in action after the break.

While you’re waiting for your chain to be cleaned you should work on making your bike pedal in both directions.

Continue reading “DIY Automatic Chain Cleaning Machine”

Simple Keypad Scanning With SPI And Some Hardware

16-button keypads have a clever method of encoding their data into 8 pins. Pins are mapped to four rows and four columns on the keypad. A user reads the keypad by bringing each row up to logic: HIGH, and reading the corresponding column values, (HIGH or LOW). Keypad scanning can be farmed out to a microcontroller with a simple finite-state machine and some button debouncing techniques. [Mario], [Glen], and [Paul] on the Netduino forums took an entirely different route: they’ve designed and implemented a Keypad Scanner using any microcontrollers SPI peripheral and a 74HC595 Shift register.

The trio’s solution is an elegant adventure into circuit design. With two diodes and a voltage divider, they devise a simple circuit that pulls the SPI MISO line LOW if a button in the corresponding circuit’s row is pushed closed. Copied four-fold, this circuit joins the rows and columns of the 74HC595 to the keypad matrix. To scan across the four columns, the microcontroller performs an SPI transfer of the key value: 0x01. To decode which button is pushed, the value received back from the SPI bus encodes which button was pushed out of the 16 possible buttons. Note: some cases for ambiguity as to “which button was pressed” do exist if multiple buttons are pushed at the same time, but for the general case where we’re punching in values one-by-one, this circuit works perfectly.

The team’s hack is a clever use of existing hardware to outsource a microcontroller’s software problem to hardware while leveraging the SPI peripheral to cleverly decrypt and retrieve data back from the keypad. Kudos to the team of three over at the Netduino Forums, and we’re always thrilled to see and idea grow from one person to the next. In case you want to take a step lower and build up the keypad itself, here’s a blast from the past that does just that.

Where 3000MPG+ Cars Come To Compete: The Ecomarathon

Every year teams from around the world come together for the Ecomarathon, an event (ironically put on by Shell) that tasks teams from high schools and universities with creating energy-efficient electric, gas, and hybrid vehicles. This year’s competition was held in Detroit, so I headed over to check it out.

vehicle-blur
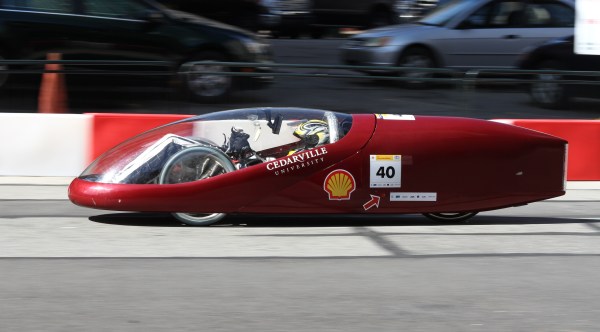
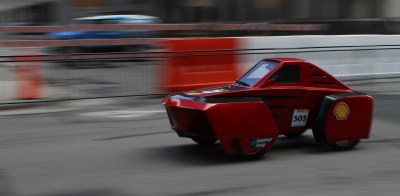
The event has two categories that vehicles compete in: prototype vehicles that compete for the highest fuel efficiency and “urban concept” vehicles that are more focused on normal driving environments and look slightly closer to street-legal vehicles. Cars in both categories can be fully electric or powered by gas, diesel, compressed natural gas, or other alternative fuels. Vehicles drive around a 0.9 mile track that weaves through downtown Detroit and the efficiency of each vehicle is measured as they complete a fixed number of laps around the track.

Continue reading “Where 3000MPG+ Cars Come To Compete: The Ecomarathon”

Bike-Powered Everything

It’s hard to argue that bicycles aren’t super handy. They get you from point A to B in a jiffy with little effort. Since these machines are so simple and convenient, why not use them for things other than transportation? Well, [Job] set out to do just that.

[Job’s] starts with a standard single speed bike and adds a few parts. First, a stand is installed to the back axle. When in the down position, it lifts the rear wheel off of the ground and provides support so the bike does not tip over. When flipped up into the ‘up’ position the stand creates a rack for holding goods and the bike can be pedaled around in a normal manner.

dualpurposebike-mid
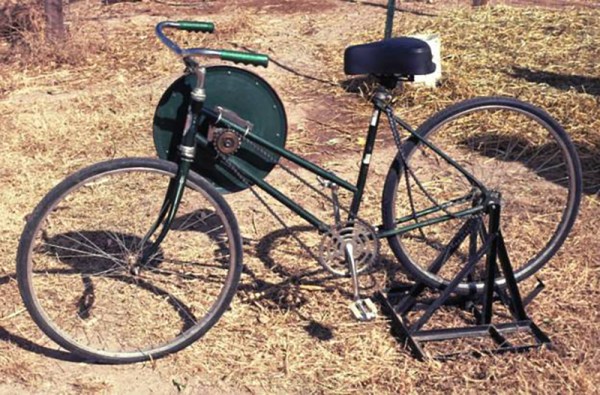
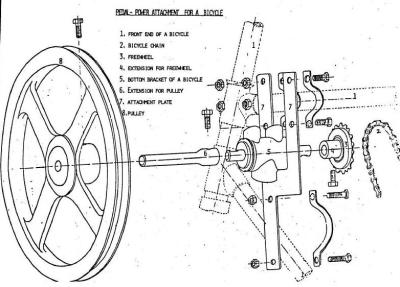
Next, a jack shaft made from a bike bottom bracket and crank is installed up front in between the top tube and down tube of the frame. On one side of the jack shaft is a sprocket and the other side is a large pulley. When converting to what [Job] calls ‘power production mode’, the chain going to the rear wheel is removed from the crank sprocket and replaced with a chain connected to the jack shaft.

With the rear stand down supporting the bike and the pedals now powering the jack shaft and large pulley, it is time to connect the bike to any sort of machine. A belt is slung around the pulley and connected to a matching pulley on a power-hungry machine. This dual-purpose bike has powered a rice thresher, peanut sheller, water pump, table saw and even a wood lathe!

[Job] set out to create a simple and inexpensive way to make a bike even more useful than just riding around town. We think he did just that. For more bike-powered stuff, check out this generator.

Retro Edition: VCF East X This Weekend

It’s mid-April and time once again for the Vintage Computer Festival East X. The X means 10. It’s a three-day weekend full of interesting people, cool tech, and computers you’ve only heard about. We’ll be there all three days, and if you’re in New York or are unable to pump your own gas (Oregon excluded), it’s a great way to spend the weekend.

The sessions for this Friday will include everything from chiptunes to retr0bright to emulating vintage computers on FPGAs. Sessions of note include our own [Bil Herd] giving a talk on system architecture. Think of this as a bunch of engineers in a room with a whiteboard. How could you not have fun with that. There will also be the first meeting of the Quarternet committee, headed up by [Jim Brain]. This session will be a discussion of implementing a vintage networking protocol across different models and different brands of vintage computers. Confused? It’s a, “two-bit solution for an eight-bit world.” That’s all we know, and I’m pretty sure that’s all anyone knows. It will be interesting.

Saturday and Sunday will feature an incredible number of exhibits that includes everything from Atari 8-bits, Hollerith cards, mainframes, an amateur radio station (KC1CKV) and somehow a Fairlight CMI. Since this is the 50th anniversary of the PDP-8, there will be a few of these ancient machines on display. A freshly restored Straight-8 will be up and working, as will an incredible emulation from hackaday.io.

Just because there are exhibits doesn’t mean the talks end on Friday. On Saturday the guest speaker will be [Brian Kernighan], the guy who literally wrote the book on C. Sunday will feature [Bob Frankston], co-developer of VisiCalc. There will be very important people here all weekend.

Even if vintage computers aren’t your thing, there’s still plenty of stuff to see at the venue. The InfoAge science center has technological curiosities stretching back a century, and recently they’ve rehabbed an old satellite dish and turned it into a radio telescope. Registration happens here, and if the last few paragraphs haven’t sold you on the event, you can check out [The Guru Meditation]’s VCF preview video below. We will, of course, be posting a lot of stuff from the event.

Continue reading “Retro Edition: VCF East X This Weekend”

electric canoe

Canoeing Sans Paddles. Yes, It Is Possible

Now that Spring is upon us, it’s time to get out the kayaks, canoes and row boats. As fun as paddling around a lake may be, after a long winter of sitting inside our arms are not up to that task. Well, [comsa42] has a solution to that problem. He’s made a quick-attaching trolling motor setup for his canoe and documented the process along the way.

[comsa42] started with a run of the mill canoe. Although he wanted a trolling motor option, he didn’t want to permanently modify the canoe. He started by making a wooden beam that spans the width of the canoe and overhangs on one side. The beam was notched out to securely fit over the lip of the canoe and a couple bolts and washers were used to clamp the beam to the canoe. This beam is just a few inches behind the rear seat so that the motor is at a comfortable position for the person steering.

The electric trolling motor is attached to this beam. To power the trolling motor, [comsa42] wired up two 12v deep cycle marine batteries in parallel. He installed them in a recycled wooden case to protect the batteries from the elements or occasional splash.

Continue reading “Canoeing Sans Paddles. Yes, It Is Possible”

1337-sp34k Keyboard

What started off as a quick prank-hack to re-map a colleague’s keyboard turned into a deep dive in understanding how keyboards work. [ch00f] and his other work place colleagues are in a habit of pulling pranks on each other. When [ch00f]’s buddy, who is an avid gamer and montage parody 1337-sp34k (leet speak) fan, went off on a holiday, [ch00f] set about re-mapping his friend’s keyboard to make it spit out words his friend uses a lot – “SWAG” “YOLO” and “420”. But remapping in software is too simple, his hack is a hardware remapping!

The keyboard in question used mechanical keys mounted on a keyboard sized PCB. Further, it was single sided, with jumper links used in place of front side tracks. This made hacking easier. The plan was to use keys not commonly used – Scroll Lock, Print Screen, and Pause/Break – and get them to print out the words instead. The signal tracks from these three keys were cut away and replaced with outputs from a microcontroller. The original connections were also routed to the microcontroller, and a toggle switch used to select between the remapped and original versions. This was eventually not implemented due to a lack of space to install the toggle switch. [ch00f] decided to just replace the keyboard if his friend complained about the hack. A bit of work on the ATMega PCB and firmware, and he was able to get the selected keys to type out SWAG, YOLO and 420.

And this is where a whole can of worms opened up. [ch00f] delves in to an explanation on the various issues at hand – keyboard scanning/multiplexing, how body-diodes in switching FET’s affected the scanning, ghosting and the use of blocking diodes. Towards the end, he just had the word SWAG activated by pressing the Pause/Break key. But he does get to the bottom of why the keyboard was behaving odd after he had wired in his hack, which makes for some interesting reading. Don’t miss the video of the hack in action after the break.

Continue reading “1337-sp34k Keyboard”