Putting Pi In Infrared Doohickies

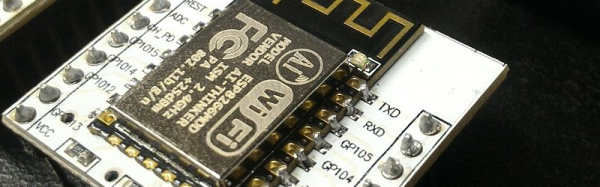
The Raspberry Pi Zero W is a tiny, cheap Linux computer with WiFi. It’s perfect for Internet of Things things such as controlling ceiling fans, window blinds, LED strips, and judgmental toasters. This leads to an obvious question: how do you attach your ceiling fan and LED strips to a Pi Zero? A lot of these things already have infrared remotes, so why not build an infrared hat for the Pi? That’s what [Leon] did, and it’s Open Hardware with documentation.

[Leon]’s Anavi Infrared Pi Hat does exactly what you think it should do. There’s an IR receiver, two IR LEDs, and UART pins for debugging. That’s all you need to control infrared doohickies over the Internet, and [Leon] wrapped it up in a nice neat package that’s the same size as a Raspberry Pi Zero. Add on some documentation and you have something we rarely see: a project meant to be used by other people.

This focus on allowing people to actually use what [Leon] created can lead to only one cynical conclusion: he’s probably selling these things somewhere. The cynic is never surprised. [Leon] has a crowdfunding campaign going, that’s over 400% funded with a month to go. That’s okay, though: all the design files are available so if you want to build your own without supporting people who build useful devices, have at it.

Save ESP8266 RAM With PROGMEM

When [sticilface] started using the Arduino IDE to program an ESP8266, he found he was running out of RAM quickly. The culprit? Strings. That’s not surprising. Strings can be long and many strings like prompts and the like don’t ever change. There is a way to tell the compiler you’d like to store data that won’t change in program storage instead of RAM. They still eat up memory, of course, but you have a lot more program storage than you do RAM on a typical device. He posted his results on a Gist.

On the face of it, it is simple enough to define a memory allocation with the PROGMEM keyword. There’s also macros that make things easier and a host of functions for dealing with strings in program space (basically, the standard C library calls with a _P suffix).

Continue reading “Save ESP8266 RAM With PROGMEM”

Closer Look At Everyone’s Favorite Blinky

Admit it, you love looking at silicon die shots, especially when you have help walking through the functionality of all the different sections. This one’s really easy for a couple of reasons. [electronupdate] pointed his microscope at the die on a WS2812.

The WS2812 is an addressible RGB LED that is often called a Neopixel (a brand name assigned to it by Adafruit). The part is packaged in a 5×5 mm housing with a clear window on the front. This lets you easily see the diodes as they are illuminated, but also makes it easy to get a look at the die for the logic circuit controlling the part.

This die is responsible for reading data as it is shifted in, shifting it out to the next LED in the chain, and setting each of the three diodes accordingly. The funcitonality is simple which makes it a lot easier to figure out what each part of the die contributes to the effort. The diode drivers are a dead giveaway because a bonding wire connected to part of their footprint. It’s quite interesting to hear that the fourth footprint was likely used in testing — sound off in the comments if you can speculate on what those tests included.

We had no trouble spotting logic circuitry. This exploration doesn’t drill down to the gate level like a lot of [Ken Shirriff’s] silicon reverse engineering but the process that [electronupdate] uses is equally fun. He grabs a tiny solar cell and scopes it while the diodes are running to pick up on the PWM pattern used to fade each LED. That’s a neat little trick to keep in your back pocket for use in confirming your theories about clock rate and implementation when reverse engineering someone else’s work.

Continue reading “Closer Look At Everyone’s Favorite Blinky”

Supersonic Speed Measurement With A Sound Card

You might think that if you have a need to measure the speed of a projectile that is too fast for your high-speed camera, you would have to invest in some significantly expensive equipment.

That was the problem facing [Nick Moore], and the solution he arrived at is extremely elegant in its simplicity. He’s arranged a pair of foil tapes in the path of the projectile, as it passes through them they break, and he measures the time between those breaks. The clever bit though lies not in the tapes, but in how he measures the timing. Instead of relying on a lab stuffed with equipment, he’s using his computer sound card. The outputs send a tone through each tape to the inputs, and using Audacity he can capture both tones and measure the time between the end of each one on left and right channels.

In the video below the break he demonstrates measuring the speed of a supersonic particle at 496.5 metres per second, which for such relatively simple equipment is rather an achievement. He could certainly improve his resolution by increasing the sampling frequency, but we are guessing that the choice of 48 kHz owes much to the quality of his sound card. Still, to achieve this with such a relatively basic piece of equipment is a neat achievement.

Continue reading “Supersonic Speed Measurement With A Sound Card”

Arduino Into NAND Reader

[James Tate] is starting up a project to make a “Super Reverse-Engineering Tool”. First on his list? A simple NAND flash reader, for exactly the same reason that Willie Sutton robbed banks: because that’s where the binaries are.

As it stands, [James]’s first version of this tool is probably not what you want to use if you’re dumping a lot of NAND flash modules. His Arduino code reads the NAND using the notoriously slow digital_read() and digital_write() commands and then dumps it over the serial port at 115,200 baud. We’re not sure which is the binding constraint, but neither of these methods are built for speed.

Instead, the code is built for hackability. It’s pretty modular, and if you’ve got a NAND flash that needs other low-level bit twiddling to give up its data, you should be able to get something up and working quickly, start it running, and then go have a coffee for a few days. When you come back, the data will be dumped and you will have only invested a few minutes of human time in the project.

With TSOP breakout boards selling for cheap, all that prevents you from reading out the sweet memory contents of a random device is a few bucks and some patience. If you haven’t ever done so, pull something out of your junk bin and give it a shot! If you’re feeling DIY, or need to read a flash in place, check out this crazy solder-on hack. Or if you can spring for an FTDI FT2233H breakout board, you can read a NAND flash fast using essentially the same techniques as those presented here.

Two Weeks Until The Greatest 3D Printer Meetup On The Planet

Every year, sometime in March, the world’s preeminent 3D printing enthusiasts gather in the middle of nowhere This is MRRF, the Midwest RepRap Festival. It’s only two weeks away. You need to come. Get your (free) tickets here. I’ll be there, and Hackaday is proud to once again sponsor the festival.

I need to backtrack a bit to explain why MRRF is so great. I go to a lot of cons. Maker Faire is getting old, CES was a horror show. Even DEF CON is losing its charm, and all of these cons have the same problem: there are too many people. MRRF does not have this problem. For one weekend a year, everyone who is anyone in the 3D printing world makes it out to the middle of Indiana. This is a small meetup, but that’s what makes it great. It’s a bunch of dorks dorking around for an entire weekend.

If that’s not enough to convince you, take a look at the previous coverage Hackaday has done from MRRF. The PartDaddy, an 18-foot-tall 3D printer will be there. The world’s largest 3D printed trash can will not. Prusa is coming in from Prague, E3D is coming in from England. Judging from past years, this is where the latest advancements in home 3D printing first appear. This is not an event to miss.

You might be wondering why the world’s greatest 3D printer festival is in the middle of nowhere. Goshen, Indiana is the home of SeeMeCNC, builders of the fantastic Rostock Max 3D delta bot. MRRF is hosted by the SeeMeCNC guys. If you’re exceptionally lucky, you’ll get to go over to the shop and see a demo of their milling machine that cools parts by ablation.

Linux-Fu: Keeping Things Running

If you’ve used Linux from the early days (or, like me, started with Unix), you didn’t have to learn as much right away and as things have become more complex, you can kind of pick things up as you go. If you are only starting with Linux because you are using a Raspberry Pi, became unhappy with XP being orphaned, or you are running a cloud server for your latest Skynet-like IoT project, it can be daunting to pick it all up in one place.

Recently my son asked me how do you make something run on a Linux box even after you log off. I thought that was a pretty good question and not necessarily a simple answer, depending on what you want to accomplish.

There’s really four different cases I could think of:

  1. You want to launch something you know will take a long time.
  2. You run something, realize it is going to take a long time, and want to log off without stopping it.
  3. You want to write a script or other kind of program that detaches itself and keeps running (known as a daemon).
  4. You want some program to run all the time, even if you didn’t log in after a reboot.

Continue reading “Linux-Fu: Keeping Things Running”