Laser Surgery: Expanding The Bed Of A Cheap Chinese Laser Cutter

Don’t you just hate it when you spend less than $400 on a 40-watt laser cutter and it turns out to have a work area the size of a sheet of copy paper? [Kostas Filosofou] sure did, but rather than stick with that limited work envelope, he modified his cheap K40 laser cutter so it has almost five times the original space.

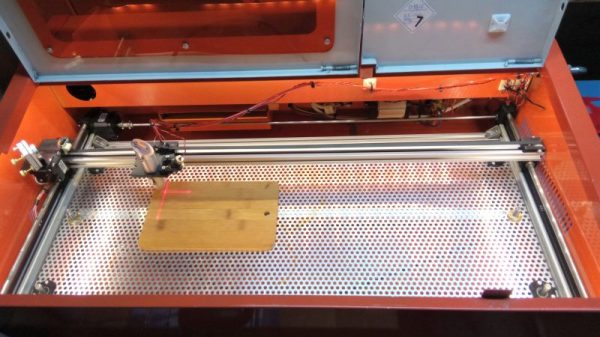
The K40 doesn’t make any pretenses — it’s a cheap laser cutter and engraver from China. But with new units going for $344 on eBay now, it’s almost a no-brainer. Even with its limitations, you’re still getting a 40-watt CO2 laser and decent motion control hardware to play with. [Kostas] began the embiggening by removing the high-voltage power supply from its original space-hogging home to the right of the work area. With that living in a new outboard enclosure, a new X-Y gantry of extruded aluminum rails and 3D-printed parts was built, and a better exhaust fan was installed. Custom mirror assemblies were turned, better fans were added to the radiator, and oh yeah — he added a Z-axis to the bed too.

We’re sure [Kostas] ran the tab up a little on this build, but when you’re spending so little to start with, it’s easy to get carried away. Speaking of which, if you feel the need for an even bigger cutter, an enormous 100-watt unit might be more your style.

Continue reading “Laser Surgery: Expanding The Bed Of A Cheap Chinese Laser Cutter”

Arbitrary Code Execution Is In Another Castle!

When one buys a computer, it should be expected that the owner can run any code on it that they want. Often this isn’t the case, though, as most modern devices are sold with locked bootloaders or worse. Older technology is a little bit easier to handle, however, but arbitrary code execution on something like an original Nintendo still involves quite a lot of legwork, as [Retro Game Mechanics Explained] shows with the inner workings of Super Mario Brothers 3.

While this hack doesn’t permanently modify the Nintendo itself, it does allow for arbitrary code execution within the game, which is used mostly by speedrunners to get to the end credits scene as fast as possible. To do this, values are written to memory by carefully manipulating on-screen objects. Once the correct values are entered, a glitch in the game involving a pipe is exploited to execute the manipulated memory as an instruction. The instruction planted is most often used to load the Princess’s chamber and complete the game, with the current record hovering around the three-minute mark.

If you feel like you’ve seen something like this before, you are likely thinking of the Super Mario World exploit for the SNES that allows for the same style of arbitrary code execution. The Mario 3 hack, however, is simpler to execute. It’s also worth checking out the video below, because [Retro Game Mechanics Explained] goes into great depth about which values are written to memory, how they are executed as an instruction, and all of the other inner workings of the game that allows for an exploit of this level.

Continue reading “Arbitrary Code Execution Is In Another Castle!”

ESP32’s Dev Framework Reaches 2.0

We’ve been watching the development of the ESP32 chip for the last year, but honestly we’ve been a little bit cautious to throw all of our friendly ESP8266s away just yet. Earlier this month, Espressif released version 2.0 of their IoT Development Framework (ESP-IDF), and if you haven’t been following along, you’ve missed a lot.

We last took a serious look at the IDF when the chips were brand-new, and the framework was still taking its first baby steps. There was no support for such niceties as I2C and such at the time, but you could get both cores up and running and the thing connected to the network. We wanted to test out the power-save modes, but that wasn’t implemented yet either. In short, we were watching the construction of a firmware skyscraper from day one, and only the foundation had been poured.

But what a difference eight months make! Look through the GitHub changes log for the release, and it’s a totally new ballgame. Not only are their drivers for I2C, I2S, SPI, the DAC and ADCs, etc, but there are working examples and documentation for all of the above. Naturally, there are a ton of bugfixes as well, especially in the complex WiFi and Bluetooth Low Energy stacks. There’s still work left to do, naturally, but Espressif seems to think that the framework is now mature enough that they’ve opened up their security bug bounty program on the chip. Time to get hacking!

Continue reading “ESP32’s Dev Framework Reaches 2.0”

Hackaday Links: April 23, 2017

‘Member StarCraft? Ooooh, I ‘member StarCraft. The original game and the Brood War expansion are now free. A new patch fixes most of the problems of getting a 20-year-old game working and vastly improves playing over LAN (‘member when you could play video games over a LAN?) And you thought you were going to have free time this week.

About a year ago, [Mark Chepurny] built a dust boot for his Shapeoko CNC router. The SuckIt (not the best possible name, by the way) is an easy, simple way to add dust collection to an X-Carve or Shapeoko 2. The folks at Inventables reached out to [Mark] and made a few improvements. Now, the renamed X-Carve Dust Control System. It’s a proper vacuum attachment for the X-Carve with grounding and a neat brush shoe.

I don’t know if this is a joke or not. It’s certainly possible, but I seriously doubt anyone would have the patience to turn PowerPoint into a Turing Machine. That’s what [Tom Wildenhain] did for a lightning talk at SIGBOVIK 2017 at CMU. There’s a paper (PDF), and the actual PowerPoint / Turing Machine file is available.

System76 builds computers. Their focus is on computers that run Linux well, and they’ve garnered a following in the Open Source world. System76 is moving manufacturing in-house. Previously, they’ve outsourced their design and hardware work to outside companies. They’re going to work on desktops first (laptops are much harder and will come later), but with any luck, we’ll see a good, serviceable, Open laptop in a few year’s time.

Remember last week when a company tried to trademark the word ‘makerspace’? That company quickly came to their senses after some feedback from the community. That’s not all, because they also had a trademark application for the word ‘FabLab’. No worries, because this was also sorted out in short order.

Hackaday Prize Entry: Memes

Snap, Inc., the company behind Snapchat, is branding itself as a hardware company. What hardware does Snap make? Spectacles, or a camera attached to a pair of sunglasses. Snap, Inc. has a market value of around $30 Billion USD.

For his Hackaday Prize entry, [William Glover] is building a device that’s easily worth $100 Billion. It’s called SnappCat, and it’s a machine learning, AI, augmented reality, buzzword-laden camera that adds memes to pictures of cats. Better get in on the Series A now because this is ????????????.

Here’s the use case for SnappCat. Place a small device containing a camera and some sort of WiFi chip. During the day, this device will take pictures. If the device recognizes your cat in a picture, it adds a meme (we assume this means text, probably using the Impact typeface), and sends it to your mobile device. Just imagine sitting in a meeting at work. Your phone buzzes, you look at the message, and you laugh uproariously. Yes, you can has fud Mr. Pibbles, you can has so much fud.

This is the height of technology. That’s not to say landing on the moon or building a civilization on Mars isn’t a superior technological achievement. SnappCat is simply the best technology humanity will every produce because it’s all downhill from here.

That said, this is a pretty interesting problem. A small, cheap device that does image recognition is hard, and adding memes is just the cherry on top. We can’t wait to see where this project goes, and it’s a great entry to the Best Product portion of the Hackaday Prize.

This Hacker Fit An Entire RetroPie In An Altoids Tin

A few months ago, [wermy] built the mintyPi, a Raspberry Pi-based gaming console that fits inside an Altoids tin. It’s amazing — there’s a composite LCD, an audio DAC, and a chopped up Nintendo controller all connected to a Raspberry Pi for vintage gaming goodness on the road. Now, there’s a new mintyPi. The mintyPi 2.0 vastly improves over the earlier generation of this groundbreaking mint-based gaming console with a better screen, better buttons, customized 3D printed bezels, and better audio. Truly, we live in a Golden Age.

Version two of mintyPi uses 3D printed parts and includes a real hinge to keep the display propped up when the Altoids tin is open. Instead of a DAC-based audio solution, [wermy] is using a USB sound card for clearer, crisper sound. This version also uses the new, wireless version of the Raspberry Pi Zero. The Raspberry Pi Zero W allows this Altoids tin to connect to the Internet or, alternatively, gives the user the ability to dump ROMs on this thing without having to connect it to a computer.

For the software, this retro Altoids video game machine is running RetroPie, a very popular way to get retro video games running under low-power Linux machines. Everything is in there, from the NES to Amstrad to the Sega Master system.

Right now, there aren’t a whole lot of details on how [wermy] created the mintyPi 2.0, but he promises a guide soon. Until then, we’ll just have to drool over the video embedded below.

Continue reading “This Hacker Fit An Entire RetroPie In An Altoids Tin”

The Raspberry Pi As An IR To WiFi Bridge

[Jason] has a Sonos home sound system, with a bunch of speakers connected via WiFi. [Jason] also has a universal remote designed and manufactured in a universe where WiFi doesn’t exist. The Sonos can not be controlled via infrared. There’s an obvious problem here, but luckily tiny Linux computers with WiFi cost $10, and IR receivers cost $2. The result is an IR to WiFi bridge to control all those ‘smart’ home audio solutions.

The only thing [Jason] needed to control his Sonos from a universal remote is an IR receiver and a Raspberry Pi Zero W. The circuit is simple – just connect the power and ground of the IR receiver to the Pi, and plug the third pin of the receiver into a GPIO pin. The new, fancy official Raspberry Pi Zero enclosure is perfect for this build, allowing a little IR-transparent piece of epoxy poking out of a hole designed for the Pi camera.

For the software, [Jason] turned to Node JS, and LIRC, a piece of software that decodes IR signals. With the GPIO pin defined, [Jason] set up the driver and used the Sonos HTTP API to send commands to his audio unit. There’s a lot of futzing about with text files for this build, but the results speak for themselves: [Jason] can now use a universal remote with everything in his home stereo now.