Retro Teardown: Inside An 8-Track Stereo Player

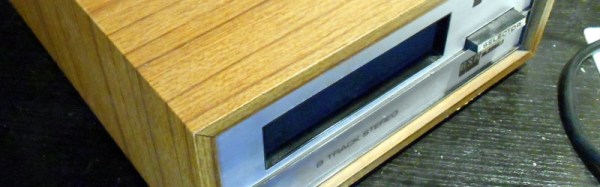
If you are a connoisseur of analogue audio, it’s probable you might have a turntable and a stack of records at home somewhere. If you are of a certain age you may even have a cassette deck, though you’re more likely to have abandoned that format some time in the 1990s. If you are old enough to have been around in the 1960s or 1970s though, you may have owned another analogue audio format. One of several that you might have found in a well-equipped home of that period was the 8-track stereo cartridge, a self-contained tape cassette format that fit four stereo tracks onto a single quarter-inch tape loop as eight parallel tracks, four each of left and right. A triumph of marketing, really, it should more accurately have been called 4-track stereo.

An 8-track stereo cartridge. Government & Heritage Library, State Library of NC (CC BY 2.0).

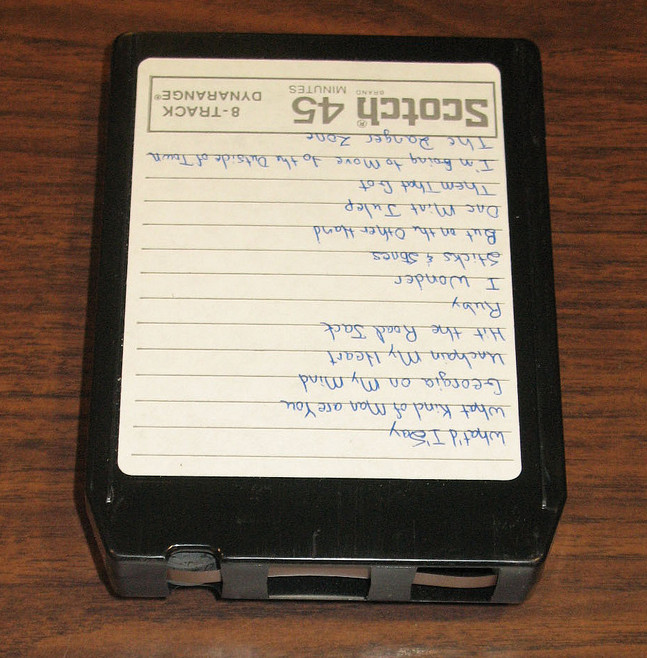
8-track cartridges were developed from earlier tape cartridge formats, largely to satisfy the demands of the automotive industry for interchangeable in-car entertainment. Thus if you owned an 8-track player it was most likely to have been found in your car, but it was not uncommon to find them also incorporated into home hi-fi systems. Thus we come to our subject today. Our retrotechtacular series usually highlights a video showing a bygone technology, but today we’re going to get a little more hands-on.

Some time in the early 1990s, I acquired an 8-track player, a BSR McDonald unit manufactured in the UK and dating from the early 1970s. BSR were much more well-known for their turntables, so this is something of an oddity. Where I found it has disappeared into the mists of time, but it was probably at a radio rally or junk sale. I certainly didn’t buy it because I wanted it to play 8-track tapes, instead I wanted a talking point for my hi-fi, something quirky to set it apart from everyone else’s. So every incarnation of listening enjoyment chez List for the last quarter century has had an 8-track player nestling within it, even if it has never played a tape while in my ownership. Thus we have a unique opportunity for this retro teardown.

Continue reading “Retro Teardown: Inside An 8-Track Stereo Player”

Friday Hack Chat: Open Source Silicon

This Friday, Hackaday.io will be graced with purveyors of Open Source Silicon. Join us in the Hackaday.io Hack Chat this Friday, April 14 at noon PDT (19:00 UTC) for a conversation with SiFive, an ‘Open’ silicon manufacturer.

This week, we’re sitting down with SiFive, a fabless semiconductor company and makers of the HiFive1, an Open Hardware microcontroller that you can just go out and buy. Late last year, SiFive released the HiFive1, an Arduinofied version of SiFive’s FE310 System on Chip. This SoC is a RISC-V core and one of the first microprocessors that is completely Open Source. It is an affront to Stallmanism, the best hope we have for truly Open hardware, and it’s pretty fast, to boot.

SiFive isn’t only working on Open Hardware microcontrollers — their business plan is pretty much, ‘OSH Park, but for silicon’. If you have a design for a new type of chip, they’ll work with foundries to turn your design into a cute little epoxy impregnated blob. It’s a fascinating business plan, and you’re going to hear all about it this Friday in the Hack Chat.

Here’s How To Take Part:

join-hack-chatOur Hack Chats are live community events on the Hackaday.io Hack Chat group messaging.

Log into Hackaday.io, visit that page, and look for the ‘Join this Project’ Button. Once you’re part of the project, the button will change to ‘Team Messaging’, which takes you directly to the Hack Chat.

You don’t have to wait until Friday; join whenever you want and you can see what the community is talking about.

Upcoming Hack Chats

We’ve got a lot on the table when it comes to our Hack Chats. On April 21st, we’re going to be talking magnets with Nanomagnetics. Making magnets, collecting magnets, playing with magnets, it’ll all be over on the Hack Chat.

32-Bit Processing For The Vectrex Arcade System

Alongside the Commodores, Ataris, Nintendos, and all the other game systems of the 80s, there was a single unique video game system that stood out from the pack. This was the Vectrex, a console with a built-in CRT meant to display vector graphics and only vector graphics. The video game crash of 1983 wasn’t kind to the Vectrex, but it still lives on with a reasonably popular homebrew scene. Still, these homebrew games are limited by the hardware itself. After thirty years, the Vectrex has an upgrade. The Vectrex32 is a coprocessor, designed for the Vectrex cartridge slot, that gives this ancient console better graphics and 32-bit capabilities.

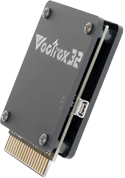
There’s a whole site dedicated to this Vectrex add-on, and the hardware is pretty much what you would expect. There’s a fast PIC32 microcontroller on this cartridge, a USB port, and a dual-port memory chip that’s connected to the Vectrix’s native processor.

Since this add-on cartridge is effectively a computer itself,  the Vectrex32 can operate as a BASIC interpreter for the Vectrex. That’s something the original hardware couldn’t have done, and makes homebrew development much easier.

You can check out a few videos describing the functionality of the Vectrex32 below, along with a few gameplay videos of new homebrew games written specifically for the Vectrex.

Continue reading “32-Bit Processing For The Vectrex Arcade System”

Fix-A-Brick 2: Nexus 5X Rises From The Ashes

It was but two weeks ago when I told my story of woe —  the tale of an LG Nexus 5X that fell ill, seemingly due to a manufacturing fault at birth. I managed to disassemble it and made my way through a semi-successful attempt at repair, relying on a freezer and hairdryer to coax it back to life long enough to backup my data. Try as I might, however, I simply couldn’t get the phone running for more than ten minutes at a time.

All was not in vain, however! I was rewarded for documenting my struggles with the vast experience and knowledge of the wider Internet: “Hairdryers don’t get as hot as heatguns!”

It turned out I had just assumed that two similar devices, both relying on a hot bit of metal and a fan as their primary components, must be virtually identical if rated at a similar power draw. I was wrong! Apparently the average hairdryer stays well cooler than 150 degrees Celsius to avoid melting one’s silky locks or burning the skin. I even learned that apparently, wet hair melts at a lower temperature than dry hair. Who knew?

Armed with this knowledge, I rushed out and bought the cheapest heat gun I could find — around $50. Rated up to 600 degrees C, this was definitely going to be hotter than the hairdryer. With the prevailing opinion being that I had not applied enough heat in general, I decided to also increase the heating period to 90 seconds, up from a quick 30 second pass originally.

Continue reading “Fix-A-Brick 2: Nexus 5X Rises From The Ashes”

DIY DynDNS With ESP8266 And Dweets

You’re on a home router, and your IP address keeps changing. Instead of paying a little bit extra for a static IP address (and becoming a grownup member of the Internet) there are many services that let you push your current IP out to the rest of the world dynamically. But most of them involve paying money or spending time reading advertisements. Who has either money or time?!

[Alberto Ricci Bitti] cobbled together a few free services and an ESP8266 module to make a device that occasionally pushes its external IP address out to a web-based “dweet” service. The skinny: an ESP8266 gets its external IP address from ipify.org and pushes it by “dweet” to a web-based data store. Freeboard reads the “dweet” and posts the resulting link in a nice format.

Every part of this short chain of software services could be replaced easily enough with anything else. We cobbled together our own similar solution, literally in the previous century, back when we were on dialup. But [Alberto R B]’s solution is quick and easy, and uses no fewer than three (3!) cloud services ending in .io. Add an ESP8266 to the WiFi network that you’d like to expose, and you’re done.

Customize Your Ratios With A 3D-Printed Gearbox

Small DC motors are easy to find — you can harvest dozens from old printers and copiers. You might even get a few with decent gearboxes too. But will you get exactly the motor with exactly the gearing your project needs? Unlikely, but you can always just print a gearbox to get exactly what you need.

There’s nothing fancy about [fortzero]’s gearboxes. The motors are junk bin specials, and the gears are all simple spur gears 3D-printed from PLA. There are four gears in the train, each with a 2:1 reduction, giving a 16:1 overall ratio. The gears ride on brass shafts that are press-fit into the housing, and there’s not a bearing in sight — just a few washers to keep the gears spaced apart and plenty of grease. Despite the simplicity, the gearboxes turned out to be pretty capable, lifting a 3.5 kg load. The design files are available and should make it easy for you to get just the ratio you want for the motor you have.

Of course more complicated gearboxes are possible with a 3D printer, including a split-harmonic planetary gear, or a strain wave gear using a timing belt. No 3D printer? No problem! Just build a LEGO gearbox.

Continue reading “Customize Your Ratios With A 3D-Printed Gearbox”

Keep An Eye On The Sky With RDuinoScope

We’ve all enjoyed looking up at a clear night sky and marveled at the majesty of the stars. Some of us have even pointed telescopes at particular celestial objects to get a closer view. Anyone who’s ever looked at anything beyond Jupiter knows the hassle involved.  It is most unfortunate that the planet we reside on happens to rotate about a fixed axis, which makes it somewhat difficult to keep a celestial object in the view of your scope.

It doesn’t take much to strap a few steppers and some silicon brains to a scope to counter the rotation of earth, and such systems have been available for decades. They are unfortunately quite expensive. So [Dessislav Gouzgounov] took matters into his own hands and developed the rDuinoScope – an open source telescope control system.

Based on the Arduino Due, the systems stores a database of 250 stellar objects. Combined with an RTC and GPS, the rDunioScope can locate and lock on to your favorite nebula and track it, allowing you to view it in peace. Be sure to grab the code and let us know when you have your own rDuinoScope set up!