Printed Nexus 7 SIM Tray Is Good ‘Nuff

When repairing something, there are in effect two schools of thought: you can craft a repair that seamlessly blends into the original hardware and doesn’t look like a repair, or you can slap that thing together and keep it moving. A lot of variables go into this decision making process, such as the complexity of the repair, the available materials, and of course whether or not you need to keep the fact you broke the thing from your significant other.

When the SIM holder on his Nexus 7 tablet broke recently, [Alex Whittemore] did the mental arithmetic and came to the conclusion that it wasn’t worth his time trying to figure out how to model an exact replacement. But he was able to print something that works well enough for his purposes, which is all that matters in the end. A perfect entry for our ongoing “Repairs You Can Print” contest.

You must be this small to ride

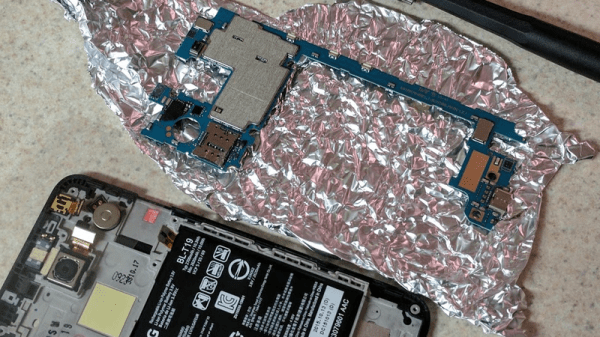
Apparently the SIM holder in the 2013 Nexus 7 is notoriously poor, and of course since this is a known issue, online retailers are trying to get as much as $100 USD out of you for a tiny sliver of plastic. Sometimes it really seems like Google was determined to run the Nexus line into the ground before bailing on it.

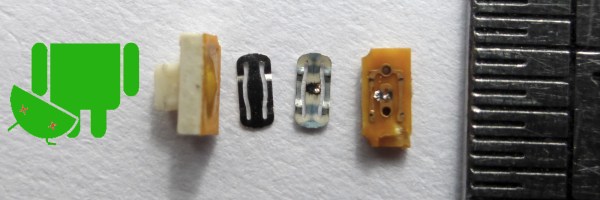
Printing such a tiny part, especially with the little details like the channel for you to hook your fingernail into, requires a fairly well calibrated printer. If you can’t muster up a 0.1mm first layer you might as well sit this one out; and if you haven’t mastered the art of bridging, that little valley to help you get the SIM back out may end up overflowing into a river of tears.

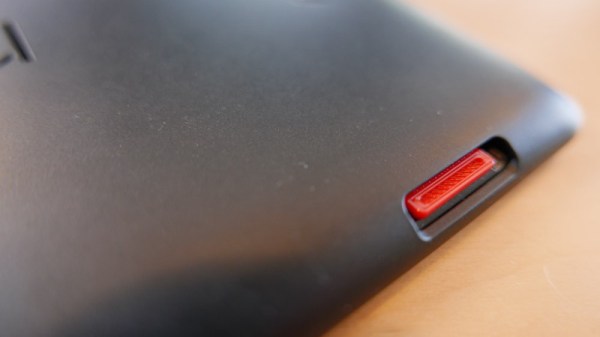
For [Alex], the piece ended up working perfectly. It might look a little weird, but if you’ve got the tablet in a case you’ll never see it anyway. It’s also worth noting that this design may work on other devices with a similar SIM arrangement, or at the very least, might be a good starting point to work from if you’ve got to come up with your own.

Remember, there’s still plenty of time to enter your own printed fix into our “Repairs You Can Print” contest. The top 20 repairs will take home $100 in Tindie credit, and for the best repair done by a Student or Organization, there’s two Prusa i3 MK3 printers with the Quad Material upgrade kits on the line.

A Salty Solution For A Dead Nexus 5X

If you’re an Android fan, there’s a good chance you’ve heard of the Nexus 5X. The last entry in Google’s line of low-cost Nexus development phones should have closed the program on a high note, or at the very least maintained the same standards of quality and reliability as its predecessor. But unfortunately, a well known design flaw in the Nexus 5X means that the hardware is essentially a time-bomb. There are far too many reports of these phones entering into an endless bootloop right around the one year mark to say it’s just a coincidence.

The general consensus seems to be that faulty BGA chip soldering on the CPU works lose after about a year or so of thermal stress. Whatever the reason, [hillbillysam] recently found himself the proud owner of a dead Nexus 5X. Resigned to the fact that he would need to get a new phone, he at least wanted to get some of his data off the device before it went to that big landfill in the sky.

As it turns out these bootlooped phones can temporarily be revived by cooling them down, say by putting them in the freezer for a few hours. There’s plenty of debate as to why this works, but even our own [Lewin Day] can testify that it does seem to get the phone booting again; though only until it comes back up to operating temperature. With this in mind, [hillbillysam] reasoned that if he kept the phone as cold as possible while it was running, it may stay operational long enough for him to pull his files off of it over USB.

He couldn’t exactly freeze the phone in a block of ice, but remembering his high school chemistry, he came up with something pretty close. By adding salt to water, you can significantly lower temperature at which it freezes. Putting the phone into a watertight bag and submerging it in this supercooled solution is an easy and non-destructive way of keeping it very cold while still being accessible over USB.

His Nexus 5X was able to keep kicking the whole time it was luxuriating in its below-freezing saltwater bath, giving him plenty of time to copy everything he needed. It doesn’t sound like the kind of spa day we’d like to have personally, but to each their own.

If your Nexus 5X has met a similar fate, you may want to take a look at our previous coverage about the issue. While your mileage may vary, we’ve reported on a couple of success stories so it’s worth a shot.

[via /r/nexus5x]

Upgrading RAM On A Nexus 5X

A screenshot of the status screen indicating the phone has detected the extended RAM.

A denizen of the venerable XDA forums reports that it is possible to upgrade the RAM of the Nexus 5X from 2GB to 4GB.  Having suffered the dreaded bootloop, [Cathair2906] decided to send their phone off to China for repair. The technician advised that since reflow of the CPU was necessary anyway, it makes sense to upgrade the RAM as well. This is due to the RAM actually being fitted directly on top of the CPU, a method amusingly known as Package on Package (SFW).

Upgrading RAM in the average computer is a relatively trivial task. Pop the case open, and you slide the new sticks into the extra slots. It’s not the same case for smartphones and tablets — in the endless quest for the slimmest form factor, all parts are permanently soldered. In addition, every device is essentially bespoke hardware; there’s no single overarching hardware standard for RAM in portable devices. You could find yourself searching high and low for the right chips, and if you do track them down, the minimum order quantity may very well be in the thousands.

Unless, of course, you had access to the Shenzhen markets where it’s possible to buy sample quantities of almost anything. Given access to the right parts, and the ability to solder BGA packages, it’s a simple enough job to swap a bigger RAM chip on top of the CPU during the repair.

It’s the sort of thing that’s trivial in Shenzhen, and almost mind-bogglingly impossible in the West. The price of the repair? About $60 USD. [Cathair2906] was even nice enough to share the address of the shop that did the work.

We’ve seen similar antics before – like this Nexus 5 storage upgrade to 64GB.

[via XDA Developers, thanks to Jack for the tip!]

Fix-A-Brick 2: Nexus 5X Rises From The Ashes

It was but two weeks ago when I told my story of woe —  the tale of an LG Nexus 5X that fell ill, seemingly due to a manufacturing fault at birth. I managed to disassemble it and made my way through a semi-successful attempt at repair, relying on a freezer and hairdryer to coax it back to life long enough to backup my data. Try as I might, however, I simply couldn’t get the phone running for more than ten minutes at a time.

All was not in vain, however! I was rewarded for documenting my struggles with the vast experience and knowledge of the wider Internet: “Hairdryers don’t get as hot as heatguns!”

It turned out I had just assumed that two similar devices, both relying on a hot bit of metal and a fan as their primary components, must be virtually identical if rated at a similar power draw. I was wrong! Apparently the average hairdryer stays well cooler than 150 degrees Celsius to avoid melting one’s silky locks or burning the skin. I even learned that apparently, wet hair melts at a lower temperature than dry hair. Who knew?

Armed with this knowledge, I rushed out and bought the cheapest heat gun I could find — around $50. Rated up to 600 degrees C, this was definitely going to be hotter than the hairdryer. With the prevailing opinion being that I had not applied enough heat in general, I decided to also increase the heating period to 90 seconds, up from a quick 30 second pass originally.

Continue reading “Fix-A-Brick 2: Nexus 5X Rises From The Ashes”

Fix-a-Brick: Fighting The Nexus 5X Bootloop

Oh Nexus 5X, how could you? I found my beloved device was holding my files hostage having succumbed to the dreaded bootloop. But hey, we’re hackers, right? I’ve got this.

It was a long, quiet Friday afternoon when I noticed my Nexus 5X was asking to install yet another update. Usually I leave these things for a few days before eventually giving in, but at some point I must have accidentally clicked to accept the update. Later that day I found my phone mid-way through the update and figured I’d just wait it out. No dice — an hour later, my phone was off. Powering up led to it repeatedly falling back to the “Google” screen; the dreaded bootloop.

Stages of Grief

I kept my phone on me for the rest of the night’s jubilant activities, playing with it from time to time, but alas, nothing would make it budge. The problem was, my Nexus still had a full day’s video shoot locked away on its internal flash that I needed rather badly. I had to fix the phone, at least long enough to recover my files. This is the story of my attempt to debrick my Nexus 5X.

Continue reading “Fix-a-Brick: Fighting The Nexus 5X Bootloop”

Nexus 5X Phone Resurrected By The Oven

Warranty shmarranty — toss the phone in the oven! There’s apparently a problem with the assembly of the Nexus 5X smartphones, and it looks like it is due to faulty BGA chip soldering. LG USA has had enough problems with the phone that they may not even have enough parts or new units to fix it, so they’re offering a refund. But we all know how it is to get attached to a device, right?

So [Alex] disassembled his beloved phone, pulled out the board in question, and gave it the XBox Red Ring Of Death treatment. He placed the board on some insulating aluminum foil, and baked it for six and a half minutes. Season with lemon and pepper, and serve! We’re honestly surprised that sticking the affected board into the oven at 195° C / 390° F for a few minutes would work at all. Isn’t that a low temperature for soldering, especially with a lead-free mix? Could it have been a problem with humidity after all? Continue reading “Nexus 5X Phone Resurrected By The Oven”

Interesting Switch Autopsy

We put a lot of trust into some amazingly cheap components, sometimes that trust is very undeserved. Long gone are the days when every electronic component was a beautifully constructed precision lab instrument.  As [Rupert Hirst] shows, this can be a hard lesson to learn for even the biggest companies.

[Rupert]’s Nexus 5 was suffering from a well known reboot issue. He traced it to the phone’s power switch. It was always shorting to ground, even though it clicked like it was supposed to.

He desoldered the switch and pried the delicate sheet metal casing apart. Inside were four components. A soft membrane with a hard nub on the bottom, presumably engineered to give the switch that quality feeling. Next were two metal buckles that produced the click and made contact with the circuit board, which is the final component.

He noticed something odd and  busted out his USB microscope. The company had placed a blob of solder on the bottom buckle. We think this is because steel on copper contact would lead to premature failure of the substrate, especially with the high impact involved during each switching event.

The fault lay in the imprecise placement of the solder blob. If it had been perfectly in the middle, and likely many phones that never showed the issue had it there, the issue would have never shown up. Since it was off-center, the impact of each switching event slowly deposited thin layers of solder onto the copper and fiberglass. Finally it built up enough to completely short the switch.

Interestingly, this exact problem shows up across different phone manufacturers, somewhere there’s a switch company with a killer sales team out there.