Keep An Eye On The Sky With RDuinoScope

We’ve all enjoyed looking up at a clear night sky and marveled at the majesty of the stars. Some of us have even pointed telescopes at particular celestial objects to get a closer view. Anyone who’s ever looked at anything beyond Jupiter knows the hassle involved.  It is most unfortunate that the planet we reside on happens to rotate about a fixed axis, which makes it somewhat difficult to keep a celestial object in the view of your scope.

It doesn’t take much to strap a few steppers and some silicon brains to a scope to counter the rotation of earth, and such systems have been available for decades. They are unfortunately quite expensive. So [Dessislav Gouzgounov] took matters into his own hands and developed the rDuinoScope – an open source telescope control system.

Based on the Arduino Due, the systems stores a database of 250 stellar objects. Combined with an RTC and GPS, the rDunioScope can locate and lock on to your favorite nebula and track it, allowing you to view it in peace. Be sure to grab the code and let us know when you have your own rDuinoScope set up!


$10 Orange Pi 2G-IoT Released To Compete With Pi Zero W

A new single-board computer by Orange Pi has popped up for sale on AliExpress. The Orange Pi 2G-IoT is designed to compete with the Raspberry Pi Zero, and if specs are anything to go by they have done a nice job.

There are a lot of options for extra small single board computers these days and there’s a growing list at the lowest price points. Let’s call it the sub-$20 cost range (to quell the argument of shipping fees). We have seen C.H.I.P., the Raspberry Pi Foundation released the Pi Zero W (an update to the Zero line that included WiFi and Bluetooth), the already available Orange Pi Zero (which was featured in a project on Monday), and now add to that list the unfortunately named Orange Pi 2G-IoT.

The 2g-IoT is sporting an ARM Cortex-A5 32bit clocked at 1GHz with 256MB DDR2 RAM. It’s nice to see 500 MB of on-board NAND to go along with an SD card slot for larger storage. It also has a CSI camera connector, WiFi, Bluetooth, an FM Radio and GSM/GPRS with a sim card slot on the bottom. It is pin compatible with Raspberry Pi’s almost standardized GPIO layout.

All this for $10 is quite impressive to say the least, especially the addition of GSM/GPRS. Will it kill Raspberry Pi Zero W sales? We think not. While the Orange Pi’s are great little computers, they don’t have the community support that is afforded to Raspberry Pi products making for less support online when you run into a problem. That’s if you can even get the thing running in the first place. The Orange Pi’s website has not yet been updated to reflect the new release. However if you are interested in getting one for yourself right now, head over to your favorite Chinese electronics supplier.

[via Geeky Gadgets and CNX]

Hackaday Prize Entry: Experiments With Wheeled Legs

If you’ve been keeping tabs on recent developments in robotics, you surely remember Handle — the awesome walking, wheeled robot from Boston Dynamics. There’s a good reason why such a combination is a good choice of locomotion for robots. Rolling on wheels is a good way to cover smooth terrain with high efficiency. But when you hit rocky patches or obstacles, using legs to negotiate these obstacles makes sense. But Handle isn’t the only one, nor is it the first.

[Radomir Dopieralski] has been building small robots for a while now, and is especially interested in how they move. He is sharing his experience while Experimenting with Wheeled Legs, with the eventual aim of “building an experimental walking+rolling robot, to more efficiently kill all humans and thus solve all the problems”. His pithy comments aside, investigating and experimenting with different forms of locomotion to understand which method is most efficient will pay rich dividends in the design of future robots.

During an earlier version of the Hackaday Prize, [Radomir] snagged a coupon for laser cutting services. He used it to build a new robot based on a fresh look at some of his earlier designs. This resulted in the Logicoma-kun — a functional model of a Logikoma (a logistics robot designed to be a fast all-terrain vehicle for transporting weapons and ammunition) from “Ghost in the Shell: Arise”. Along the way, he figured out how to save some servo channels. For gripping function, he needed to drive two servos in sync with each other, but in opposing directions. This would usually require two GPIO’s and a few extra lines of code. Instead, he dismantled a servo and reversed the motor AND the servo potentiometer connections.

But this is still early days for [Radomir]. He is fleshing out ideas, looking for feedback and discussions on robotic locomotion. This fits in perfectly with the “Design Your Concept” phase of the Hackaday Prize 2017. He has already made some progress on Logicoma-kum by having it move in either the wheeled or walking modes — check out the videos after the break.

Continue reading “Hackaday Prize Entry: Experiments With Wheeled Legs”

Making Metal Dominoes

Nearly as versatile as a deck of playing cards, dominoes are a great addition to any rainy-day repertoire of game sets. [Apollo] from the Youtube channel [carbide3d] has manufactured for themselves a custom set of domino tiles replete with brass pips.

Cutting the bar stock to the appropriate size, [Apollo] ran a few test engravings and hole sizes for the brass pips. That done, all they had to do was repeat the engraving and milling process another couple dozen times, as well as all the requisite wet and dry sanding, and buffing. [Apollo] opted to use paint marker to add a little extra style to the tiles, and advises any other makers who want to do the same to set their engraving depth to .01″ so  the paint marker won’t be rubbed off when buffing the pieces.

When it came to installing the brass balls, [Apollo] undersized the holes by .001″-.002″ for a snug press fit — adding that the hole depth is a little greater than half the ball’s diameter. They used 1/8″ balls for the pips, and 3/16 balls for the center of the tiles which also allows the tiles to be spun for a bit of fidgeting fun during play. Check out the build video after the break.

Continue reading “Making Metal Dominoes”

World Create Day: Get Together And Hack On April 22nd

Venture away from your workbench and see what others have been building this year. It’s time for Hackaday World Create Day when hackers all over the world get together to work on projects.

On April 22nd, join the creative minds in your area for a few hours of build time. It’s an opportunity to inspire and be inspired by others. There’s no better way to make those leaps forward on a project than to share your work with others. This pollination of ideas is what sparks creativity, and it’s a great excuse to meet new people.

Find a meetup near you right now. Don’t see one in your area? Become a host, it’s easy and we’ll help!

What’s It Like at a World Create Day Meetup?

When the Hackaday community gets together it’s always a fun time. Each meetup on April 22nd will be unique. These are organized locally and given life by those who show up. Bring an open mind and something you’re excited about and you’ll be right at home.

We’re sending out stickers like this one, along with other swag, to meetups that sign up early. Do it now!

For instance, if I were Brian Benchoff I might bring along my 3D printed WiFi antenna and a few different WiFi devices to see if anyone wanted to do some distance measurements and signal strength characterization. I myself have been working on an art project that uses computer vision and replacement display for my exercise machine so I’ll bring one of those. After a few hours of hacking, it’s customary to go around the room and have people give a very brief explanation of their work.

World Create Day is the perfect place to put together you Hackaday Prize Team. As the ideas fly, keep in mind the power of one idea to change the world. Consider picking a challenge, brainstorming an idea, and entering it in the Hackaday Prize.

Pics or It Didn’t Happen

Don’t let the great ideas live for only one day. Make sure you tell the story of your World Create Day. Post your pictures and descriptions on social media with hashtag #WorldCreateDay during the event. Pictures, project links, and a brief summary should be added on your meetup’s Hackaday.io event page. We want to cover as many of these as possible on Hackaday, so don’t be bashful about telling everyone what people at your meetup were working on — finished project or pencil drawing, we want to hear it!

Ask Hackaday: How Does This Air Particle Sensor Work?

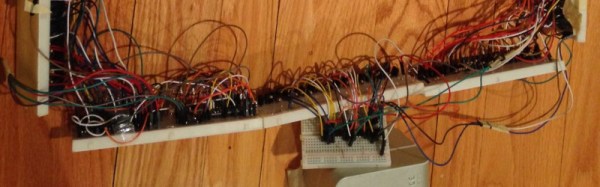
The hardware coming out of [Dr. Peter Jansen]’s lab is the craziest stuff you can imagine. He’s built a CT scanner out of plywood, and an MRI machine out of many, many turns of enamel wire. Perhaps his best-known build is his Tricorder – a real, all-sensing device with permission from the estate of [Gene Roddenberry] to use the name. [Peter]’s tricorder was one of the finalists for the first Hackaday Prize, but that doesn’t mean he’s stopped working on it. Sensors are always getting better, and by sometime in the 23rd century, he’ll be able to fit a neutrino detector inside a tiny hand-held device.

One of the new sensors [Peter] is working with is the MAX30105 air particle sensor. The marketing materials for this chip say it’s designed for smoke detectors and fire alarms, but this is really one of the smallest dust and particle sensors on the market. If you want a handheld device that detects dust, this should be the chip you’re looking at.

Unfortunately, Maxim is being very, very tight-lipped about how this particle sensor works. There is a way to get access to raw particle counts and the underlying algorithms, and Maxim is more than willing to sell those algorithms through a third-party distributor. That’s simply not how we do things around here, so [Peter] is looking for someone with a fancy particle sensor to collect a few hours of data so he can build a driver for this chip.

Here’s what we know about the MAX30105 air particle sensor. There are three LEDs inside this chip (red, IR, and green), and an optical sensor underneath a piece of glass. The chip drives the LEDs, light reflects off smoke particles, and enters the optical sensor. From there, magic algorithms turn this into a number corresponding to a particle count. [Peter]’s hackaday.io log for this project has tons of data, math, and statistics on the data that comes out of this sensor. He’s also built a test rig to compare this sensor with other particle sensors (the DSM501A and Sharp sensors). The data from the Maxim sensor looks good, but it’s not good enough for a Tricorder. This is where you, o reader of Hackaday, come in.

[Peter] is looking for someone with access to a fancy particle sensor to collect a few hours worth of data with this Maxim sensor in a test rig. Once that’s done, a few statistical tests should be enough to verify the work done so far and build a driver for this sensor. Then, [Peter] will be able to play around with this sensor and hopefully make a very cheap but very accurate air particle sensor that should be hanging on the wall of your shop.
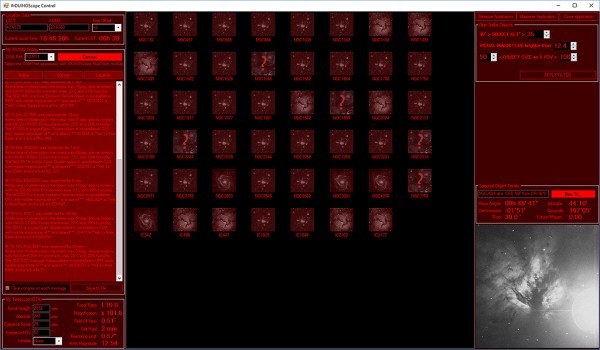
A Huge Infra-Red Touch Board

We’re all used to touch pads on our laptops, and to touch screens. It’s an expectation now that a new device with a screen will be touch-enabled.

For very large surfaces though, touch is still something of an expensive luxury. If you’re a hardware hacker, unless you are lucky enough to score an exceptional cast-off, the occasional glimpse of a Microsoft PixelSense or an interactive whiteboard in a well-equipped educational establishment will be the best you’re likely to get.

[Adellar Irankunda] may have the answer for your large touch board needs if you aren’t well-heeled, he’s made one using the interesting approach of surrounding the touch area with an array of infra-red LEDs and photo transistors. By studying the illumination of the phototransistors by different LEDs in the array, he can calculate the position of anything such as a pointing finger that enters the space. It’s an old technique that you might have found on some of the earlier touch screen CRT monitors.

His hardware is built on twelve breadboards mounted in a square, upon which sit 144 LED/phototransistor pairs managed through a pile of 4051 CMOS multiplexers by a brace of Arduino Nanos. If you fancy one yourself he’s provided all the code, though the complex array of breadboards to assemble are probably not for the faint-hearted. You can see it in action in a video we’ve posted below the break.

Continue reading “A Huge Infra-Red Touch Board”