DIY Capacitive Rotational Encoder On The Cheap With FR4

Rotary encoders are critical to many applications, even at the hobbyist level. While considering his own rotary encoding needs for upcoming projects, it occurred to [Jan Mrázek] to try making his own DIY capacitive rotary encoder. If successful, such an encoder could be cheap and very fast; it could also in part be made directly on a PCB.

First prototype, two etched plates with transparent tape as dielectric material. Disc is 15 mm in diameter.

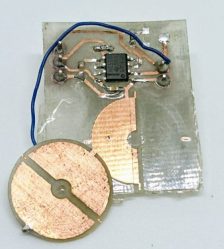
The encoder design [Jan] settled on was to make a simple adjustable plate capacitor using PCB elements with transparent tape as the dielectric material. This was used as the timing element for a 555 timer in astable mode. A 555 in this configuration therefore generates a square wave that changes in proportion to how much the plates in the simple capacitor overlap. Turn the plate, and the square wave’s period changes in response. Response time would be fast, and a 555 and some PCB space is certainly cheap materials-wise.

The first prototype gave positive results but had a lot of problems, including noise and possibly a sensitivity to temperature and humidity. The second attempt refined the design and had much better results, with an ESP32 reliably reading 140 discrete positions at a rate of 100 kHz. It seems that there is a tradeoff between resolution and speed; lowering the rate allows more positions to be reliably detected. There are still issues, but ultimately [Jan] feels that high-speed capacitive encoders requiring little more than some PCB real estate and some 555s are probably feasible.

This project is a reminder that FR4 (whether copper-clad, etched, or blank) shows up in clever applications: copper tape and blank FR4 can be used to quickly prototype RF filters, PocketNC built an entire small CNC tool around FR4, and our own [Voja] wrote a full guide on making beautiful enclosures from FR4.

Goodbye, TechShop

The CEO of TechShop, [Dan Woods], has hit the legal E-stop and declared Chapter-7 bankruptcy for the business. All ten US locations were shuttered on Wednesday with absolutely no advance warning. You can read the full statement from [Dan] here.

We are deeply saddened to hear of TechShop’s closing, and while it wasn’t implausible that this might happen someday, the abrupt shuttering must come as a painful shock to many for whom TechShop was an important part of their personal and professional lives. We owe a lot to the work and effort they put forth; they led the way as a pioneering makerspace and for more than ten years, TechShop provided access to tools, taught classes, and created opportunities for the DIY world that are still as important today as they were in the mid-aughts.

Leading the Way

Jim Newton, founder of TechShop, originally wanted a space to tinker with his pet projects. “I’m a frustrated inventor who needs to have access to this kind of stuff. And people always say that the best companies are the ones where the founders are passionate about what they are creating, which is exactly what I am,” Jim said in an interview in 2007, at the beginnings of TechShop.

It turned out that there were a lot of other tinkerers who wanted to work their pet projects too.

TechShop took a risk. All new business ventures are risky and most fail quite quickly, but in 2006, this whole movement, this idea that people could build things and take advantage of new technologies, personal fabrication, ad-hoc manufacturing, and rapid prototyping outside of universities and commercial R&D labs, was just a dream.

Adafruit was incubating in Limor’s dorm room. Arduino was just the name of some pub in Italy. Eben Upton was wiring prototype Raspberry Pi’s by hand. Nathan Seidle was still reflowing Sparkfun’s boards with a toaster oven. Maker Faire, “The World’s Largest Show and Tell,” wouldn’t even launch until the following year.

In the fading light of high school shop classes, people often were shown the ways of woodworking, light metalwork, and maybe how to fix a car or two. Filling a business with a smorgasbord of advanced machinery and teaching people how to use it, was, and still is, a relatively new concept. TechShop had a dream and made it real with the dedication of hardworking support staff and instructors around the country. Continue reading “Goodbye, TechShop”

Is Intel’s Management Engine Broken Yet?

Our own [Brian Benchoff] asked this same question just six months ago in a similar headline. At that time, the answer was no. Or kind of no. Some exploits existed but with some preconditions that limited the impact of the bugs found in Intel Management Engine (IME). But 2017 is an unforgiving year for the blue teams, as lot of serious bugs have been found throughout the year in virtually every fields of computing. Researchers from Positive Technologies report that they found a flaw that allows them to execute unsigned code on computers running the IME. The cherry on top of the cake is that they are able to do it via a USB port acting as a JTAG port. Does this mean the zombie apocalypse is coming?

Before the Skylake CPU line, released in 2015, the JTAG interface was only accessible by connecting a special device to the ITP-XDP port found on the motherboard, inside a computer’s chassis. Starting with the Skylake CPU, Intel replaced the ITP-XDP interface and allowed developers and engineers to access the debugging utility via common USB 3.0 ports, accessible from the device’s exterior, through a new a new technology called Direct Connect Interface (DCI). Basically the DCI provides access to CPU/PCH JTAG via USB 3.0. So the researchers manage to debug the IME processor itself via USB DCI, which is pretty awesome, but USB DCI is turned off by default, like one of the researchers states, which is pretty good news for the ordinary user. So don’t worry too much just yet.

Continue reading “Is Intel’s Management Engine Broken Yet?”

Cheap Flamethrower Is Predictably Worrying

We’d never criticize somebody for coming up with a creative way to save a few bucks. In truth, pickings would be pretty slim around here if we deleted every project or hack where cost savings was a prime motivator. That being said, there’s still some things you should probably spend a few extra dollars on. You know, the essential things in life that you need to know will be safe and reliable, like your car and…your flamethrower.

While we don’t have any information about what kind of car [Steve Hernandez] is driving, but over on Hackaday.io, he’s posted some info about his 3D printed wrist-mounted flamethrower. The final result does look pretty impressive, but given the subject matter and the lack of any safety gear, we would firmly plant it in the “Don’t try this at home” category.

At the heart of this flamethrower is a solenoid valve recovered from a Glade air freshener. Rather than spraying out the smell of lilacs, this valve has found a new purpose in life by squirting out butane from a pressurized can. The butane is then ignited by a spark gap made up two nails connected to a 300 kV boost coil.

[Steve] designed the frame of this creation in OpenSCAD, and printed it out in a single piece. It holds the butane can and solenoid in position, as well as keeping the nails in the proper orientation for the spark gap to function. Admittedly the head of his printed flamethrower does look very cool, but if there was ever a situation where you should be suspect of the heat tolerance of 3D printed plastic, a flamethrower is probably it.

What’s noticeably lacking of course is any method to keep the flame from potentially traveling back up through the valve and into the butane can. The high-speed flow coming out of the nozzle is probably enough to keep that from happening, but we still wouldn’t feel comfortable strapping his device to our wrist as-is.

You may be surprised to find that wrist-mounted flamethrowers are a relatively popular project here at Hackaday. We’ve covered quite a few over the years, but still aren’t convinced this is something we personally need to add to our collection of gear.