Raspberry Pi Compute Module 3 In A GameBoy Original

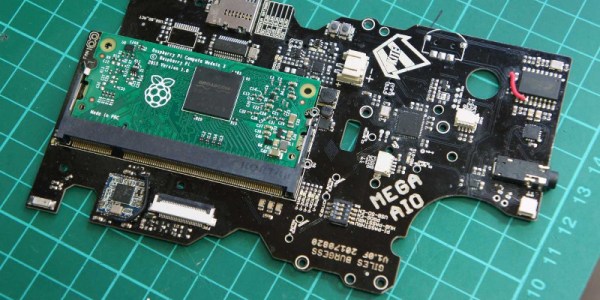
[Kite] has been making custom PCBs for GameBoys for a long time. Long enough, in fact, that other people have used his work to build even more feature-rich GameBoy platforms. Unfortunately some of their work had stagnated, so [Kite] picked it up and completed a new project: a GameBoy that uses a Raspberry Pi running on his upgraded GameBoy PCB.

At its core the build uses a Raspberry Pi 3, but one that has been shrunk down to the shape of a memory module, known as the Compute Module 3. (We featured the original build by [inches] before, but [Kite] has taken it over since then.) The upgrade frees up precious space in the GameBoy case to fit the custom PCB that was originally built by [Kite], and also eliminates the need to cut up a Raspberry Pi and solder it to the old version of his PCB. The build is very clean, and runs RetroPie like a champ. It has some additional features as well, such as having an HDMI output.

For anyone looking for that retro GameBoy feel but who wants important upgrades like a backlit color screen, or the ability to play PSP games, this might be the build for you. The video below goes into details about how it all fits together. If you’re looking for more of a challenge in your GameBoy hacks, though, there’s an ongoing challenge to build the tiniest GameBoy possible as well.

Continue reading “Raspberry Pi Compute Module 3 In A GameBoy Original”

New Part Day: A Fake Sun

LED technology has improved by leaps and bounds in recent years, with what was once considered unachievable being common place now. Two of the main parameters of interest, total input power and conversion efficiency have been steadily increasing over the years. An efficacy of 120 lumens/watt is fairly common nowadays, and it may not be improbable to expect double this figure in the near future. Input power ratings have also steadily increased, with single LED units capable of 100 W or more becoming common.

But the Chinese manufacturer Yuji seems to have hit the ball out of the park by introducing their BC-Series, 500 W, high CRI, high Power, COB LED. Single, 500 W COB LED’s are not new and have been available since a couple of years, but their emitting surface areas are quite large. For example, a typical eBay search throws up parts such as this one – 500 W, high Power LED, 60,000 lm, 6000-6500K. It has a large, square emitting area of 47.6 x 47.6 mm. By comparison, the Yuji BC-Series are 27 mm square, with an active emitting area only 19 mm in diameter. This small emitting area makes it easier to design efficient reflector and/or lens units for the LED.

Luminous Flux is between 18,000 to 21,000 for a color temperature of 3200 K, and between 20,000 to 24,000 for the 5600 K type. Further, this high power rating is accompanied with a pretty high color rendering index (CRI) above 95. This allows the LED to faithfully reveal the natural colors of objects due to its wide spectrum. Electrically, it is rated for 12 Amps with input voltage between 35 V to 39 V. This translates to between 420 W ~ 468 W of input electrical power. Some quick math tells us that the efficacy efficiency works out to just a little over 50 lm/W, which isn’t all that great. But with light sources, you can have high-efficacy high-efficiency or high CRI, but not both – that’s just how the physics of it works.

At US $ 500 a pop, these eye blinders do not come cheap and may not find much use for individual hackers. But for some applications, such as studio and theatre lighting or photography, they may be just what the Doctor prescribed. In the video after the break, you can see [Matt] from DIY Perks give a rundown of the LED’s features and take it for a test ride.

Continue reading “New Part Day: A Fake Sun”

Your Next Wearable May Not Need Electricity

What if you could unlock a door with your shirtsleeve, or code a secret message into your tie? This could soon be a thing, because researchers at the University of Washington have created a fabric that can store data without any electronics whatsoever.  The fabric can be washed, dried, and even ironed without losing data. Oh, and it’s way cheaper than RFID.

By harnessing the ferromagnetic properties of conductive thread, [Justin Chen] and [Shyam Gollakota] have  proved the ability to store bit strings and 2D images through magnetization. The team used an embroidery machine to lay down thread in dense strips and patches, and then coded in ones and zeros by rubbing the threads with N and S neodymium magnets.

They didn’t use anything special, either, just this conductive thread, some magnets, and a Nexus 5 to read the data. Any phone with a magnetometer (so, most of them) could decode this type of binary data. The threads stay reliably magnetized for about a week and then begin to weaken. However, their tests proved that the threads can be re-magnetized over and over.

The team also created 2D images with magnets on a 9-patch made of conductive fabric. The images can be decoded piecemeal by a single magnetometer, or all at once by an array of them. Finally, the team made a glove with a magnetized patch of thread on the fingertip. They were able to get the phone to recognize six unique gestures with 90% accuracy, even with the phone tucked away in a pocket. See it in action in their demo video after the break.

Magnetic memory is certainly not a new concept. But for the wearable technology frontier, it’s a novel one.

Continue reading “Your Next Wearable May Not Need Electricity”

Mindstorms Forkliftbots Gonna Take Your Job

With every advance in robotics, we get closer to being able to order stuff from Amazon and have no human being participate in its delivery. Key step in this dream: warehouse robots, smart forklifts able to control and inventory and entire warehouse full of pallets, without the meat community getting involved. [Thomas Risager] designed just such a system as part of his Masters Thesis in Software Engineering. It consists of five LEGO Mindstorms robots working in concert (video embedded below), linked via WiFi to a central laptop. Mindstorms’ native OS doesn’t support WiFi (!!!) so he reflashed the EV3’s ARM9 chip with software developed using Java and running under LeJOS. On the laptop side [Thomas] wrote a C++ application that handles the coordination and routing of the forklifts. We can see a lot of weary forklift drivers ready to kick back and let a robot have the full-time job for a change.

The robots use WiFi to a central laptop. Mindstorms’ native OS doesn’t support WiFi (!!!) so [Thomas] reflashed the EV3’s ARM9 chip with software developed using Java and running under LeJOS. On the laptop side he wrote a C++ application that handles the coordination and routing of the forklifts. [Thomas] is sharing his forklift design.

Now to scale up — maybe with DIY forklifts like we published earlier? We can see a lot of weary forklift drivers ready to kick back and let a robot have the full-time job for a change.

Continue reading “Mindstorms Forkliftbots Gonna Take Your Job”

Hacking The IKEA Trådfri Light Bulb

[BasilFX] wanted to shoehorn custom firmware onto his IKEA Trådfri light bulb. The product consists of a GU10-size light bulb with a LED driver as well as IKEA’s custom ZigBee module controlling it all. A diffuser, enclosure shell, and Edison-screw base give the whole thing the same form factor as a standard A-series bulb. The Trådfri module, which ties together IKEA’s home automation products, consists of an ARM Cortex M4 MCU with integrated 2.4Ghz radio and 256 Kb of flash — not bad for 7 euros!

Coincidentally, [BasilFX] had just contributed EFM32 support to RIOT-OS (“the friendly OS for IoT”) so he was already halfway there. He used a JTAG/SWD-compatible debugger to flash the chip on the light bulb while the chip was still attached.

[BasilFX] admits the whole project is a proof of concept with no real use yet, though he has turned his eye toward getting the radio to work, with a goal of creating a network of light bulbs. You can find more info on his code repository.

We ran a post on Trådfri hacking earlier this year, as well as one on the reverse-engineering process used to suss out the bulb’s secrets.

Continue reading “Hacking The IKEA Trådfri Light Bulb”

Modernizing A 170 Year Old Antique Grandfather Clock

Frankly, we let out a yelp of despair when we read this in the tip line “Antique Grandfather clock with Arduino insides“! But before you too roll your eyes, groan, or post snark, do check out [David Henshaw]’s amazing blog post on how he spent almost eight months working on the conversion.

Before you jump to any conclusions about his credentials, we must point out that [David] is an ace hacker who has been building electronic clocks for a long time. In this project, he takes the antique grandfather clock from 1847, and puts inside it a new movement built from Meccano pieces, stepper motors, hall sensors, LEDs, an Arduino and lots of breadboard and jumper wires while making sure that it still looks and sounds as close to the original as possible.

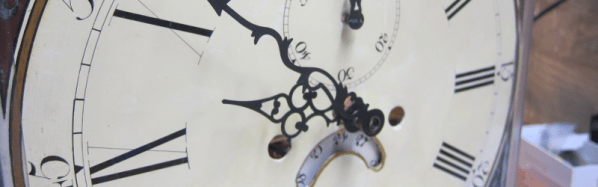
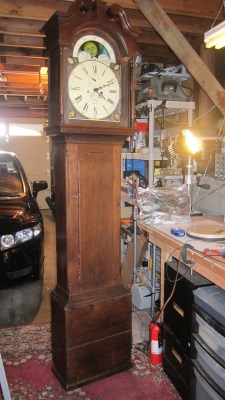
He starts off by building a custom electro-mechanical clock movement, and since he’s planning as he progresses, meccano, breadboard and jumper wires were the way to go. Hot glue helps preserve sanity by keeping all the jumper wires in place. To interface with all of the peripherals in the clock, he decided to use a bank of shift registers driven from a regular Arduino Uno. The more expensive DS3231 RTC module ensures better accuracy compared to the cheaper DS1307 or similar clones. A bank of RGB LEDs acts as an annunciator panel inside the clock to help provide various status indications. The mechanical movement itself went through several iterations to get the time display working with a smooth movement of the hands. Besides displaying time, [David] also added a moon phase indicator dial. A five-rod chime is struck using a stepper motor driven cam and a separate solenoid is used to pull and release three chime hammers simultaneously to generate the loud gong sounds.

And here’s the amazing part – he did all of this before laying his hands on the actual grandfather clock – which was shipped to him in California from an antique clock specialist in England and took two months to arrive. [David] ordered just the clock housing, dial/face and external parts, with none of the original inner mechanism. Once he received it, his custom clock-work assembly needed some more tweaking to get all the positions right for the various hands and dials. A clock like this without its typical “ticktock” sound would be pretty lame, so [David] used a pair of solenoids to provide the sound effect, with each one being turned on for a different duration to produce the characteristic ticktock.

At the end of eight months, the result – christened Judge – was pretty satisfying. Check the video below to judge the Judge for yourself. If you would like to see some more of [David]’s clockwork, check out Dottie the Flip Dot Clock and A Reel to Reel Clock.

Continue reading “Modernizing A 170 Year Old Antique Grandfather Clock”

What Actually Happens At A Hardware Hacking Con

The Hackaday Superconference was last weekend, and it was the greatest hardware con on the planet. What can you build out of a conference badge? If you answered “a resin-based 3D printer” you would have won a prize. If you decided to put your badge in a conference water bottle and make a stun gun you’d receive adoration of all in attendance. Yeah, it got that crazy.

Yes, there’s a Supercon badge in that bottle and it’s now a stun gun.

At other tech conferences, you’ll find gaggles of nerds sitting around a table with MacBooks and Thinkpads. The Superconference is different. Here, you’ll find soldering irons, tackle boxes filled with components, and loose WS2812s scattered about the floor. The smell of solder flux wafts through the air. You detect a hint of ozone.

The depth and breadth of hacks that came out of this were simply stunning. We a binocular virtual reality hack, an internet trolling badge, blinky add-on boards, audio add-on boards, a film festival was shot on the badge, and much more which you’ll find below.

We have started a Badge Hacks list and want to see details of all of the hacks. So if you were at Supercon be sure to publish them on Hackaday.io and send a DM to be added to the list.

Starting Up An Extra Day of Hacking

To get all of this creativity rolling we did something a bit different for this year’s Superconference. Instead of opening the doors up on Saturday morning, we set up a badge hacking area and party on Friday afternoon. The drinks flowed like the meniscus on a properly soldered lead, and by 2pm on Friday, everyone was hacking firmware on the incredible camera badge for this year’s con.

We didn’t stop on Friday. The Superconference is a hardware hacking conference, and that meant we brought out the soldering irons, experimented with melting aluminum with gallium, reflowed a few boards, and created a few deadbug LED cubes. This went on all weekend.

Continue reading “What Actually Happens At A Hardware Hacking Con”