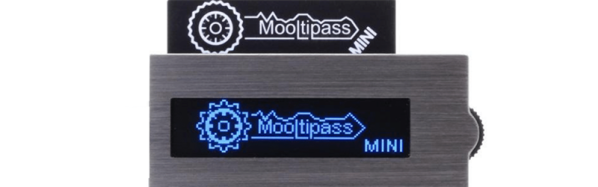
Mathieu Stephan is an open source hardware developer, a Tindie seller who always has inventory, a former Hackaday writer, and an awesome all-around guy. One of his biggest projects for the last few years has been the Mooltipass, an offline password keeper built around smart cards and a USB interface. It’s the solution to Post-It notes stuck to your monitor and using the same password for all your accounts around the Internet.
The Mooltipass is an extremely successful product, and last year Mathieu launched the Mooltipass Mini. No, it doesn’t have the sweet illuminated touch-sensitive buttons, but it is a bit cheaper than its big brother and a bit more resistant to physical attacks — something you want in a device that keeps all your passwords secure.
Mathieu didn’t build the Mooltipass alone, though. This is an Open Source project that has developers and testers from around the globe. It may have started off as a Hackaday Post, but now the Mooltipass has grown into a worldwide development team with contributors across the globe. How did Mathieu manage to pull this off? You can check out his talk at the 2017 Hackaday Superconference below.
Printed circuit boards are a fundamental part of both of commercial electronic equipment and of the projects we feature here on Hackaday. Many of us have made our own, whether done so from first principles with a tank of etchant, or sent off as a set of Gerbers to a PCB fab house.
To say that the subject of today’s Retrotechtacular is the manufacture of printed circuit boards might seem odd, because there is nothing archaic about a PCB, they’re very much still with us. But the film below the break is a fascinating look at the process from two angles, both for what it tells us about how they are still manufactured, and how they were manufactured in 1969 when it was made.
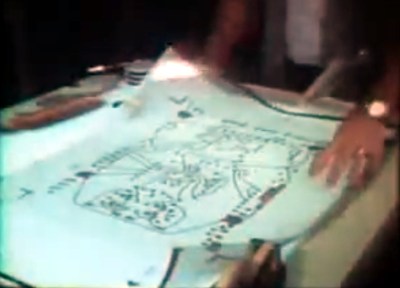
Board artwork laid out at four-times actual size
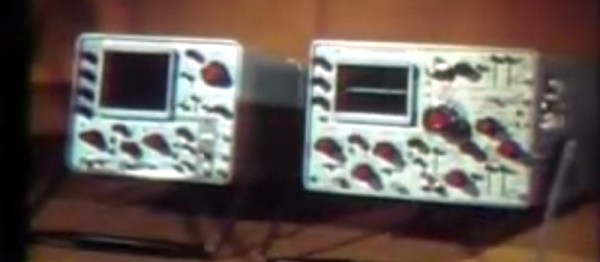
Tektronix were as famous for the manufacturer of particularly high quality oscilloscopes back then as they are now. The Tektronix ‘scopes of the late 1960s featured several printed circuit boards carrying solid-state electronics, and were manufactured to an extremely high standard. The film follows the manufacturing process from initial PCB layout to assembled board, with plenty of detail of all production processes.
In 2017 you would start a PCB design in a CAD package, but in 1969 the was incredibly manual. Everything was transcribed by hand from a paper schematic to transparent film. Paper mock-ups of component footprints four times larger than actual size are placed on a grid, and conductors drawn in pencil on an overlaid piece of tracing paper. Then the pads and pattern of tracks are laid out using black transfers and tape on sheets of film over the tracing paper, one each for top and bottom of the board. A photographic process reduces them to production size onto film, from which they can be exposed and etched in the same way that you would in 2017.
Pantograph drilling machine uses a manually moved styuls on a template to drill six boards at once
Most of the physical process of creating a PCB has not changed significantly since 1969. We are shown the through-plating and gold plating processes in detail, then the etching and silkscreening processes, before seeing component installation and finally wave soldering.
What are anachronistic though are some of the machines, and the parts now robotised that were done in 1969 by hand. The PCB drilling is done by hand with a pantograph drill for small runs, but for large ones a fascinating numerically-controlled drilling rig is used, controlled by punched tape without a computer in sight. Component placement is all by hand, and the commentator remarks that it may one day be done by machine.
The film remains simultaneously an interesting look at PCB production and a fascinating snapshot of 1960s manufacturing. It’s probable that many of the Tek ‘scopes made on that line are still with us, they’re certainly familiar to look at from our experience at radio rallies.
Next week we’ll be at a few awesome hardware meetups around the Bay Area, and we want you to head out and join us.
The first meetup will be the Silicon Valley Hardware Meetup at the Evil Mad Scientist shop in Sunnyvale. It’s going down Wednesday, December 6th, from 6:30 until 9:30. At least some of the Hackaday/Tindie/Supplyframe crew will be there, and the night will be filled with lightning talks, demos, and the cool hardware people you know and love.
Speakers for this meetup will include [Mitch Altman], hacker extraordinaire and owner of far, far too many TV remotes. He’ll be talking about hardware successes and failures in his own businesses. Also headlining the event will be [Clarissa Redwine] from Kickstarter. She’ll be talking about crowdfunding hardware, and the fact that making a thousand of something is a million times harder than making one of something.
The day after, on December 7th, we’re also going to be opening the doors at the San Francisco Supplyframe office to host the Hardware Developers Didactic Galactic. These Didactics are fun and popular, and you don’t need to go to the South Bay. Food and drink will be served, and there’s a sweet Rick and Morty mural in the alley across the street.
On deck for this month’s Didactic is [Tiffany Tseng], lead UX designer at Autodesk. Her work involves creating and implementing the design decisions that go into Eagle CAD. If you’re wondering why the icons changed a few years ago, she is not the person to talk to; that happened before the Autodesk mothership bought Eagle. If you’re wondering how the awesome push and shove routing actually works, [Tiffany] is the person to talk to.
Also at the Didactic will be [Asaad Kaadan]. He’s a robotics engineer working on cinematic tools for his day job and is currently exploring a very, very cool modular electronics project called Hexabitz. He’ll be talking about Hexabitz and designing for modular electronics.
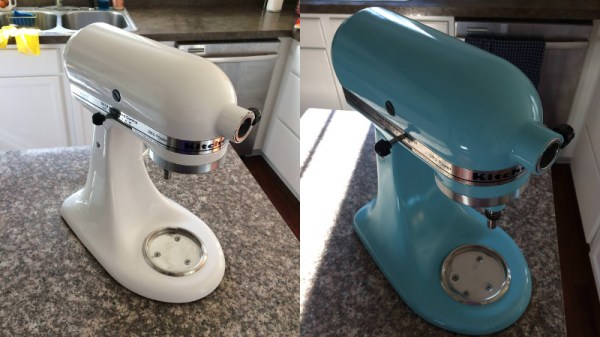
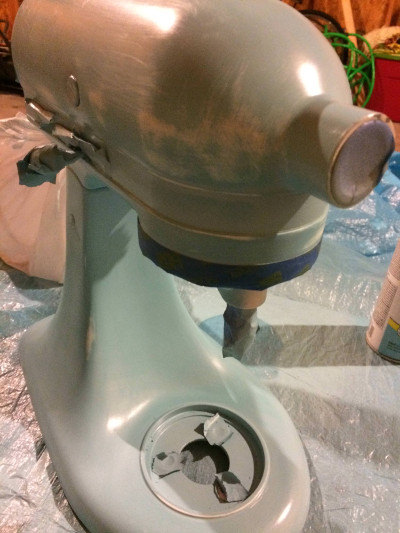
If you know anyone who is serious about baking, there’s a good chance you’ve seen one of these classic KitchenAid mixers. Built to last, they are often handed down generation to generation (or at least, when a newer model comes out), which is how [Kaitlin Flannery] received hers. While it didn’t look too bad considering its long life and the fact it’s been through a motor replacement already, she decided to spruce it up a bit by stripping it down and repainting the whole machine.
Sanding between coats of paint.
These KitchenAid mixers are solidly built and look highly serviceable, it’s refreshing to see a teardown that doesn’t involve any finicky plastic clips or glue. A standard philips screwdriver gets you inside the case, and a couple more screws allow the trim pieces to be removed.
Most of the work [Kaitlin] does is not completely unlike what you might have to do if you wanted to respray the fender of your car. You take off as much extra hardware as your patience allows, put painters tape over everything you want to keep over-spray off of, and then go to town.
To get the smooth metallic finish that you’d expect on a kitchen appliance, [Kaitlin] sands with 220 paper between the coats of hardware store Rust-Oleum. Generally we’d advise switching over to wet sanding at a higher grit once a few coats of paint have been laid down, but we can’t argue with the final results [Kailtin] got. The last coat is followed up with a clear enamel, which will help protect the finish from scratches; very important for a kitchen appliance.
[Kaitlin] does mention that she mistakenly taped off a bit more than she should have, and there’s still some of the original color visible on the rear of the machine. But beyond that, the finish looks fantastic, and with the new motor installed it looks like this machine is going to stick around long enough to get handed down a second time at least.
If you’re comfortable with the technical side of becoming a consultant or contractor but are unsure what to charge for your services, you’re not alone. “How much do I charge?” is a tough question, made even tougher by the fact that discussing money can be awkward, and at times virtually taboo.
As a result it’s not uncommon for the issue to get put off because it’s outside one’s comfort zone. Technical people in particular tend to suffer from an “if you build it, they will come” mentality; we get the technical side of things all figured out and just sort of assume that the rest — customers, money, and so forth — will fall into place afterward. If you’re lucky, it will! But it’s better to do some planning.
The short and simple answer of how much to charge is a mix of “it depends” and “whatever the market bears” but of course, that’s incredibly unhelpful all by itself. It’s time to make the whole process of getting started a bit less opaque.
A stubborn determination to solve my own problems has given me plenty of opportunity to make mistakes and commit inefficiencies over the years; I’ve ended up with a process that works for me, but I also happen to think it is fairly generally applicable. Hopefully, sharing the lessons I’ve learned will help make your own process of figuring out what to charge easier, or at least make the inevitable blunders less costly.
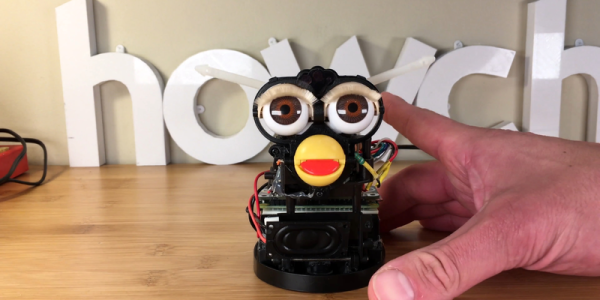
The original Furby product wowed consumers of the 90s. In addition to animatronic movements, it also packed simulated voice learning technology that seemed to allow the Furby to learn to speak. It wasn’t like anything else on the market, and even got the toy banned from NSA’s facilities in case it could spy on them. Elegantly, the robot uses only one motor to move all of its parts, using a variety of plastic gears, levers, and cams to control all of the robot’s body parts and to make it dance.
Over the past twenty years the Furby has earned the reputation as one of the most hackable toys ever — despite its mystery microcontroller, which was sealed in plastic to keep the manufacturer’s IP secret. [Zach] replaced the control board with a Pi Zero. He also replaced the crappy mic and pizeo speaker that came with toy with a Pimoroni Speaker pHat and a better mic.
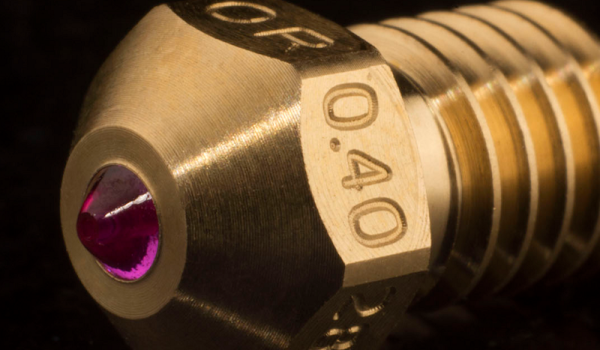
Watching a 3D printer work always reminds us of watching a baker decorate a cake. Gooey icing squeezes out of a nozzle and makes interesting shapes and designs. While hot plastic doesn’t taste as good as icing, it does flow easily through the printer’s nozzle. Well… normal plastic, anyway. These days, advanced 3D printers are using filament with wood, metal, carbon fiber, and other additives. These can provide impressive results, but the bits of hard material in them tend to wear down metallic nozzles. If this is your problem and you are tired of replacing nozzles, you should check out the Olsson Ruby Nozzle.
Ruby, in this case, isn’t just a name. The nozzle has a small bit of ruby with a 0.4mm hole in the center — or they have a few other sizes. We suppose diamond would even be better, but ruby is so much more affordable. We haven’t tried these ourselves, but [3D Printing Nerd] has an interesting video review you can see below.