Improvising An EPROM Eraser

Back in the old days, when we were still twiddling bits with magnetized needles, changing the data on an EPROM wasn’t as simple as shoving it in a programmer. These memory chips were erased with UV light shining through a quartz window onto a silicon die. At the time, there were neat little blacklights in a box sold to erase these chips. There’s little need for these chip erasers now, so how do you erase and program a chip these days? Build your own chip eraser using components that would have blown minds back in the 70s.

[Charles] got his hands on an old 2764 EPROM for a project, but this chip had a problem — there was still data on it. Fortunately, old electronics are highly resistant to abuse, so he pulled out the obvious equipment to erase this chip, a 300 watt tanning lamp. This almost burnt down the house, and after a second round of erasing of six hours under the lamp, there were still unerased bits.

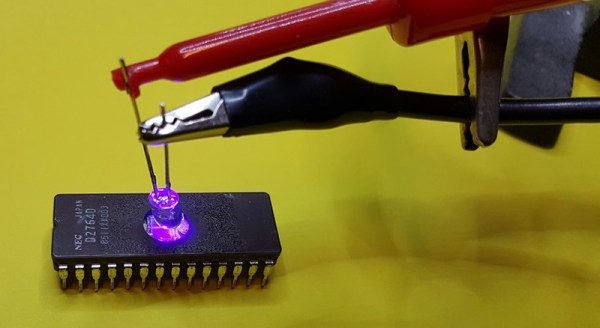
Our ability to generate UV light has improved dramatically over the last fifty years, and [Charles] remembered he had an assortment of LEDs, including a few tiny 5mW UV LEDs. Can five milliwatts do what three hundred watts couldn’t? Yes; the LED had the right frequency to flip a bit, and erasing an EPROM is a function of intensity and time. All you really need to do is shine a LED onto a chip for a few hours.

With this vintage chip erased, [Charles] slapped together an EPROM programmer — with a programming voltage of 21V — out of an ATMega and a bench power supply. It eventually worked, allowing [Charles]’ project, a vintage liquid crystal display, to have the right data using vintage-correct parts.

34C3: Reverse Engineering FPGAs

We once knew a guy who used to tell us that the first ten times he flew in an airplane, he jumped out of it. It was his eleventh flight before he walked off the plane. [Mathias Lasser] has a similar story. Despite being one of the pair who decoded the iCE40 bitstream format a few years ago, he admits in his 34C3 talk that he never learned how to use FPGAs. His talk covers how he reverse engineered the iCE40 and the Xilinx 7 series devices.

If you are used to FPGAs in terms of Verilog and VHDL, [Mathias] will show you a whole new view of rows, columns, and tiles. Even if you don’t ever plan to work at that level, sometimes understanding hardware at the low level will inspire some insights that are harder to get at the abstraction level.

Continue reading “34C3: Reverse Engineering FPGAs”

Confessions Of A Reformed Frequency Standard Nut

Do you remember your first instrument, the first device you used to measure something? Perhaps it was a ruler at primary school, and you were taught to see distance in terms of centimetres or inches. Before too long you learned that these units are only useful for the roughest of jobs, and graduated to millimetres, or sixteenths of an inch. Eventually as you grew older you would have been introduced to the Vernier caliper and the micrometer screw gauge, and suddenly fractions of a millimetre, or thousandths of an inch became your currency.  There is a seduction to measurement, something that draws you in until it becomes an obsession.

Every field has its obsessives, and maybe there are bakers seeking the perfect cup of flour somewhere out there, but those in our community will probably focus on quantities like time and frequency. You will know them by their benches surrounded by frequency standards and atomic clocks, and their constant talk of parts per billion, and of calibration. I can speak with authority on this matter, for I used to be one of them in a small way; I am a reformed frequency standard nut. Continue reading “Confessions Of A Reformed Frequency Standard Nut”

Friday Hack Chat: Fashion! (Turn To The Left)

An underappreciated facet of the maker movement is wearable technology. For this week’s Hack Chat, we’re going to be talking all about wearable and fashion tech. This includes motors, lighting, biofeedback, and one significantly overlooked aspect of wearables, washability.

For this week’s Hack Chat, we’re sitting down with Kathryn Blair and Shannon Hoover to talk about the workability and washability of fashion tech. Over the last decade or so, wearable tech has become ever more popular, and these advances in the science aren’t just limited to amazing outfits lined with hundreds of Neopixels. Now, we’re dealing with biofeedback, clothing that regulates your body temperature monitors your vital signs, and necklaces that glow when the sun goes down.

Kathryn and Shannon are part of the team behind MakeFashion, a Calgary-based outfit that has produced over 60 wearable tech garments shown at 40 international events. MakeFashion is introducing designers to wearables through a series of hands-on workshops built around developing wearable electronics and electronic wearables.

One of the key technologies behind MakeFashion is the StitchKit, a development kit that’s now available on Kickstarter designed to add electronics to wearables. This means everything from uglier Christmas sweaters to interactive clothing.

During this Hack Chat, we’re going to be discussing the design and engineering behind fashion technology, including biofeedback, how motors and lighting work with a human body, and how to design for washability. If you have a question for this Hack Chat, add it to the discussion part of the event page.

join-hack-chat

Our Hack Chats are live community events on the Hackaday.io Hack Chat group messaging. This Hack Chat is going down Friday, January 19th at noon, Pacific time. Time Zones got you down? Here’s a handy countdown timer!

Click that speech bubble to the left, and you’ll be taken directly to the Hack Chat group on Hackaday.io.

You don’t have to wait until Friday; join whenever you want and you can see what the community is talking about.

Joykill: Previously Undisclosed Vulnerability Endangers User Data

Researchers have recently announced a vulnerability in PC hardware enabling attackers to wipe the disk of a victim’s computer. This vulnerability, going by the name Joykill, stems from the lack of proper validation when enabling manufacturing system tests.

Joykill affects the IBM PCjr and allows local and remote attackers to destroy the contents of the floppy diskette using minimal interaction. The attack is performed by plugging two joysticks into the PCjr, booting the computer, entering the PCjr’s diagnostic mode, and immediately pressing button ‘B’ on joystick one, and buttons ‘A’ and ‘B’ on joystick two. This will enable the manufacturing system test mode, where all internal tests are performed without user interaction. The first of these tests is the diskette test, which destroys all user data on any inserted diskette. There is no visual indication of what is happening, and the data is destroyed when the test is run.

A local exploit destroying user data is scary enough, but after much work, the researchers behind Joykill have also managed to craft a remote exploit based on Joykill. To accomplish this, the researchers built two IBM PCjr joysticks with 50-meter long cables.

Researchers believe this exploit is due to undocumented code in the PCjr’s ROM. This code contains diagnostics code for manufacturing burn-in, system test code, and service test code. This code is not meant to be run by the end user, but is still exploitable by an attacker. Researchers have disassembled this code and made their work available to anyone.

As of the time of this writing, we were not able to contact anyone at the IBM PCjr Information Center for comment. We did, however, receive an exciting offer for a Carribean cruise.

Custom Alexa Skill In A Few Minutes Using Glitch

As hackers, we like to think of ourselves as a logical bunch. But the truth is, we are as subject to fads as the general public. There was a time when the cool projects swapped green LEDs out for blue ones or added WiFi connectivity where nobody else had it. Now all the rage is to connect your project to a personal assistant. The problem is, this requires software. Software that lives on a publicly accessible network somewhere, and who wants to deal with that when you’re just playing with custom Alexa skills for the first time?

If you have a computer that faces the Internet, that’s fine. If you don’t, you can borrow one of Amazon’s, but then you need to understand their infrastructure which is a job all by itself. However, there is a very simple way to jump start an Alexa skill. I got one up and running in virtually no time using a website called Glitch. Glitch is a little bit of everything. It is a web hosting service, a programming IDE for Node.js, a code repository, and a few other things. The site is from the company that brought us Trello and helped to start Stack Overflow.

Glitch isn’t about making Alexa skills. It is about creating web applications and services easily. However, that’s about 90% of the work involved in making an Alexa skill. You’ll need an account on Glitch and an Amazon developer’s account. Both are free, at least for what we want to accomplish. Glitch has some templates for Google Home, as well. I have both but decided to focus on Alexa, for no particular reason.

Continue reading “Custom Alexa Skill In A Few Minutes Using Glitch”

Four Pi Zeros, Four Cameras, One Really Neat 3D Scanner

Sometimes when you walk into a hackerspace you will see somebody’s project on the table that stands so far above the norm of a run-of-the-mill open night on a damp winter’s evening, that you have to know more. If you are a Hackaday scribe you have to know more, and you ask the person behind it if they have something online about it to share with the readership.

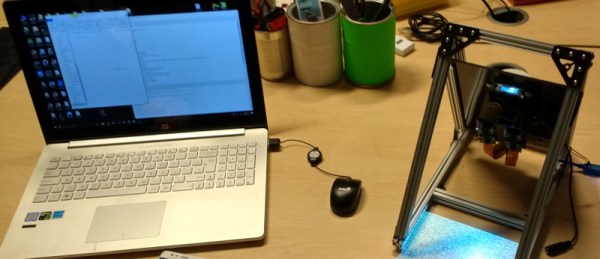
[Jolar] was working on his 3D scanner project on just such an evening in Oxford Hackspace. It’s a neatly self-contained unit in the form of a triangular frame made of aluminium extrusions, into which are placed a stack of Raspberry Pi Zeros with attached cameras, and a very small projector which needed an extra lens from a pair of reading glasses to help it project so closely.

The cameras are arranged to have differing views of the object to be scanned, and the projector casts an array of randomly created dots onto it to aid triangulation from the images. A press of a button, and the four images are taken and, uploaded to a cloud drive in this case, and then picked up by his laptop for processing.

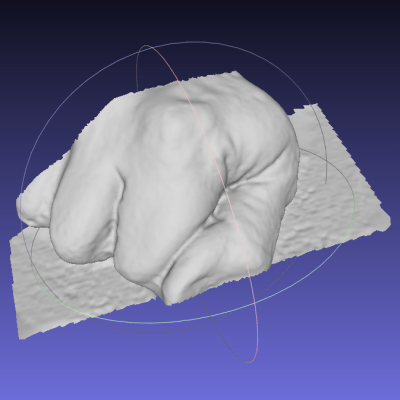
A Multi-view Stereo (MVS) algorithm does the processing work, and creates a 3D model. Doing the processing is VisualSFM, and the resulting files can then be viewed in MeshLab or imported into a CAD package. Seeing it in action the whole process is quick and seamless, and could easily be something you’d see on a commercial product. There is more to come from this project, so it is definitely one to watch.

Four Pi boards may seem a lot, but it is nothing to this scanner with 39 of them.