Smooth PLA Through The Fire And Flames

3D printing makes it easy to produce complex geometries, but the fused deposition methods generally create parts with poor surface finish, largely due to the layers being highly visible in the finished part. There are a wide variety of ways to deal with this, often involving sanding parts after production, or the use of fillers and paints. [XerotoLabs] has another solution. (YouTube, video below the break.)

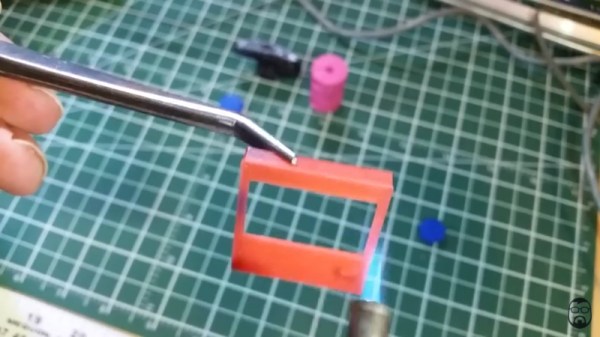
To smooth the parts, a butane torch is pressed into service. The flame temperature is kept fairly low, and the torch is used almost like a brush to evenly apply heat to the surface of the part. As the PLA reaches its melting temperature, surface tension helps to smooth the part out. This is very similar to flame polishing which is commonly used in the fabrication of acrylic plastics.

It is a technique that requires some finesse – too much heat or focus on a single area, and you’re liable to end up with a molten plastic blob instead of a nice shiny finished part. Precautions must also be taken to avoid burning yourself or your workshop to the ground. But it’s a useful tool to have in your kit when you’re producing PLA parts that you want to look their best.

We’ve seen other techniques for smoothing PLA, too – the solvent method is particularly interesting. Continue reading “Smooth PLA Through The Fire And Flames”

3D Printering: Which Raspberry Pi Is Best At Slicing In Octoprint?

OctoPrint is arguably the ultimate tool for remote 3D printer control and monitoring. Whether you simply want a way to send G-Code to your printer without it being physically connected to your computer or you want to be able to monitor a print from your phone while at work, OctoPrint is what you’re looking for. The core software itself is fantastic, and the community that has sprung up around the development of OctoPrint plugins has done an incredible job expanding the basic functionality into some very impressive new territory.

RAMBo 3D controller with Pi Zero Integration

But all that is on the software side; you still need to run OctoPrint on something. Technically speaking, OctoPrint could run on more or less anything you have lying around the workshop. It’s cross platform and doesn’t need anything more exotic than a free USB port to connect to the printer, and people have run it on everything from disused Windows desktops to cheap Android smartphones. But for many, the true “home” of OctoPrint is the Raspberry Pi.

As I’ve covered previously, the Raspberry Pi does make an exceptional platform for OctoPrint. Given the small size and low energy requirements of the Pi, it’s easy to integrate into your printer. The new Prusa i3 MK3 even includes a header right on the control board where you can plug in a Raspberry Pi Zero.

But while the Raspberry Pi is more than capable of controlling a 3D printer in real-time, there has always been some debate about its suitability for slicing STL files. Even on a desktop computer, it can sometimes be a time consuming chore to take an STL file and process it down to the raw G-Code file that will command the printer’s movements.

In an effort to quantify the slicing performance on the Raspberry Pi, I thought it would be interesting to do a head-to-head slicing comparison between the Pi Zero, the ever popular Pi 3, and the newest Pi 3 B+.

Continue reading “3D Printering: Which Raspberry Pi Is Best At Slicing In Octoprint?”

More Details On That First Home-Made Lithographically Produced IC

A few days ago we brought you news of [Sam Zeloof]’s amazing achievement, of creating the first home-made lithographically produced integrated circuit. It was a modest enough design in a simple pair of differential amplifiers and all we had to go on was a Twitter announcement, but it promised a more complete write-up to follow. We’re pleased to note that the write-up has arrived, and we can have a look at some of the details of just how he managed to produce an IC in his garage. He’s even given it a part number, the Zeloof Z1.

For ease of manufacture he’s opted for a PMOS process, and he is using four masks which he lists as the active/doped area, gate oxide, contact window, and top metal. He takes us through 66 different processes that he performs over the twelve hours of a full production run, with comprehensive descriptions that make for a fascinating run-down of semiconductor manufacture for those of us who will never build a chip of our own but are still interested to learn how it is done. The chip’s oblong dimensions are dictated by the constraints of an off-the-shelf Kyocera ceramic chip carrier, though without a wire bonding machine he’s unable to do any more than test it with probes.

You can read our reporting of his first announcement, but don’t go away thinking that will be all. We’re certain [Sam] will be back with more devices, and can’t wait to see the Z2.

Playing Jedi Mind-Tricks On Your TV

Gesture-enabled controls mean you get to live out your fantasy of wielding force powers. It does, however, take a bit of hacking to make that possible. Directly from the team at [circuito.io] comes a hand gesture controller for Jedi mind-trick manipulation of your devices!

The star of the show here is the APDS-9960 RGB and gesture sensor, with an Arduino Pro Mini 328 doing the thinking and an IR transmitter LED putting that to good use. The Arduino Sketch is a chimera of two code examples for IR LEDs and the gesture sensor — courtesy of the always estimable Ken Shirriff, and SparkFun respectively.

Of course, you can have the output trigger different devices, but since this particular build is meant to control a TV the team had to use a separate Arduino and IR receiver to discover the codes for the commands they wanted  to use. Once they were added to the Sketch, moving your hand above the sensor in X, Y or Z-axes executes the command. Voila! — Jedi powers.

Continue reading “Playing Jedi Mind-Tricks On Your TV”